Bees
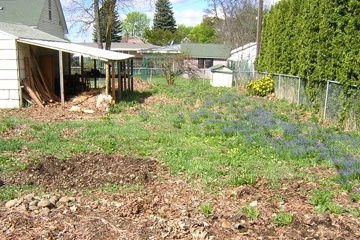
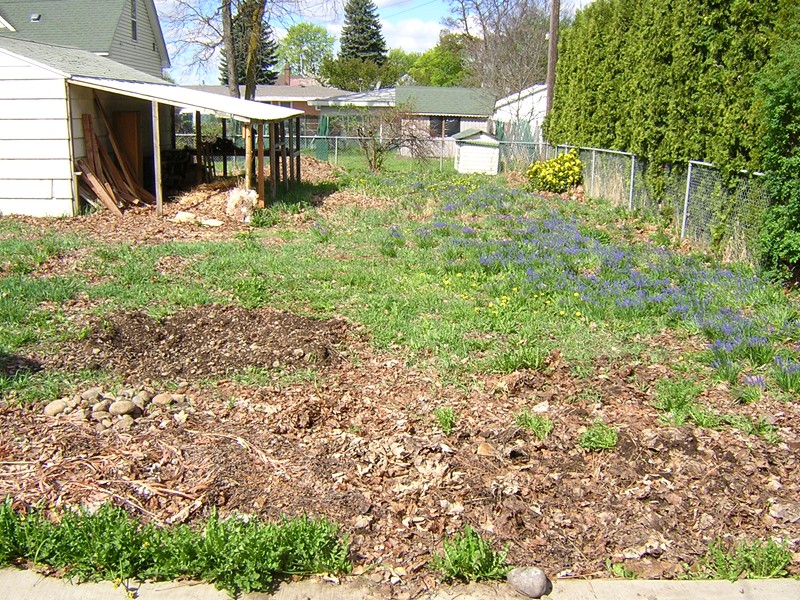
This was the backyard of my house in April 2012. My original plan was to do chickens under that garage awning, but I changed my mind and decided to do bees, and put the hives just this side of that yellow oregon grape bush. My sister has done both, and she says chickens are simple animals, while bees are much more complex. You can study them for years and still barely understand them. A good internet resource about beekeeping is
Michael Bush's website.
Bees live in an interesting grey area between wild and domesticated. We breed them and take their honey, and some vegans think they're exploited, but unlike other agricultural animals, they know how to survive in the wild and they are free to fly away at any time. In this sense, bees are less exploited than humans!
In popular culture, the bee social order is a metaphor for totalitarianism. But people who observe bees say that they're anarchists: they make decisions collectively, and in colonies of tens of thousands, every worker bee has full participation in power. They even have distinct
personalities.
Types of Hives
The box beehives that you see along the highway, and that are used by all large-scale commercial beekeepers, are called
Langstroth hives. They are designed for human needs: to keep the combs easily removable, to maximize honey production, to enable swapping components from one hive to another, and to be stackable so that bees can be trucked around for pollination. Every box in a Langstroth hive has a bunch of vertical rectangular frames holding "foundation": a sheet of wax or plastic stamped into contoured hexagons from which the bees build out their comb.
After researching the options, I decided not to do Langstroth but Top Bar. A Top Bar hive does not have a stack of boxes, but a single long box, and instead of frames and foundation it just has naked bars from which the bees hang their comb in the air. The big advantage of Top Bar hives is that bees like them better. I read one beekeeper say that Langstroth bees have a high-pitched nervous buzz, while Top Bar bees are lower pitched and mellower. Probably the main reason for this is that Top Bar bees get to engineer their own comb. It's the same reason humans are happier in houses they build themselves than in housing projects. Without foundation, bees can make whatever cell size they want, including making a variety of cell sizes for different functions.
Every time you harvest honey from a Top Bar hive, you harvest the comb too. You crush the honey out, then you can use hot water to separate the last of the honey from the wax. Langstroth beekeepers use an expensive machine called an extractor to remove the honey without damaging the comb, so they can put the used comb back in the hive. The idea is that if bees don't have to spend time and energy building more comb, they can produce more honey, and generally this is true. Les Crowder did an experiment in which five Top Bar hives produced 20% less honey than five Langstroth hives -- and six times more beeswax. Also, your bees won't produce any honey if they die. Beeswax concentrates toxins, and old black comb can harbor disease and make bees unhappy. In a wild hive, wax moths live symbiotically with the bees and eat the old comb. In a perfectly managed Top Bar hive, the beekeeper rotates the old comb so it gets filled with honey and removed.
Langstroth hives often use a queen excluder and a "honey super", a part of the hive where the queen can't go so the comb is just filled with honey and no eggs or brood. This fits industrial beekeeping because it requires less attention -- you just pull the super off and throw the frames in the extractor. In a Top Bar hive the queen can go everywhere, so you have to look through the frames and find the ones with honey.
Another way that Top Bar hives require more attention is that the bees don't neatly hang a comb from every bar. Without foundation, they tend to veer off into curving or bulging combs that connect between multiple bars, and you have to carefully watch a growing hive and manage the combs to keep the bees on the right track. So Top Bar is good for a backyard hive but not for a remote hive that you leave alone for weeks at time.
Some beekeepers use Langstroth hives without foundation, and there's a popular design of foundationless box hive called a Warre hive. I don't know much about it, but supposedly it's the best hive for enabling the bees to keep a consistent temperature. Top Bar is better for this than Langstroth, because the bars themselves form the roof of the hive, and you only open it one bar at a time, instead of opening the lid and exposing cracks between all the frames at once.
Another advantage of Top Bar is that you never have to lift a heavy box, only individual bars. And one more advantage is they're the easiest hive to build yourself. One thing I did not do myself was make the bars, because I had only a few pieces of scrap wood in the right dimensions. Instead I spent $100 to order 60 really good top bars, precisely cut with wedge shaped guides for the bees to start their comb.
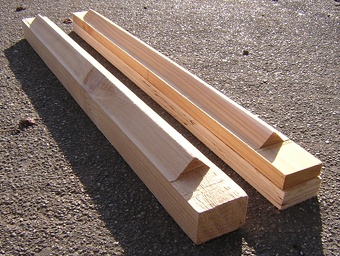
This turned out to be a mistake. Later when I ordered more top bars, the manufacturer had changed the dimensions so that the new and old ones were not interchangeable. To fix this, I cut a 48 by 17½ inch piece of ¾ inch plywood, laboriously stripped a layer off to make the thickness
9⁄16, cut a bunch of 1⅜ inch bars with a borrowed table saw, and glued them onto the new bars to make them as thick and wide as the originals. Here you can see an old bar and an altered new bar. I strongly recommend buying a table saw and making your own top bars with an integrated triangular comb guide. It takes some extra steps but you can do it with any table saw that can angle the blade at 45 degrees.
My Hives
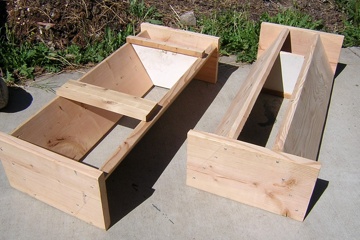
Here are the basic frames for two Top Bar hives. The one on the left is right side up, and these are called Kenyan hives because of the sloping sides. Tanzanian Top Bar hives have vertical sides, which is a bit easier to build, but the advantage of the slope is that the comb has to be smaller as it gets farther down, so as the comb gets larger and heavier, it also has a proportionally larger connection to the bar, and it's less likely to fall off. I made the angles precisely 120 degrees, because that's the angle the bees use themselves in a hexagonal comb cell. Later I read about Les Crowder's experiment in a round-bottomed hive, where the spot at 120 degrees had the least comb attached to the walls. Still, I ended up with a lot of combs attached to the walls. During an inspection, I'll cut them with a long thin bread knife or a hacksaw blade.
Following the advice in
this video by David Wright, I attached the sides to the ends by first making follower boards and using them as a template. The follower boards are those two flat white things, and in a completed hive you use them to change the internal size, so a small colony can stay cozy and later have room to expand. I cut the boards to precise dimensions (16 inches on top, 5 on the bottom, 11 on the edges), screwed them onto top bars, and arranged the wood like the hive on the right, with both follower boards in there and the side boards leaned up against them, and a big T-square on the floor to get it square, before putting in the screws. I used 3½ inch square/phillips drive Spax screws and drilled pilot holes.
In the frame on the left, notice that the end boards are higher than the sides, to match the thickness of the bars. I stuck three bars in the middle so you can see how they fit. And in the upside down frame on the right, notice that I let the corners of the side boards stick up and then sanded them down, to make a wider fitting surface for the bottom boards.
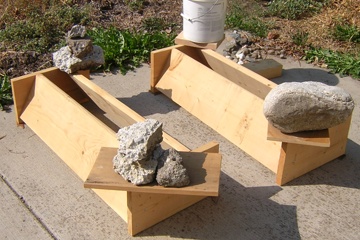
Now there was a complication. Notice that I'm using 2 inch (really 1½ inch) lumber. All the plans I saw online said to use 1 inch (really ¾ inch) boards. But when I went to Home Depot to buy them, the thicker boards were two thirds the price of the thinner boards, and twice as thick, which equals three times the value! So I got the thick boards (2x12 douglas fir) and because the wood was not completely dried before being milled, when they finished drying, they spiraled. This is a typical problem with cheap lumber. So the hives themselves became spiraled, and the bottom boards and lids would be wobbly unless I straightened out the main body. In this photo you see how I did it by putting heavy weights on opposite corners, and bits of wood under the other opposite corners, for a week or two. That bucket is full of water and rocks.
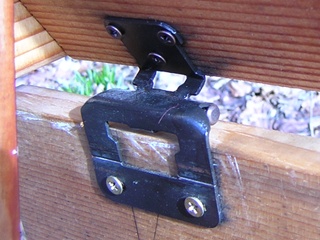
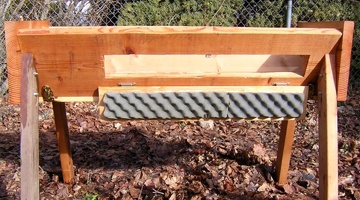
Next were the bottom boards. For these I used ¾ inch boards from a cabinet I tore out in another project. Some people nail them on permanently, some people design them to slide in and out, and I decided to put them on hinges and latches so I could easily open and close them. There is controversy about whether open bottoms help the bees keep cool in summer, but they definitely help by forcing mites that fall off the bees to fall out of the hive, instead of climbing back up. You also need a screen to keep the bees in, which I'll get to later. This photo is a closeup of one of the hinges, which were tricky.
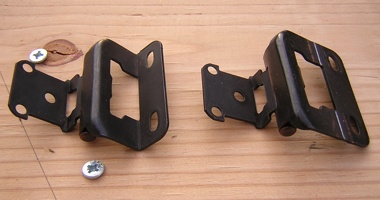
I couldn't find any hinges that fit the way I wanted, so I did a hack. These are two hinges I bought from Lowes, the one on the left unaltered, and the one the right with a 90 degree angle flattened out using Knipex parallel pliers. For latches I used Stanley chest latches, and strangely none of the big box stores in Spokane carry them, so ended up ordering some off eBay.
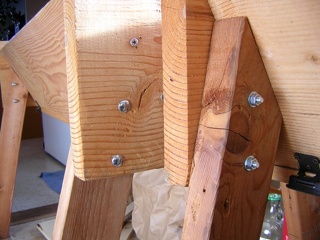
Next I put the legs on. I cut scrap 2x4's 30 inches long with a 45 degree angle on top and an angle on the bottom to fit the ground, and attached them with carriage bolts. Bolts are more expensive than screws, but it's much easier if I ever need to replace a leg with bees inside.
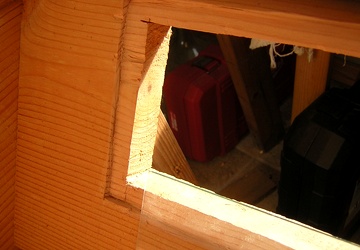
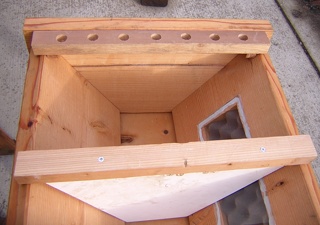
Next, I decided to make both hives with observation windows. At Lowes for less than $10 I was able to buy a piece of glass and have them cut two pieces 30 inches by 5 inches. Then I cut a smaller rectangle all the way through one side of each hive, using a drill to get it started, then a keyhole saw and a regular saw. All sawing on this project was done with Japanese hand saws from Hardwick's in Seattle. Then with a chisel I made a quarter inch deep notch around the edge to fit the glass into. I wanted the glass flush with the inside so if the follower board is against the glass, the bees can't get around it. It's held in by gravity, and I also used a bunch of bathroom caulk (you can see this in another photo below). I expect bees to finish the job with propolis, which is bee glue made from plant resin.
Here you see a completed window with door. The window has to be covered because bees like the dark. I used scrap wood and scrap hinges and did the same thing as the bottom board hinges to bend them and make them fit. It was really tricky to get that cupboard door closer thingy lined up right. (Hint: the last step was screwing the hinges to the hive.) The foam is for insulation and it's stuck on with non-toxic wood glue. Notice that the window is more toward the entrance side, because if they ever use the full hive, the bars farthest from the entrance are likely to be used for honey storage without a lot of bee action.
Next is the lid, and now I have to mention the entrance. Bees need a large entrance, or many small ones, when they're foraging in the summer, and in the winter, just enough of an opening to blow moisture out of the hive. Normally a Top Bar hive has holes drilled in one of the ends or in the end of one of the sides, and the size of the hole is often designed to be plugged with a wine cork so the beekeeper can add or remove corks to change the number of openings.
I wanted a top entrance, because I wanted to harvest pollen, and the best pollen trap, the Sundance 2, is designed to fit on the
top of a Langstroth hive. A pollen trap is stressful enough for the bees, and I didn't want to stress them more by making them switch from a side to a top entrance, so I decided to give them a top entrance from the very beginning. My first idea was to leave a permanent gap between the hive and the first bar... but how could I regulate the size and get it small enough in winter? My next idea was what you see in this photo, to make the first bar an entrance bar with holes drilled through the top. Notice the tiny pieces of wood I nailed to the bottom of the bar to keep it in place, and in this photo you can also get a better look at a follower board and the window caulking. I was thinking I could open or close holes with corks, but then I thought of this...

As far as I know, no one has ever tried this. The lid itself is cut so that by sliding it, I can open or cover holes. Other than that the lid foundation is simple: top, sides, no ends, cut from heavy ¾ inch plywood and screwed together. The length of the hive is 47 inches, and plywood is 48 inches wide, so I could use it efficiently with minimum sawing and still get a bit of overhang.
Later I changed my mind about pollen, because you only need to trap it outside the hive if you mean to
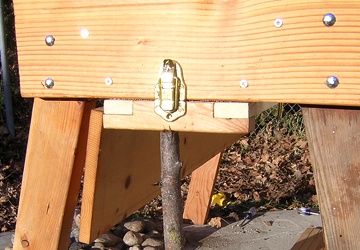
sell it. If you want to eat it yourself, you'll find plenty when you harvest comb, and it's been treated by the bees to be more digestible. Since I didn't absolutely need a top entrance, I decided to drill some holes at the end of the hive and let the bees decide which entrance they like better. By October of the first year, they had plugged the top holes with wax and were using only the end holes. Here's a
photo where you can see what they look like. In the winter I plugged all but one with wine corks to keep the cold out. So the top holes and wavy-ended sliding lid were a fun experiment, but I recommend not doing them, and just drilling end holes.
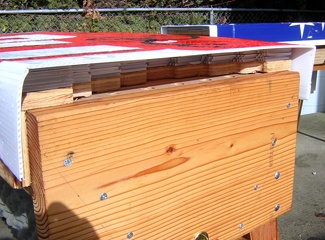
The white stripes in the photo above are carpet tape, used to hold the next stage which you see here. The corrugated plastic is from 4x8 campaign signs, which I snagged in my truck right after the election. It's waterproof, almost weightless, a great insulator, and useful for many things. If you have to buy it it's ridiculously expensive. I picked the prettiest parts of the prettiest signs for the tops of the lids, but later decided to paint them dull green to draw less attention from the neighbors. The sides were attached with a staple hammer, and I sealed a few small holes with some Vulkem 116 that was left over from the rain gutter project.
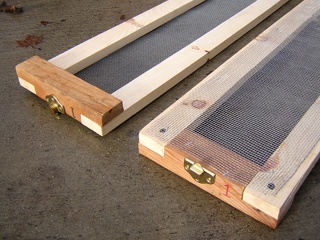
Finally, the screens. To keep bees in and let mites fall through, you need eighth inch hardware cloth, and nobody in Spokane sells it, so I had to go to McLendon Hardware in Seattle. My first idea was to permanently staple the screen to the inside of the hive, just above the bottom board. But I saw three problems. First, stuff will inevitably fall on the bottom of the hive, like tools and pieces of comb, and it will be hard to get it out without disturbing the bees. Second, if there's a screen, it's much harder to use the bottom board to feed the bees. (I ended up feeding them by putting old crystallized honey in a shallow wooden dish on the bottom board with half corks and tiny wood scraps to keep them from getting stuck). Third, if the bees want to stick propolis in the cracks to seal up tightly for winter, they won't be able to get through the screen to the cracks on the edge of the bottom board. So I decided to go with removable screens on frames. Here you can see how I made them. Each piece of dark wood is a 2x4 cut in half lengthwise.
And here's how I attached them. That stick is propped on a rock that you can't see, I used a board and a rock on the other end, and the goal was to push the screen rack hard against the hive to position it for screwing in the latches. In the picture above you can see numbers I wrote on them later, because they only fit a certain way. Another trick was that I noticed the long side pieces of wood were slightly bowed, and I made it so the bows pressed up against the bottom of the hive, so there aren't cracks for bees to get out or enemy bees to get in.
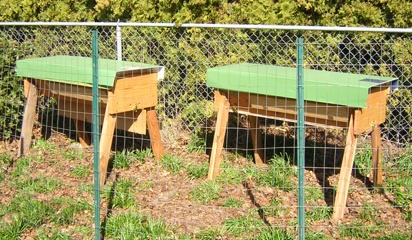
Finally, here they are all finished in final position. I left a bit unpainted over the entrances to help the bees tell the hives apart. I've also coated all the outside wood with flax oil, except I ran out before I got to the window doors. "Boiled linseed oil" is not actually boiled but has toxic solvents added, so I use expired food grade flax oil if I can find it. And I put a wire fence up to keep visitors from accidentally getting too close. Later I wove lots of dry grass through the wire fence to make a rustic grass fence that also blocks the view from neighbors and shelters the hives from wind.
Mini/Bait Hives
When I finished the hives above, I thought I might not find a local supplier of bees, and would have to catch a swarm with a bait hive. The idea is, in late spring a healthy hive will reproduce by sending out the old queen with a bunch of workers to find a new home, so if you build a perfect bee home, a swarm might move in, and then you can transfer the bees to a regular hive. The essential document is
Bait Hives for Honey Bees (pdf) by Thomas Seeley. Studies show that the ideal size is around 1.4 cubic feet, and bees like old wood, so I removed a sheet of 3/4 inch plywood that had been serving as a ramp outside my back door, did some sketching and math, and figured out how to most efficiently cut it up.
My original plan was to make every piece of wood 13 by 16 inches. Plywood is 48 inches wide, so you can make three 16 inch pieces with only two cuts and nothing left over. I sawed a bunch of 13x48 sections, and since they were all bowed from being a ramp out in the rain, I set them face down with a weight in the middle for a few weeks to bend them back, and then cut them down to 13x16. But by this time I was thinking, instead of a plywood lid, I should just use top bars, and then I can give the bees a few days to start building comb and just move the bars over to the main hive. Also I was reading more and learning about the many uses of a mini-hive. I went back to the sketchbook and altered the plans to so the top would exactly fit ten bars. The bars I use are 1⅜ inches, or 1.375, and ten would be 13.75. There was enough plywood to cut one more piece, 13.75 by 48, which would make the bottoms of three hives.
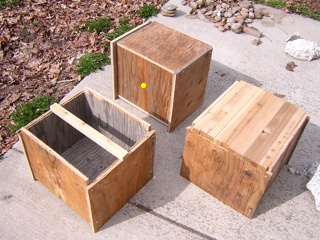
Here are three finished hives, arranged so you can see them from three angles. The yellow dot marks the hive bottom, 13.75 by 16. Then I screwed on the two flush sides, then the end pieces. They're sticking out because it was easiest to just cut everything (except the bottoms) 13x16. And now they're easier to grip and will stay ventilated on the bottom. None of the wood was perfectly flat, so I had to do some bending to make everything fit, and I fit the bars in each hive before attaching the end pieces to make sure the top openings were square and the right size. Notice that the side pieces are attached on the sides of the bottom piece, not on top of it, to maintain the right internal dimensions. The final internal volume is 13.75 x 16 x 11.25 = 2475 cubic inches = 1.43 cubic feet. Also notice that I put all the weathered grey wood facing inside, and later I coated the insides with water with a few drops of lemongrass oil. I hadn't made the entrances yet, but I ended up drilling three ¾ inch holes (same as in the main hives) at the bottom of the front of each hive.
The Continuing Story
In 2013 I put one bait hive in a tree in my front yard, and one on a shelf under my garage awning. They did not catch any swarms, but my bees thrived all summer, cranking out about three frames of comb per week. By late July they had filled the hive, and I had to open it in both July and August to replace a few frames with empty bars, so they didn't get too crowded and try a fatal late-season swarm. So I got honey the first year, and still left them with a loaded hive to get through the winter.
They barely used any of the honey, and in spring of 2014 I should have harvested most of it as soon as the weather was warm enough to break the seals on the hive without killing the bees. I waited too long and they turned almost all of the honey into more bees. In late April and early May the hive threw off at least four swarms. I caught one and put it in my second hive, but the colony seemed weak and incompetent. A much stronger colony (probably from my main hive but I didn't see it happen) moved into the bait hive under the garage awning.
After a few weeks (too long) I decided to move the weak colony to the back of the second hive, and for an entrance I decided to reverse the lid and use a top entrance bar rather than drill holes in the back of the hive. Then I moved the strong colony from the bait hive to the front of the second hive, separating it loosely from the weak colony with both follower bars. Still don't know how this will work out...
(last updated May 2014)

 This was the backyard of my house in April 2012. My original plan was to do chickens under that garage awning, but I changed my mind and decided to do bees, and put the hives just this side of that yellow oregon grape bush. My sister has done both, and she says chickens are simple animals, while bees are much more complex. You can study them for years and still barely understand them. A good internet resource about beekeeping is Michael Bush's website.
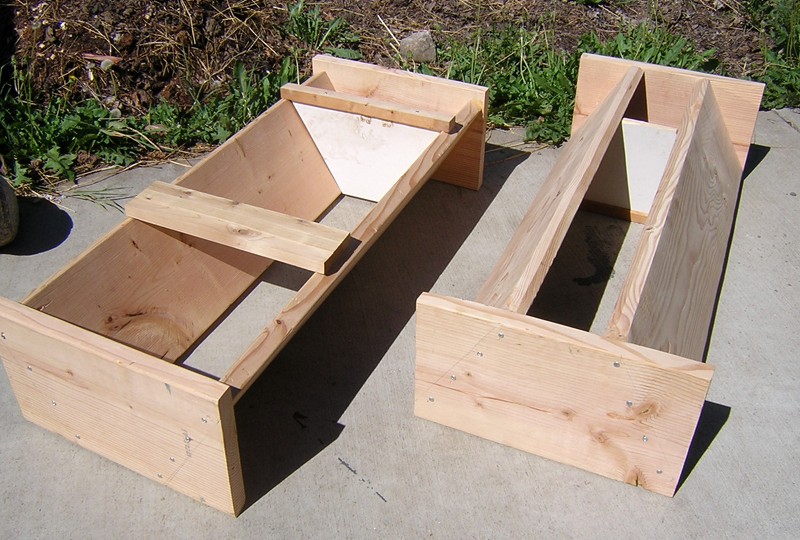 Here are the basic frames for two Top Bar hives. The one on the left is right side up, and these are called Kenyan hives because of the sloping sides. Tanzanian Top Bar hives have vertical sides, which is a bit easier to build, but the advantage of the slope is that the comb has to be smaller as it gets farther down, so as the comb gets larger and heavier, it also has a proportionally larger connection to the bar, and it's less likely to fall off. I made the angles precisely 120 degrees, because that's the angle the bees use themselves in a hexagonal comb cell. Later I read about Les Crowder's experiment in a round-bottomed hive, where the spot at 120 degrees had the least comb attached to the walls. Still, I ended up with a lot of combs attached to the walls. During an inspection, I'll cut them with a long thin bread knife or a hacksaw blade.
 Next I put the legs on. I cut scrap 2x4's 30 inches long with a 45 degree angle on top and an angle on the bottom to fit the ground, and attached them with carriage bolts. Bolts are more expensive than screws, but it's much easier if I ever need to replace a leg with bees inside.
 Here you see a completed window with door. The window has to be covered because bees like the dark. I used scrap wood and scrap hinges and did the same thing as the bottom board hinges to bend them and make them fit. It was really tricky to get that cupboard door closer thingy lined up right. (Hint: the last step was screwing the hinges to the hive.) The foam is for insulation and it's stuck on with non-toxic wood glue. Notice that the window is more toward the entrance side, because if they ever use the full hive, the bars farthest from the entrance are likely to be used for honey storage without a lot of bee action.
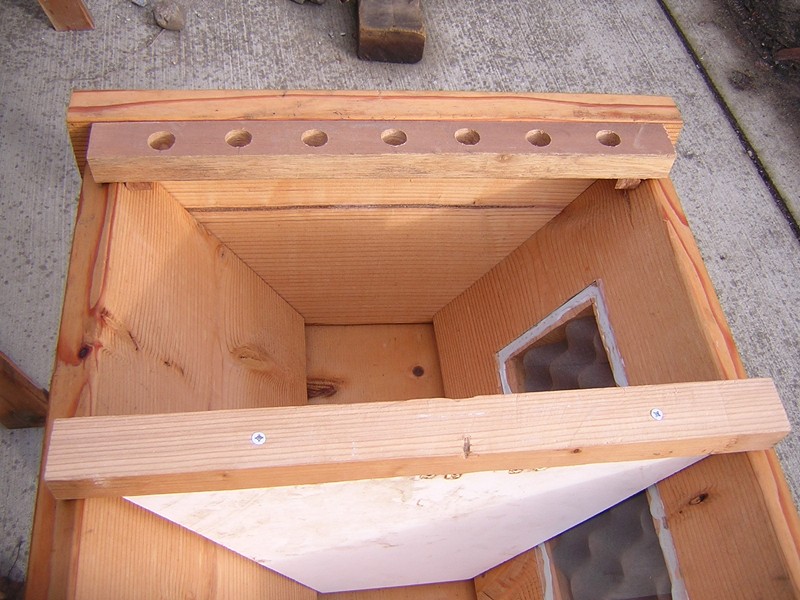 I wanted a top entrance, because I wanted to harvest pollen, and the best pollen trap, the Sundance 2, is designed to fit on the top of a Langstroth hive. A pollen trap is stressful enough for the bees, and I didn't want to stress them more by making them switch from a side to a top entrance, so I decided to give them a top entrance from the very beginning. My first idea was to leave a permanent gap between the hive and the first bar... but how could I regulate the size and get it small enough in winter? My next idea was what you see in this photo, to make the first bar an entrance bar with holes drilled through the top. Notice the tiny pieces of wood I nailed to the bottom of the bar to keep it in place, and in this photo you can also get a better look at a follower board and the window caulking. I was thinking I could open or close holes with corks, but then I thought of this...
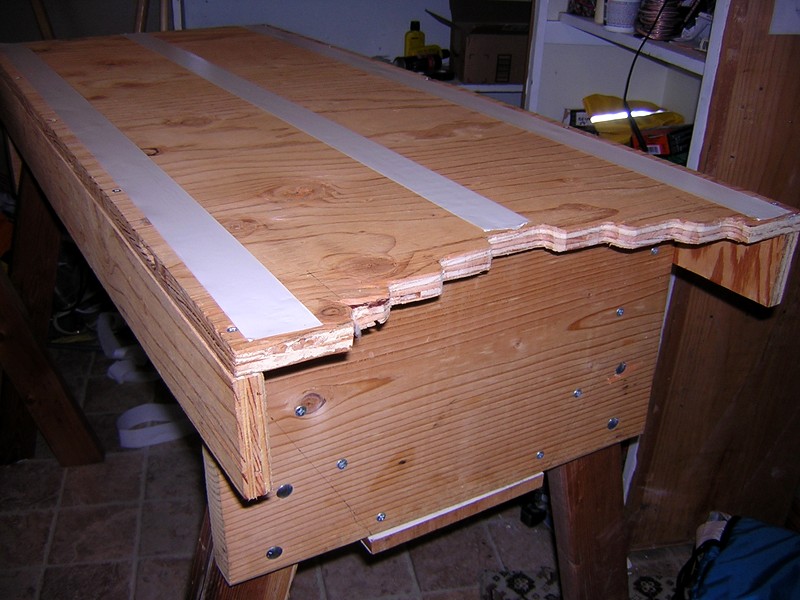 As far as I know, no one has ever tried this. The lid itself is cut so that by sliding it, I can open or cover holes. Other than that the lid foundation is simple: top, sides, no ends, cut from heavy ¾ inch plywood and screwed together. The length of the hive is 47 inches, and plywood is 48 inches wide, so I could use it efficiently with minimum sawing and still get a bit of overhang.
 The white stripes in the photo above are carpet tape, used to hold the next stage which you see here. The corrugated plastic is from 4x8 campaign signs, which I snagged in my truck right after the election. It's waterproof, almost weightless, a great insulator, and useful for many things. If you have to buy it it's ridiculously expensive. I picked the prettiest parts of the prettiest signs for the tops of the lids, but later decided to paint them dull green to draw less attention from the neighbors. The sides were attached with a staple hammer, and I sealed a few small holes with some Vulkem 116 that was left over from the rain gutter project.
 Finally, the screens. To keep bees in and let mites fall through, you need eighth inch hardware cloth, and nobody in Spokane sells it, so I had to go to McLendon Hardware in Seattle. My first idea was to permanently staple the screen to the inside of the hive, just above the bottom board. But I saw three problems. First, stuff will inevitably fall on the bottom of the hive, like tools and pieces of comb, and it will be hard to get it out without disturbing the bees. Second, if there's a screen, it's much harder to use the bottom board to feed the bees. (I ended up feeding them by putting old crystallized honey in a shallow wooden dish on the bottom board with half corks and tiny wood scraps to keep them from getting stuck). Third, if the bees want to stick propolis in the cracks to seal up tightly for winter, they won't be able to get through the screen to the cracks on the edge of the bottom board. So I decided to go with removable screens on frames. Here you can see how I made them. Each piece of dark wood is a 2x4 cut in half lengthwise.
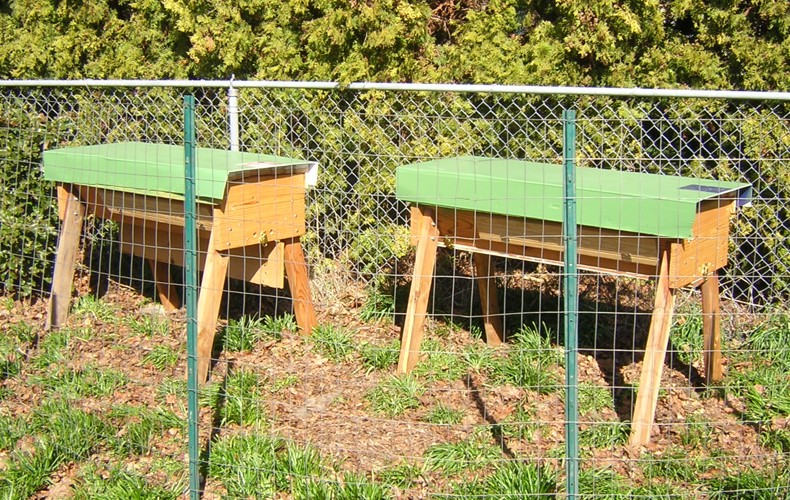 Finally, here they are all finished in final position. I left a bit unpainted over the entrances to help the bees tell the hives apart. I've also coated all the outside wood with flax oil, except I ran out before I got to the window doors. "Boiled linseed oil" is not actually boiled but has toxic solvents added, so I use expired food grade flax oil if I can find it. And I put a wire fence up to keep visitors from accidentally getting too close. Later I wove lots of dry grass through the wire fence to make a rustic grass fence that also blocks the view from neighbors and shelters the hives from wind.
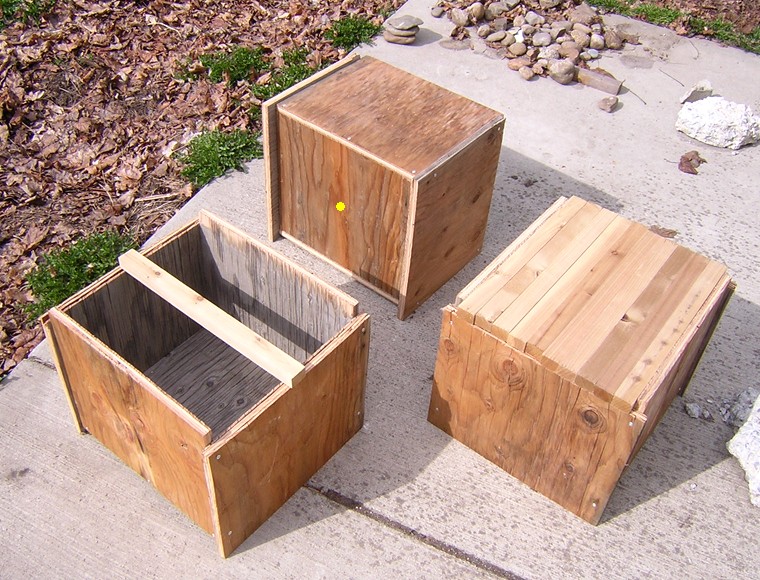 Here are three finished hives, arranged so you can see them from three angles. The yellow dot marks the hive bottom, 13.75 by 16. Then I screwed on the two flush sides, then the end pieces. They're sticking out because it was easiest to just cut everything (except the bottoms) 13x16. And now they're easier to grip and will stay ventilated on the bottom. None of the wood was perfectly flat, so I had to do some bending to make everything fit, and I fit the bars in each hive before attaching the end pieces to make sure the top openings were square and the right size. Notice that the side pieces are attached on the sides of the bottom piece, not on top of it, to maintain the right internal dimensions. The final internal volume is 13.75 x 16 x 11.25 = 2475 cubic inches = 1.43 cubic feet. Also notice that I put all the weathered grey wood facing inside, and later I coated the insides with water with a few drops of lemongrass oil. I hadn't made the entrances yet, but I ended up drilling three ¾ inch holes (same as in the main hives) at the bottom of the front of each hive.