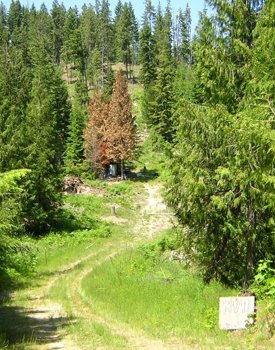
This is my land. It's ten acres in northeast Washington state. I've been working there off and on since 2004, planting fruit trees and berry bushes, and doing small building projects like an outhouse and a tent platform. In summer of 2009, I decided to build a tiny structure for storage and camping, in the shade of the dying cedar tree in the center of this photo.
Cob is a very old building technique in which you stack dirt and straw into free-standing monolithic walls. The dirt has to have some clay, but beyond that people worked with whatever dirt they had. In the late 1980's, Ianto Evans developed "Oregon cob", which features curved walls and a strong cob mix that's mostly sand. The best sand for cob is coarse granite, and my land could be a quarry for coarse granite sand. That's one reason I decided to build with cob. Also it's simple, non-toxic, and makes beautiful structures. Here's a good article on the
history of cob.
Cobwood is a hybrid between cob and cordwood construction. With cordwood, the walls are built like a stack of firewood, and the spaces are typically filled with a mix of sand, sawdust, and lime or cement. As an infill with wood, cob is not as strong as masonry, and not as weather-proof, but it's cheaper, nicer looking, and easier to work with. You can get it all over your hands, and if you make a mistake you can easily break it down and rebuild.
I decided to do cobwood instead of straight cob, because the best wood for cordwood is cedar, and I've got lots of western redcedar trees that are dying, possibly because climate change is making them more susceptible to honey fungus. So I figured, if I can replace half the cob with wood, I only have to make half as much cob. Large cob structures have walls as thick as two feet, but because I was making a hut, I decided to go with one foot.
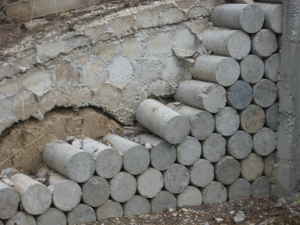
Because cob can be softened and dissolved by too much water, you need a foundation to keep it off the ground. This is the picture from the Craigslist posting where I got part of the foundation. These are called test cylinders. When professional builders are making something with concrete, they test it by making cylinders and trying to break them. These are the largest of several sizes: 12 inches long, six inches in diameter, and about 27 pounds. On a 95 degree day in August 2009, I hauled 50 of them up to the land. I already had some "urbanite", or broken concrete, from a demolished sidewalk. You can find as much as you want free in any city -- the expensive part is owning or renting a truck that can haul that much weight in not too many loads. My 1997 Ranger gets 30mpg, but only holds 3/8 of a ton. So I didn't have much urbanite, I had to divide the cylinders into two loads, and I needed help with the next ingredient.

If there's clay on my land, I haven't found it yet. I was thinking of doing weak cob with fine silt, or spending a small fortune on pottery clay. Then in early September 2009, I got a stroke of luck. Road construction projects are always digging up piles of nearly pure clay, and someone connected with the Sandpoint Bypass project decided to post the clay on Craigslist. So all through September I was driving to Sandpoint and hauling loads, and finally Charlie, my mom's husband, offered to take a load in his giant Ram 2500, which just about doubled what I already had, and cleaned out this pile.
Meanwhile, I was working on the foundation. I decided to make an ellipse, with the wide part facing south to catch the sun. A circle is defined by one point, the center, and one distance, the radius. An ellipse is defined by
two points and a distance. Each point is called a focus (plural foci), and the distance is the sum of the distances to each one.
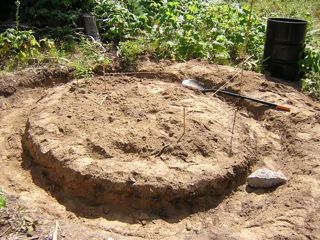
This photo shows how to draw an ellipse on the ground: drive two thin stakes, tie a string between them with plenty of slack, and move another stick around as far as the string lets it go. The sticks here are bamboo that came with tree saplings. At the outside edge, the trench is roughly ten feet by nine feet. I knew at the beginning that I wanted those dimensions, so before I did any digging I did some math to figure out that I should use a ten foot string and put the foci four feet apart. It turns out that the long diameter of the ellipse is always equal to the length of the string. If the foci are in the same spot, the "short" diameter is the same as the long and you have a circle. As the foci get farther apart, the short side gets shorter.
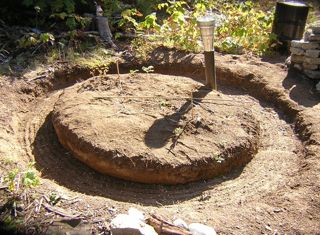
I would dig a bit, run the stick around on the string, and dig a bit more, making the trench a few inches wider than the eventual wall, to spread the weight. Here's where I called it good enough, and this is most dangerous decision I made on the entire structure, because I haven't even dug down to pure sand, and I'm still way above the frost line. So, one of the functions of this hut is to test the damage from frost heave, to get some idea of what I can get away with in future cob walls.
Also you can see a pipe sticking up on the downhill side. This a greywater sump, designed and mostly installed by Chuck. He brought up a ten foot length of six inch plastic pipe, with three rows of quarter inch holes drilled all along the bottom, and a plastic grate on the end. We buried it almost two feet deep and surrounded it with not enough gravel, but it should still work because we got down to pure sand. The uphill end was attached to a 90 degree elbow, a 22½ degree elbow, another short bent connector, and the four foot vertical pipe. It's hard to explain, but two bent connectors enable the vertical pipe to be straight even if the slope of the horizontal pipe is not exactly 22½ degrees. I used a mallet to take it apart a couple times before we got it right.
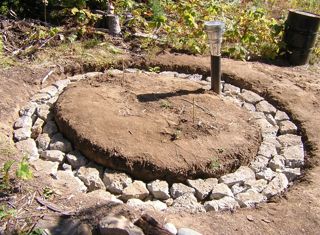
At the top of the vertical pipe are a couple stovepipe parts, and a screen made of quarter inch hardware cloth held on with a hose clamp. Eventually the hut will have a sink, and wash water will go straight underground and water plants downhill.
I think it was early October when I put the urbanite in. Really you should put a layer of gravel under it, but I didn't have any. I also didn't have quite enough urbanite, so I found some rocks to fill in the bigger gaps. And that's where I left it over the winter.

At the end of September, I made these cob test bricks. I didn't have straw so I used reed canarygrass. The hardest part was getting the clay in usable form. I soaked some chunks in water overnight, and then the next day I repeatedly stirred the bucket with a piece of wood and pounded the lumps out, until it was a uniform smooth thick texture that formed soft peaks just like meringue. Then I measured the clay goop and the sand by volume to get the percentages of clay, which are carved on top: 20, 10, and 30.
When they dried, the 10 was clearly weaker, and the 30 and 20 were close. Because I have unlimited sand, I was trying to get away with the lowest clay percentage. Then I did another test, with 15, 20, and 25 percent, and decided to go with 20.

Now we're in late April, 2010, and Jana and Ian are helping me mix concrete. I got the 80 pound bags from Home Depot, which only need water added, and mixing it in a wheelbarrow with a shovel is surprisingly easy if you do it a bag at a time -- and if you can lift 80 pounds. If not, the 60 pound bags are only a slightly worse value. I was afraid it would be so wet that I would have to fill the whole trench, which would have required a lot more of it. But we could keep it firm enough to just fill the cracks between the urbanite and get a couple inches on top.

Next we put on the test cylinders, and a slab of rock to go under the doorway. Here's a
detail of what we put under the door slab: a few more rocks with concrete around them. That big rock to the right of the slab is holding in a piece of bark which is holding in some wet concrete. Then we covered it all with wet leaves to keep it moist so it could cure better. Later I dug a channel on the downhill side, to carry off water that would otherwise fill the foundation trench and freeze in winter. We ended up using 45 of the 50 cylinders, and fourteen bags of concrete. Total cost of the foundation, not counting the massive costs of owning a vehicle and the gas to haul stuff up: around $55.
Now my plan was to get straw and start building the walls. According to
The Hand-Sculpted House, the best straw for cob is oat, rye, or winter wheat, and I expect that winter wheat is the most common. Here's a page that shows planting and
harvest dates for wheat. In eastern Washington, winter wheat is not harvested until July, which means if I want it in May, I have to buy bales stored for ten months. But I couldn't find any! Desperate, in late May I drove nearly an hour each way to buy three mediocre bales for $5 each, but they turned out to have been soaked in the rainy spring weather, and ruined. The next time I build with cob, I'll get the straw in late summer and store it myself. But this time I had to spend a few months doing other projects, waiting for the 2010 harvest.
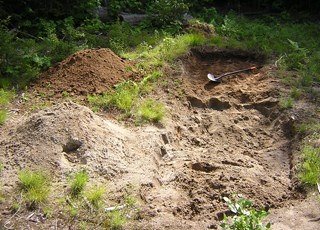
One thing I did was to start digging up the sand, and here's my first quarry pit, just downhill from the hut. In this picture you can see a pile of sand, a pile of brown silt, and in the background, a pile of topsoil.
I had the idea to dig a big pit, line it with tarps, and fill it with pre-mixed sand and clay, so that when I got straw, I could quickly make cob. This turned out to be a mistake. When wet sand and clay sits for a week or two, the sand sinks to the bottom, the water rises to the top and evaporates, and wetting and mixing it again takes just as much time and effort as mixing it in the first place. So I wasted some time, but the pit later turned out to be perfect for mixing large batches of cob. All the mixing was done using the popular method of stomping on it barefoot on a tarp, and lifting the edges of the tarp to turn it.

Wheat harvest started some time in July, and in early August someone finally offered fresh straw on Craigslist, and cheap, only $1.25 a bale! It was 80 miles north, but it was a nice day for a drive. Along the way I picked up two hitchhikers on their way to a Rainbow gathering. I dropped them off and found the farmer, who led me to the field in the photo. The bales were just barely small enough that I could cram four of them in the truck and still get the cover on in case it rained.
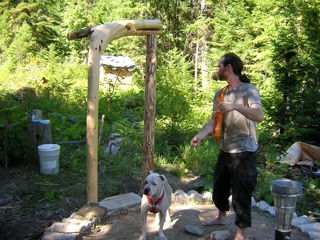
In mid-August, Chuck and Agamemnon came up from Portland to help with the project and clumsily stalk chipmunks, respectively. The wooden thing is a door frame, with the curved part made out of a western redcedar, and the straight part made out of a grand fir. The fir was already dead and I killed the cedar for exactly this purpose. It was growing upside down from how you see it.
Chuck has some construction engineering skill, and we decided to join the two pieces of wood with a
mortise and
tenon joint. Those links go to photos that were taken when both were still in crude form. I forgot to bring a chisel, so we roughed out the perimeter of the mortise with a drill, and then got the center out and smoothed the edges with a mini hatchet, a mallet, the sharp part of a hammer, and a whittling knife. It helped that the center of the log was rotted out. The tenon just took some sawing. I made the mistake of cutting the tenon a little big, figuring that we could always make it smaller. But then it took me a long time to get it small enough to fit.
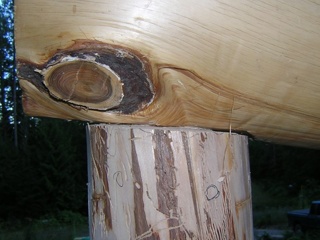
Then we had to fit the parts together so that the legs were parallel, cut some wood off the bottoms of the legs so the whole thing stood up straight at the right height, and cut away some wood so that we'd have a smooth joint, which you can see in the photo. The "O" was to remind us which side of the log faced the outside of the structure. Chuck was a good sport about holding the thing up while I checked it with a level and figured out how much wood to cut. I made some lucky guesses and we still had to stand it up and set it down a few times.
Then we had to hold it in place for the next month or two until the walls got filled in around it. I was going to use long pieces of wood nailed to the frame and braced against the ground, but Chuck had the clever idea to use a tripod of wires and stakes. In the photo above he's wrapping the remains of an orange t-shirt around a wire so people don't run into it. And the bottoms of the frame are held in place with cob.
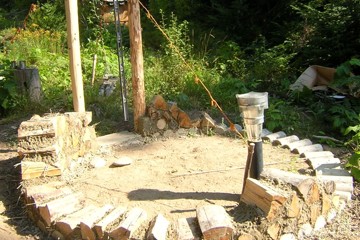
Then we started the walls. Chuck and I were beginners, and we probably did this in about five hours over two days. We started out being very careful to press the cob in perfectly around the wood, as if we were doing masonry that would be permanent when it dried. Later, short of time, I left the cob a lot sloppier. Those little holes on top of the cob are so the next layer fits more securely, but later I stopped doing that, and instead just left as little cob as possible exposed to dry. Then I would squirt some water on it before adding new cob.
This entire time, I had other things to do in the city, so I could only go up to the land a few days at a time. After cobbing hard for two days in late August, I had to quit early, because I knew that if I did any more, I would have nightmares about it. The next day, still dreading the wall, I did a bunch of chainsawing and drawknifing of future roof beams.
I mention this because you need to know that natural building is not fun. It has many advantages over unnatural building: it's cheaper, the structures are more beautiful, and it is more meaningful to shape something out of materials you have cut and dug with your own hands, than out of industrial products. This makes it much easier to feel motivated for natural building. But the actual work, just like unnatural building, is a chore. Ianto Evans has written that he loves cobbing so much that he feels sad to finish a house. It's because freaks like him write books that the rest of us get discouraged. If ordinary people wrote books about building, they would figure out all the shortcuts and good-enoughs to get the best ratio of quality to effort, and then if you loved building, you could go beyond that.
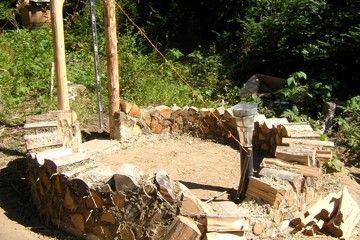
Anyway, the walls in this photo represent about 25 human-hours of work -- not counting the work to gather and prepare the materials. I was using about as much sand and clay as I expected, less straw, and much more wood. The wood came from
these trees, two big western hemlocks that fell in winter of 2006/2007. I was saving a bunch of cedar for a future project, but the hemlock was running out so fast that I would end up using all the cedar too, and then having to scavenge even more cedar from slash piles.
Cobwood has an advantage over cob if you already have a big pile of cordwood. You just stick the wood in the wall and you only have to make half as much cob. But if you have to pick out trees, cut them down, take off the limbs and bark, saw them into rounds, and split them, that's actually more work per volume of wall than digging up and mixing sand and clay. Also, integrating wood and cob takes more work than just piling up cob. Also, it's easy to taper a cob wall, so it gets thinner near the top, but logistically difficult to do this with wood. Also, cordwood doesn't like tight curves, because the ends are spaced too closely on the inside and too far apart on the outside. Also, although everyone says that cobwood can hold up a roof, in practice everyone uses it to fill in between posts and beams. This hut will be the first example I've seen of a roof-bearing cobwood wall.
My conclusion is that cobwood is only worth doing in a special case, where you already have the wood, and you're filling in straight or slightly curved walls. Otherwise, go with all cob.
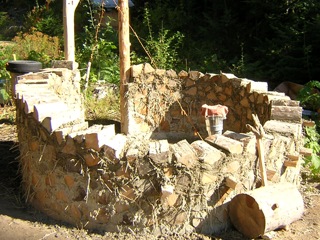
And here's where the wall stood in early September. By now I had emptied the sand-clay pre-mix from the pit, and I discovered that the pit was great for making large batches of cob. It was easier to make fifty gallons in the pit and lift it out, than to make more smaller batches outside the pit. Fifty gallons was exactly enough to go once around the wall, plastering on cob, fitting on wood, and filling in the cracks. Each round took about four hours.
Before mixing cob, I still had to pre-mix the clay with water. I would go down to the big pile of dry clay, knock a bunch off with a mattock, haul it up in buckets, and move it bit by bit to another bucket, where I would pound it with a tamping log to break it up into small bits and powder. Then I would dump that into a 55 gallon steel drum half filled with water, and mix it with a shovel, aiming for the pudding-like thickness. This was actually easier than it sounds. The whole hut used only four barrels of clay, and each barrel took about four hours of clay processing.
I had been getting the water from a nearby pool fed by a seasonal spring. Now it was dry, but I had anticipated this, and stored 50 gallons in a plastic barrel right next to the clay barrel. Water barrels are so heavy that tipping them and pouring the water is not an option, so when I needed it, I siphoned it with a hose.

In late September I had another visitor, Alexa. We stayed on the land for five days, but there was some rain and both of us got sick, so we only managed to get three more courses of wood on the wall. Also we did some splitting. This was where I made the transition from hemlock to cedar, and it's a wonderful experience to split a more difficult wood first, and then switch to cedar. It's like you just wave your axe and the cedar splits itself. Anyway, this is what the wall looked like after Alexa helped, and after I put a little more on myself. At this stage, the best thing about having a helper is that one of us can stand on each side of the wall to make sure the wood fits right, and pack the cob around it. Alone I have to keep running in and out to look at both sides. The piece of wood in the gap at the front, and the empty propane canisters, mark the locations of the next stage.
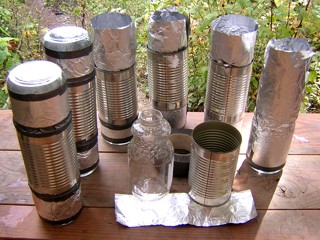
These are bottle windows, a common feature in cob buildings. There are different methods for making them. I noticed that 32 ounce glass juice bottles fit perfectly inside 40 ounce Dinty Moore beef stew cans, which I got for $4 each from Grocery Outlet. Also included was the stew, which was nourishing even though it smells like dog food. The photo shows all necessary materials, except one thing: to keep the whole thing under 13 inches, at least one of the bottles needs to have the top cut off. I did this with a bottle cutting kit that I picked up a few years ago. Bottle cutters generally score the glass and then you have to heat and cool it to break it at the score. Some of them cracked, which I patched with duct tape. It was also tricky to keep the foil smooth inside the tube, instead of bunching up and blocking the light.
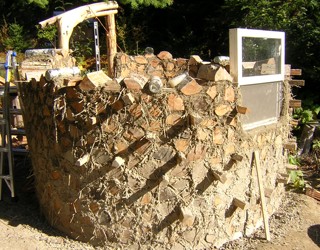
And here's the wall with everything installed and a bit more cob and wood added. Thanks Bob for donating the big window. He also donated the rock slab under the doorway, and the long level in the background, which I used to keep the walls roughly vertical. You can't see it here, but I've put a stainless steel wire across the front of the window, wrapped around logs on either side, to keep it from falling out. It can't fall in because the angle of the wall stops it. There are three bottle windows on each side, lower toward the front and higher toward the door. They say to put them at eye level, so this covers eyes of different heights of people.
In early October I had two more visitors, Ethan and Ian, who hitchhiked across the state to help out. They quickly learned to mix cob and build the wall without my supervision, so I had time to chainsaw enough of an old cedar log to finish the walls. The slow drying limited the speed we could put cob on, so we also did a lot of splitting.
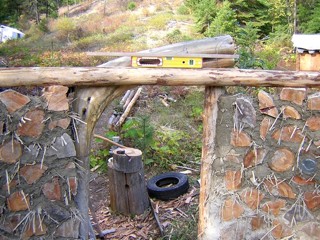
In mid-October, I built the walls around the door frame high enough to begin placing the roof beams. This photo shows something I was thinking about, and when I got to this point, it became obvious. It's called a
lintel, and the first thing it does is make it much easier to place one of the beams. That piece of wood on top of the level marks the space between the beams, with one of them going to the right of the door frame, and the other going above the low side of the frame. Originally I was going to rest it on top of the sloping frame, which would raise two problems: how to hold it there, and how to get all the beams parallel and level, if one of them can't be moved side to side without also moving it up and down. The lintel solves both problems. Also it makes a platform to fill in the walls above the door.

Then I used some copper pipes to mark the locations of the beams.
I love this kind of work! I spent more than an hour fiddling with them, measuring the distance between them and lining them all up with my eye, until I could see all four positions and know how high to build the cob and wood under them. Also notice the wires, which are wrapped around wood buried in cob and will be wrapped around the beams. The pieces of wood sticking out are designed to hold vines growing up the front, but they also turned out to be useful for standing on to work higher on the wall, and they look cool. I recommend them in any cob house.
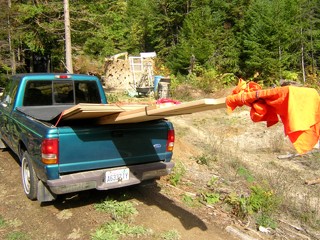
Now we come to the roof! When people talk about natural or low-budget building, they talk almost exclusively about the walls. This is because the roof is more complex than the walls, there are more ways to mess it up, the consequences of messing it up are worse, and it's damn hard to make a roof that's natural and low-budget. After considering every option, I finally decided to do a metal roof. It's light, fireproof, goes on fast, and is only moderately expensive. To go under it, I considered using all native wood, but I was short of time, and all this stuff cost only $100 at Home Depot. It was not as hard as I expected to put fourteen foot boards in a six foot truck bed. To keep them from tipping or sliding out, they're bundled with twelve and ten foot boards, and then the whole thing is weighted down with five sheets of plywood, and just to be safe, on top of that I put a 50 pound bag of clay.
Before I knew what stuff to buy, I spent many hours doing sketches, and it's taken me years just to wrap my mind around roofing in general. But having done the mental work, the physical work went faster than I expected, and I was lucky that October was dry this year.
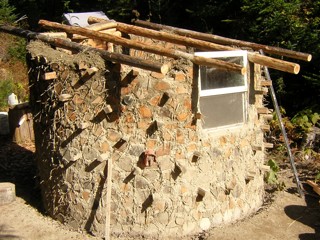
Here's the first layer, which I'm calling the
beams. Since they slant downward, you could also call them "rafters". It was an ongoing project all summer to find four trees, living or dead, that were the right size and straight enough. The two center ones are fresh douglas-fir, I think the one on the right was standing dead on the north hill, and the one on the left was in a slash pile. I had the two center beams cobbed in and wired down on Friday October 15th, and on Monday I got the two edge beams placed and loosely cobbed in. Then came one of the tricky parts.
If you're building with all rustic materials, you can just slap them on top of each other and not worry about how they line up. But if any of your materials are manufactured with flat surfaces and 90 degree angles, then you have to build a bridge between the roiling chaos of Earth and the mechanical perfection of Heaven. On top of the curves, you have to make a
square. I decided to transition to square between the center beams and the edge beams. The center beams had to fit around the positions of the window and door, so they are a bit skewed, kind of like this
// and I had to place the two edge beams so that the four beams together would look like this
|//|
I did this by cutting the edge beams precisely to 132 inches, and placing boards across the ends, cut to 104 inches, making a rectangle. Then I pounded tiny nails into the top two corners, to hold the ends of two measuring tapes, and brought the tapes down in a big X to read them at the bottom corners. Then I kept sliding everything up and down and back and forth until the two cross-corner measurements were equal. I was having fun, so I kept tweaking them, and continued to measure and tap with a mallet as I screwed the boards down, so the corners ended up less than a millimeter off -- a ridiculous level of precision for this structure.

And here you see the second layer of the roof, done on Wednesday the 20th and photographed (as always) on the following morning when the light is good. The cans of Amy's Curried Lentil soup mark the corners of the square. (It was easier than photoshopping in four arrows.) So all the other boards could be placed by measuring up or down the slope from those two boards. You might also notice that the edge beam on the right is propped up. That's one of the little imperfections that crept in: that beam was a bit low so I was trying to raise it and pack more cob under it, but I never was able to raise it enough, so the boards had to be bent down to screw into it. These boards are 2x4's, which are actually 1½ by 3½ inches. Originally I was going to put them up on edge, at 24 inch intervals, but Charlie convinced me that it would be much easier, and almost as strong, to lay them flat at 16 inch intervals. Then I made a few final tweaks, moving one board up a bit to fit around the window, and most of the rest one inch toward the top when I decided that was a better fit for the roof.
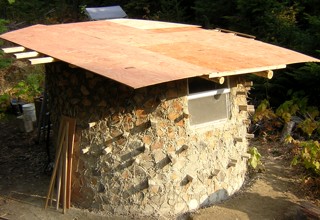
And here's the plywood over the boards, done on Thursday. I decided to go with all screws, no nails, and I'm sure I didn't pick exactly the right kind of screws, but square drive screws are definitely better than phillips head screws, which were designed for machines, not humans. Also, I decided to go with plywood, not OSB. The cheapest plywood was almost double the price of the cheapest OSB, but it smelled like wood, where the OSB smelled like industrial chemicals.
If you look closely, you can see how I arranged the plywood. They say you should avoid having four corners meet at the same spot. So at top center, lower right, and lower left, are three full sheets. The bottom center sheet is a bit darker, and I cut two pieces off it with a Japanese hand saw. One of them is leaning against the side, and the other is placed at center right, which takes up enough room for the top left and top right panels to be cut from the same sheet, with one of them rotated making it look brighter.
Friday was the most exciting part of the whole project. To round off the corners, I walked around the perimeter of the whole building, holding up the chainsaw while the falling pieces bounced off my helmet. Using the corners from the two bottom pieces, and the small rectangular piece, I was later able to cover the long boards sticking out on the two sides.
A big rainstorm was coming, so I drove back to the city for a night, and came back up with a brand new 15x20 foot tarp, which I carefully attached so the rainwater wouldn't run off onto the walls.
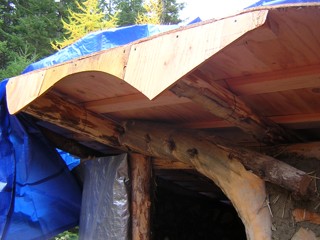
A few days later, during a break in the rain, I dashed up to finish the plywood and make this. I think it's called a
fascia. The idea is that water hitting the edge of the roof structure on the high side will drizzle down into the building, so you need something like this to catch the water and drip it onto the ground.
Originally I was going to use a five foot piece of 2x8, and I bought the board and cut it, but before I attached it, I grabbed a piece of roofing and slid it on top to see how it would fit. I planned the metal to overhang the wood by an inch on the bottom of the roof and a half inch on the top, but at some point I made an error, and the span of wood was an inch too long. So I sawed an inch off the top edge of the plywood, and then replaced the 1½ inch thick board with ½ inch thick scraps of plywood, which will probably work better anyway. This is made from four pieces, and I wanted the left side to match the right side, because it would look like the batman logo, but it didn't work out that way. Then I gave the whole thing a coat of linseed oil. "Boiled" linseed oil, by the way, is not boiled, but mixed with toxic solvents. Linseed oil is flax seed oil, and now I use food grade flax oil that's past the expiration date, which can be bought at Grocery Outlet for roughly the same price as non-food grade raw linseed oil, if you can even find it.
The picture above has lots of information. You can see the walls, both parts of the door frame, the lintel, the center beams, and several of the wires holding stuff together. The beams are held to the lintel by nothing but gravity and wires, and the boards are held to the beams by screws, and also by wires all around the outside. I want the roof to last 50 years, and there will be some very strong winds in the next 50 years, so every level has to be built to not be pulled up by air pressure.
Back in September I had bought metal roofing and felt from a family friend in the roofing business. He hauled it up in a trailer and we tied it to a tree to unload it. I bought enough for this project and a future project, and this project's share of the cost was around $250, by far the largest expense. In early November we got a few more days of sunny weather, and I went up to put it on.

Roofing "felt" is actually thick paper saturated with asphalt. I'm using #30, also called 30-pound, which is the thicker kind. It comes in three foot wide rolls, so to cover 13½ feet from top to bottom, I used five courses, going side to side across the roof, with 3½ inch overlaps calculated to leave a few inches on the top and bottom. Here is a closer photo of the
felt with lines that I drew to mark the locations of the boards under the plywood (in pale green) and the edges of the plywood (in orange, or if you're colorblind, they're the dim perpendicular lines). The white lines came already on the paper, to help lay it parallel. I was marking the boards so that when I put the roofing on, I would know where to put the screws to get them anchored in the boards for extra strength; and I was marking the edges of the plywood to help put the metal on straight, and also to avoid driving the roofing screws into the deeper screws holding the plywood to the boards. For the lines I used crayons, which are much cheaper than grease pencils and have the advantage of coming in many colors. To attach the tar paper, I used a staple hammer and 3/8 inch staples.
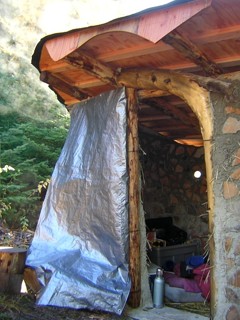
The tar paper went on without a hitch. I got up there in the early afternoon of Tuesday the 2nd, and had it all done, except some trimming, before bedtime. Here's a photo I took on Wednesday morning, waiting for the sun to steam the dew off the tar paper. You can see the tarp I've been using for a door, and my setup inside, with car seat mattress and propane camp stove. This time of year the days are very short. I get up at sunrise, see what work I can do before the frost thaws, and then work all through the sunny part of the day. When the sun goes behind the trees, I start putting on layers of clothing and keep working until it's too dark to see what I'm doing. Overall, I still like it better than working in the summer, when midday is too hot to do anything and then the mosquitoes come.
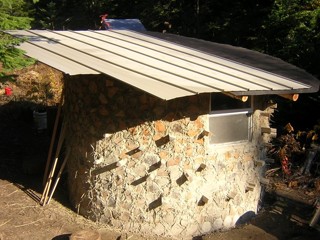
Later on Wednesday I started putting on the metal, and here you can see where it stood on Thursday morning. This is a locally-made roofing product called
Loc-Rib. It's a brilliant idea: the screws go on one edge of the panel, and then the rib of the next panel snaps down and covers them from the weather. I started on the left side of the roof, with the short panel, which I made by cutting one of the long panels in half. Then I worked my way across. At first I was using an awl with a mallet to pound holes in the metal, then a hand drill to make pilot holes for the screws, then a battery-powered drill to drive the screws. Later I figured out that I could have just made a tiny hole with the awl and driven the screws straight in, but then, that might have drained the batteries faster and forced me to finish by hand.
On Thursday I squeezed in another project and then finished putting on the panels. The main thing left to do on Friday was trim the edges. This was harder than I thought! I was using good tinsnips, but the problem with using scissors to cut metal, is that it's damn hard to get the metal out of the way so you can get the tool in there to keep cutting. You have to do a lot of bending, and I eventually learned to think of it as
tearing the metal, with the snips just helping it tear. Also, cutting the locked ribs was impossible. My family was coming up for a visit, so I asked them to bring hacksaw blades, and
here you can see what it looked like half-done, with the flat parts cut away and the ribs waiting for the saw.

And here it is all attached and trimmed. Thanks Sean for helping with sawing and drilling. Even Loc-Rib needs some exposed screws, and you can see them around the edges. The hidden screws are pancake head, and the exposed ones are painted to match the roof, and have rubber washers to keep the water out. The tips of these screws were sticking out from the bottom of the plywood, and on a later trip I cut a dead tree limb into a bunch of cylinders, drilled tiny holes in the centers, and screwed them on like nuts, to cover the tips and hold them a little tighter.

Here's the other project I did on Thursday. There was still a gap between the walls and roof, and I filled it with this, which is called straw-clay slip. You make it by mixing straw with a smooth clay-water mix about as thick as cream, like mixing a salad, so the clay coats every piece of straw but doesn't soak it. I diluted the clay left over from cobbing, and poured it on ten or twelve wheelbarrows full of straw -- almost as much as I used for the whole rest of the walls. It occurred to me that this is what birds make their nests out of. The clay serves to stick the straw together, keep bugs out, and make it resistant to fire. I packed it in pretty tightly, and it's still going to insulate much better than cob. Of course, you can only use something this light at the top of the wall where it doesn't have to bear any weight.
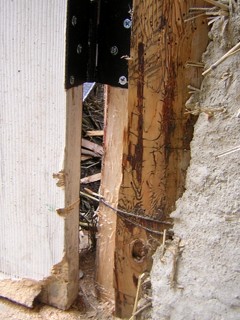
On my last two trips in November, before the snows came, I had time to do one more project: the door. I already had a solid-core door that I got free off Craigslist in the spring. The trick was to fit it in my curvy doorway. Obviously, the hinges would have to go on the straight side, and I planned for this back in August when I decided how to stand the frame: so that the door would swing away from the path, and create an opening toward it. I used the long level to draw a line, and then used a big chisel, a mallet, and a mini hatchet to carve this notch in the wood for the door to fit. Notice that I had to carve away a bit of the door to fit around the wires that hold the frame to the wall. You can also see the pencil marks I made in August to show where the hinges were going to be, so I didn't put the wires there. I bought hinges at Home Depot, screwed them first to the door, and then it took almost an hour to get the door exactly positioned to screw the hinges to the frame.

My original plan was to extend the notch all around the edge of the frame, and then cut the door to fit it, with a curved profile but square edges. Then I figured out that it would be much easier to leave the frame alone and just carve the door with angled edges. The material inside the door was basically sawdust and glue, so it was easy to shape. First I used a file-like rasp, and then I discovered that a sideways raking motion with the Japanese saw worked better. Still, shaping the door took hours! I repeatedly closed it as far as it would go, while standing inside so I could look through the crack and see where the wood was sticking. Then I would shave that bit down and go again. Finally, because of the curving frame, the door fit at the top but stuck out too far at the bottom. I fixed this by simply bending the door: near the bottom, on the inside, I screwed in a plant hanging hook, screwed another to the inside wall, and stretched a rubber tie-down strap tightly between them while I slept. The hooks will stay in place and serve to hold the door shut from the inside. And in the photo you can see the "latch" on the outside: two eye screws and a stick!
And that's where the project stands at the end of 2010. It's my policy to not write about anything until after I have done it, but there will be more in 2011...

 This is my land. It's ten acres in northeast Washington state. I've been working there off and on since 2004, planting fruit trees and berry bushes, and doing small building projects like an outhouse and a tent platform. In summer of 2009, I decided to build a tiny structure for storage and camping, in the shade of the dying cedar tree in the center of this photo.
 Because cob can be softened and dissolved by too much water, you need a foundation to keep it off the ground. This is the picture from the Craigslist posting where I got part of the foundation. These are called test cylinders. When professional builders are making something with concrete, they test it by making cylinders and trying to break them. These are the largest of several sizes: 12 inches long, six inches in diameter, and about 27 pounds. On a 95 degree day in August 2009, I hauled 50 of them up to the land. I already had some "urbanite", or broken concrete, from a demolished sidewalk. You can find as much as you want free in any city -- the expensive part is owning or renting a truck that can haul that much weight in not too many loads. My 1997 Ranger gets 30mpg, but only holds 3/8 of a ton. So I didn't have much urbanite, I had to divide the cylinders into two loads, and I needed help with the next ingredient.
 If there's clay on my land, I haven't found it yet. I was thinking of doing weak cob with fine silt, or spending a small fortune on pottery clay. Then in early September 2009, I got a stroke of luck. Road construction projects are always digging up piles of nearly pure clay, and someone connected with the Sandpoint Bypass project decided to post the clay on Craigslist. So all through September I was driving to Sandpoint and hauling loads, and finally Charlie, my mom's husband, offered to take a load in his giant Ram 2500, which just about doubled what I already had, and cleaned out this pile.
 This photo shows how to draw an ellipse on the ground: drive two thin stakes, tie a string between them with plenty of slack, and move another stick around as far as the string lets it go. The sticks here are bamboo that came with tree saplings. At the outside edge, the trench is roughly ten feet by nine feet. I knew at the beginning that I wanted those dimensions, so before I did any digging I did some math to figure out that I should use a ten foot string and put the foci four feet apart. It turns out that the long diameter of the ellipse is always equal to the length of the string. If the foci are in the same spot, the "short" diameter is the same as the long and you have a circle. As the foci get farther apart, the short side gets shorter.
 I would dig a bit, run the stick around on the string, and dig a bit more, making the trench a few inches wider than the eventual wall, to spread the weight. Here's where I called it good enough, and this is most dangerous decision I made on the entire structure, because I haven't even dug down to pure sand, and I'm still way above the frost line. So, one of the functions of this hut is to test the damage from frost heave, to get some idea of what I can get away with in future cob walls.
 At the top of the vertical pipe are a couple stovepipe parts, and a screen made of quarter inch hardware cloth held on with a hose clamp. Eventually the hut will have a sink, and wash water will go straight underground and water plants downhill.
 At the end of September, I made these cob test bricks. I didn't have straw so I used reed canarygrass. The hardest part was getting the clay in usable form. I soaked some chunks in water overnight, and then the next day I repeatedly stirred the bucket with a piece of wood and pounded the lumps out, until it was a uniform smooth thick texture that formed soft peaks just like meringue. Then I measured the clay goop and the sand by volume to get the percentages of clay, which are carved on top: 20, 10, and 30.
 Now we're in late April, 2010, and Jana and Ian are helping me mix concrete. I got the 80 pound bags from Home Depot, which only need water added, and mixing it in a wheelbarrow with a shovel is surprisingly easy if you do it a bag at a time -- and if you can lift 80 pounds. If not, the 60 pound bags are only a slightly worse value. I was afraid it would be so wet that I would have to fill the whole trench, which would have required a lot more of it. But we could keep it firm enough to just fill the cracks between the urbanite and get a couple inches on top.
 Next we put on the test cylinders, and a slab of rock to go under the doorway. Here's a
detail of what we put under the door slab: a few more rocks with concrete around them. That big rock to the right of the slab is holding in a piece of bark which is holding in some wet concrete. Then we covered it all with wet leaves to keep it moist so it could cure better. Later I dug a channel on the downhill side, to carry off water that would otherwise fill the foundation trench and freeze in winter. We ended up using 45 of the 50 cylinders, and fourteen bags of concrete. Total cost of the foundation, not counting the massive costs of owning a vehicle and the gas to haul stuff up: around $55.
 One thing I did was to start digging up the sand, and here's my first quarry pit, just downhill from the hut. In this picture you can see a pile of sand, a pile of brown silt, and in the background, a pile of topsoil.
  Wheat harvest started some time in July, and in early August someone finally offered fresh straw on Craigslist, and cheap, only $1.25 a bale! It was 80 miles north, but it was a nice day for a drive. Along the way I picked up two hitchhikers on their way to a Rainbow gathering. I dropped them off and found the farmer, who led me to the field in the photo. The bales were just barely small enough that I could cram four of them in the truck and still get the cover on in case it rained.
 In mid-August, Chuck and Agamemnon came up from Portland to help with the project and clumsily stalk chipmunks, respectively. The wooden thing is a door frame, with the curved part made out of a western redcedar, and the straight part made out of a grand fir. The fir was already dead and I killed the cedar for exactly this purpose. It was growing upside down from how you see it.
 Then we had to fit the parts together so that the legs were parallel, cut some wood off the bottoms of the legs so the whole thing stood up straight at the right height, and cut away some wood so that we'd have a smooth joint, which you can see in the photo. The "O" was to remind us which side of the log faced the outside of the structure. Chuck was a good sport about holding the thing up while I checked it with a level and figured out how much wood to cut. I made some lucky guesses and we still had to stand it up and set it down a few times.
 Then we started the walls. Chuck and I were beginners, and we probably did this in about five hours over two days. We started out being very careful to press the cob in perfectly around the wood, as if we were doing masonry that would be permanent when it dried. Later, short of time, I left the cob a lot sloppier. Those little holes on top of the cob are so the next layer fits more securely, but later I stopped doing that, and instead just left as little cob as possible exposed to dry. Then I would squirt some water on it before adding new cob.
  Anyway, the walls in this photo represent about 25 human-hours of work -- not counting the work to gather and prepare the materials. I was using about as much sand and clay as I expected, less straw, and much more wood. The wood came from these trees, two big western hemlocks that fell in winter of 2006/2007. I was saving a bunch of cedar for a future project, but the hemlock was running out so fast that I would end up using all the cedar too, and then having to scavenge even more cedar from slash piles.
 And here's where the wall stood in early September. By now I had emptied the sand-clay pre-mix from the pit, and I discovered that the pit was great for making large batches of cob. It was easier to make fifty gallons in the pit and lift it out, than to make more smaller batches outside the pit. Fifty gallons was exactly enough to go once around the wall, plastering on cob, fitting on wood, and filling in the cracks. Each round took about four hours.
 In late September I had another visitor, Alexa. We stayed on the land for five days, but there was some rain and both of us got sick, so we only managed to get three more courses of wood on the wall. Also we did some splitting. This was where I made the transition from hemlock to cedar, and it's a wonderful experience to split a more difficult wood first, and then switch to cedar. It's like you just wave your axe and the cedar splits itself. Anyway, this is what the wall looked like after Alexa helped, and after I put a little more on myself. At this stage, the best thing about having a helper is that one of us can stand on each side of the wall to make sure the wood fits right, and pack the cob around it. Alone I have to keep running in and out to look at both sides. The piece of wood in the gap at the front, and the empty propane canisters, mark the locations of the next stage.
 These are bottle windows, a common feature in cob buildings. There are different methods for making them. I noticed that 32 ounce glass juice bottles fit perfectly inside 40 ounce Dinty Moore beef stew cans, which I got for $4 each from Grocery Outlet. Also included was the stew, which was nourishing even though it smells like dog food. The photo shows all necessary materials, except one thing: to keep the whole thing under 13 inches, at least one of the bottles needs to have the top cut off. I did this with a bottle cutting kit that I picked up a few years ago. Bottle cutters generally score the glass and then you have to heat and cool it to break it at the score. Some of them cracked, which I patched with duct tape. It was also tricky to keep the foil smooth inside the tube, instead of bunching up and blocking the light.
 And here's the wall with everything installed and a bit more cob and wood added. Thanks Bob for donating the big window. He also donated the rock slab under the doorway, and the long level in the background, which I used to keep the walls roughly vertical. You can't see it here, but I've put a stainless steel wire across the front of the window, wrapped around logs on either side, to keep it from falling out. It can't fall in because the angle of the wall stops it. There are three bottle windows on each side, lower toward the front and higher toward the door. They say to put them at eye level, so this covers eyes of different heights of people.
 In mid-October, I built the walls around the door frame high enough to begin placing the roof beams. This photo shows something I was thinking about, and when I got to this point, it became obvious. It's called a lintel, and the first thing it does is make it much easier to place one of the beams. That piece of wood on top of the level marks the space between the beams, with one of them going to the right of the door frame, and the other going above the low side of the frame. Originally I was going to rest it on top of the sloping frame, which would raise two problems: how to hold it there, and how to get all the beams parallel and level, if one of them can't be moved side to side without also moving it up and down. The lintel solves both problems. Also it makes a platform to fill in the walls above the door.
 Then I used some copper pipes to mark the locations of the beams.
I love this kind of work! I spent more than an hour fiddling with them, measuring the distance between them and lining them all up with my eye, until I could see all four positions and know how high to build the cob and wood under them. Also notice the wires, which are wrapped around wood buried in cob and will be wrapped around the beams. The pieces of wood sticking out are designed to hold vines growing up the front, but they also turned out to be useful for standing on to work higher on the wall, and they look cool. I recommend them in any cob house.
 Now we come to the roof! When people talk about natural or low-budget building, they talk almost exclusively about the walls. This is because the roof is more complex than the walls, there are more ways to mess it up, the consequences of messing it up are worse, and it's damn hard to make a roof that's natural and low-budget. After considering every option, I finally decided to do a metal roof. It's light, fireproof, goes on fast, and is only moderately expensive. To go under it, I considered using all native wood, but I was short of time, and all this stuff cost only $100 at Home Depot. It was not as hard as I expected to put fourteen foot boards in a six foot truck bed. To keep them from tipping or sliding out, they're bundled with twelve and ten foot boards, and then the whole thing is weighted down with five sheets of plywood, and just to be safe, on top of that I put a 50 pound bag of clay.
 Here's the first layer, which I'm calling the beams. Since they slant downward, you could also call them "rafters". It was an ongoing project all summer to find four trees, living or dead, that were the right size and straight enough. The two center ones are fresh douglas-fir, I think the one on the right was standing dead on the north hill, and the one on the left was in a slash pile. I had the two center beams cobbed in and wired down on Friday October 15th, and on Monday I got the two edge beams placed and loosely cobbed in. Then came one of the tricky parts.
 And here you see the second layer of the roof, done on Wednesday the 20th and photographed (as always) on the following morning when the light is good. The cans of Amy's Curried Lentil soup mark the corners of the square. (It was easier than photoshopping in four arrows.) So all the other boards could be placed by measuring up or down the slope from those two boards. You might also notice that the edge beam on the right is propped up. That's one of the little imperfections that crept in: that beam was a bit low so I was trying to raise it and pack more cob under it, but I never was able to raise it enough, so the boards had to be bent down to screw into it. These boards are 2x4's, which are actually 1½ by 3½ inches. Originally I was going to put them up on edge, at 24 inch intervals, but Charlie convinced me that it would be much easier, and almost as strong, to lay them flat at 16 inch intervals. Then I made a few final tweaks, moving one board up a bit to fit around the window, and most of the rest one inch toward the top when I decided that was a better fit for the roof.
 And here's the plywood over the boards, done on Thursday. I decided to go with all screws, no nails, and I'm sure I didn't pick exactly the right kind of screws, but square drive screws are definitely better than phillips head screws, which were designed for machines, not humans. Also, I decided to go with plywood, not OSB. The cheapest plywood was almost double the price of the cheapest OSB, but it smelled like wood, where the OSB smelled like industrial chemicals.
 A few days later, during a break in the rain, I dashed up to finish the plywood and make this. I think it's called a fascia. The idea is that water hitting the edge of the roof structure on the high side will drizzle down into the building, so you need something like this to catch the water and drip it onto the ground.
 Roofing "felt" is actually thick paper saturated with asphalt. I'm using #30, also called 30-pound, which is the thicker kind. It comes in three foot wide rolls, so to cover 13½ feet from top to bottom, I used five courses, going side to side across the roof, with 3½ inch overlaps calculated to leave a few inches on the top and bottom. Here is a closer photo of the felt with lines that I drew to mark the locations of the boards under the plywood (in pale green) and the edges of the plywood (in orange, or if you're colorblind, they're the dim perpendicular lines). The white lines came already on the paper, to help lay it parallel. I was marking the boards so that when I put the roofing on, I would know where to put the screws to get them anchored in the boards for extra strength; and I was marking the edges of the plywood to help put the metal on straight, and also to avoid driving the roofing screws into the deeper screws holding the plywood to the boards. For the lines I used crayons, which are much cheaper than grease pencils and have the advantage of coming in many colors. To attach the tar paper, I used a staple hammer and 3/8 inch staples.
 The tar paper went on without a hitch. I got up there in the early afternoon of Tuesday the 2nd, and had it all done, except some trimming, before bedtime. Here's a photo I took on Wednesday morning, waiting for the sun to steam the dew off the tar paper. You can see the tarp I've been using for a door, and my setup inside, with car seat mattress and propane camp stove. This time of year the days are very short. I get up at sunrise, see what work I can do before the frost thaws, and then work all through the sunny part of the day. When the sun goes behind the trees, I start putting on layers of clothing and keep working until it's too dark to see what I'm doing. Overall, I still like it better than working in the summer, when midday is too hot to do anything and then the mosquitoes come.
 Later on Wednesday I started putting on the metal, and here you can see where it stood on Thursday morning. This is a locally-made roofing product called Loc-Rib. It's a brilliant idea: the screws go on one edge of the panel, and then the rib of the next panel snaps down and covers them from the weather. I started on the left side of the roof, with the short panel, which I made by cutting one of the long panels in half. Then I worked my way across. At first I was using an awl with a mallet to pound holes in the metal, then a hand drill to make pilot holes for the screws, then a battery-powered drill to drive the screws. Later I figured out that I could have just made a tiny hole with the awl and driven the screws straight in, but then, that might have drained the batteries faster and forced me to finish by hand.
 And here it is all attached and trimmed. Thanks Sean for helping with sawing and drilling. Even Loc-Rib needs some exposed screws, and you can see them around the edges. The hidden screws are pancake head, and the exposed ones are painted to match the roof, and have rubber washers to keep the water out. The tips of these screws were sticking out from the bottom of the plywood, and on a later trip I cut a dead tree limb into a bunch of cylinders, drilled tiny holes in the centers, and screwed them on like nuts, to cover the tips and hold them a little tighter.
 Here's the other project I did on Thursday. There was still a gap between the walls and roof, and I filled it with this, which is called straw-clay slip. You make it by mixing straw with a smooth clay-water mix about as thick as cream, like mixing a salad, so the clay coats every piece of straw but doesn't soak it. I diluted the clay left over from cobbing, and poured it on ten or twelve wheelbarrows full of straw -- almost as much as I used for the whole rest of the walls. It occurred to me that this is what birds make their nests out of. The clay serves to stick the straw together, keep bugs out, and make it resistant to fire. I packed it in pretty tightly, and it's still going to insulate much better than cob. Of course, you can only use something this light at the top of the wall where it doesn't have to bear any weight.
 On my last two trips in November, before the snows came, I had time to do one more project: the door. I already had a solid-core door that I got free off Craigslist in the spring. The trick was to fit it in my curvy doorway. Obviously, the hinges would have to go on the straight side, and I planned for this back in August when I decided how to stand the frame: so that the door would swing away from the path, and create an opening toward it. I used the long level to draw a line, and then used a big chisel, a mallet, and a mini hatchet to carve this notch in the wood for the door to fit. Notice that I had to carve away a bit of the door to fit around the wires that hold the frame to the wall. You can also see the pencil marks I made in August to show where the hinges were going to be, so I didn't put the wires there. I bought hinges at Home Depot, screwed them first to the door, and then it took almost an hour to get the door exactly positioned to screw the hinges to the frame.
 My original plan was to extend the notch all around the edge of the frame, and then cut the door to fit it, with a curved profile but square edges. Then I figured out that it would be much easier to leave the frame alone and just carve the door with angled edges. The material inside the door was basically sawdust and glue, so it was easy to shape. First I used a file-like rasp, and then I discovered that a sideways raking motion with the Japanese saw worked better. Still, shaping the door took hours! I repeatedly closed it as far as it would go, while standing inside so I could look through the crack and see where the wood was sticking. Then I would shave that bit down and go again. Finally, because of the curving frame, the door fit at the top but stuck out too far at the bottom. I fixed this by simply bending the door: near the bottom, on the inside, I screwed in a plant hanging hook, screwed another to the inside wall, and stretched a rubber tie-down strap tightly between them while I slept. The hooks will stay in place and serve to hold the door shut from the inside. And in the photo you can see the "latch" on the outside: two eye screws and a stick!