Landblog Main
previous archive
 The Roof Part One -- 24 October 2010 -- When people talk about natural or low-budget building, they talk almost exclusively about the walls. This is because the roof is more complex than the walls, there are more ways to mess it up, the consequences of messing it up are worse, and it's damn hard to make a roof that's natural and low-budget. It's like, "oooo, you can build this wonderful hand-made house and oh yeah you'll have to shell out thousands of dollars for industrial materials to keep it from getting ruined in the first rainstorm."
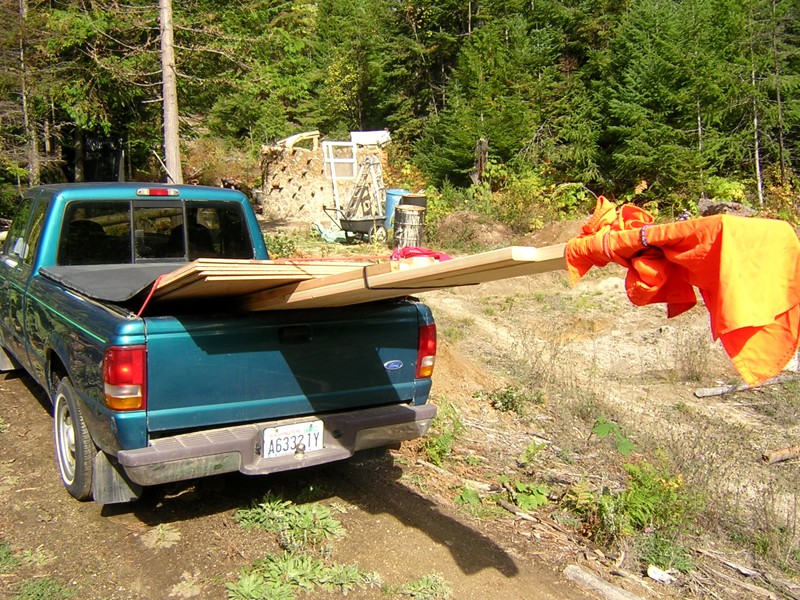
In the photo above you can see $100 in industrial materials that I bought at Home Depot and hauled up a couple weeks ago. It was not as hard as I expected to put fourteen foot boards in a six foot truck bed. To keep them from tipping or sliding out, they're bundled with twelve and ten foot boards, and then the whole thing is weighted down with five sheets of plywood, and just to be safe, on top of that I put a 50 pound bag of clay.
 Before I knew what stuff to buy, I spent many hours doing sketches, and it's taken me years just to wrap my mind around roofing in general. But having done the mental work, the physical work is going faster than I expected. Here's the first layer, which I'm calling the beams. Since they slant downward, you could also call them "rafters". It was an ongoing project this summer to find four trees, living or dead, that were the right size and straight enough. The two center ones are fresh douglas-fir, I think the one on the right was standing dead on the north hill, and the one on the left was in a slash pile. I had the two center beams cobbed in and wired down on the previous Friday. On Monday I got the two edge beams placed and loosely cobbed in. Then came one of the tricky parts.
If you're building with all rustic materials, you can just slap them on top of each other and not worry about how they line up. But if any of your materials are manufactured with flat surfaces and 90 degree angles, then you have to build a bridge between the roiling chaos of Earth and the mechanical perfection of Heaven. On top of the curves, you have to make a square. I decided to transition to square between the center beams and the edge beams. The center beams had to fit around the positions of the window and door, so they are a bit skewed, kind of like this // and I had to place the two edge beams so that the four beams together would look like this |//|
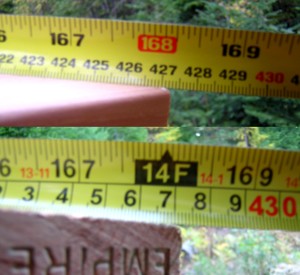 I did this by cutting the edge beams precisely to 132 inches, and placing boards across the ends, cut to 104 inches, making a rectangle. Then I pounded tiny nails into the top two corners, to hold the ends of two measuring tapes, and brought the tapes down in a big X to read them at the bottom corners. Then I kept sliding everything up and down and back and forth until the two cross-corner measurements were equal. Then I drilled holes and screwed the boards down, one corner at a time, continuing to measure and tap with a mallet. In this photo the screws have been placed, and you can see that the numbers are still a little off: one is 4272mm, and the other is nearly 4273mm. Seriously, that level of precision for this structure is ridiculous, but I was having fun!
 And here you see the second layer of the roof, done on Wednesday and photographed (as always) on the following morning when the light is good. The cans of Amy's Curried Lentil soup mark the corners of the square. (It was easier than photoshopping in four arrows.) So all the other boards could be placed by measuring up or down the slope from those two boards. You might also notice that the edge beam on the right is propped up. That's one of the little imperfections that crept in: that beam was a bit low so I was trying to raise it and pack more cob under it, but I never was able to raise it enough, so the boards had to be bent down to screw into it. These boards are 2x4's, which are actually 1½ by 3½ inches. Originally I was going to put them up on edge, at 24 inch intervals, but Charlie convinced me that it would be much easier, and almost as strong, to lay them flat at 16 inch intervals. Then I made a few final tweaks, moving one board up a bit to fit around the window, and most of the rest one inch toward the top when I decided that was a better fit for the roof.
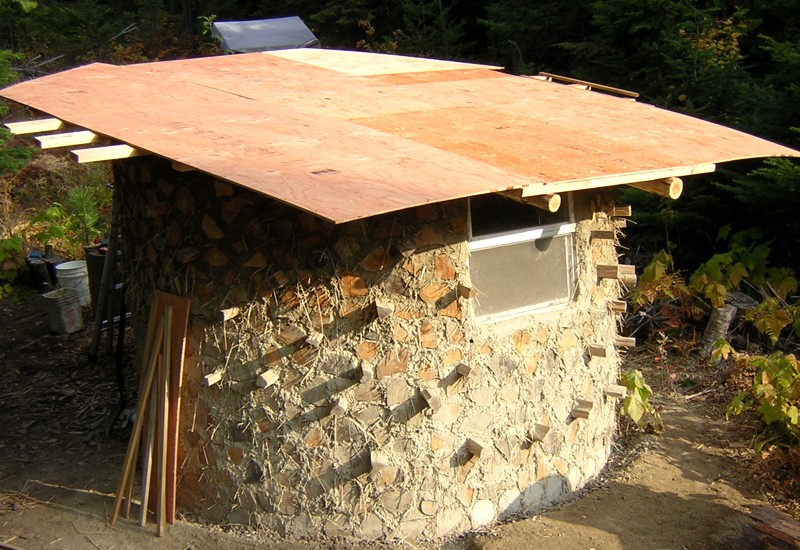 And here's the plywood over the boards, done on Thursday. At this stage the panels have been screwed down just enough to hold them in place. I decided to go with all screws, no nails, and I'm sure I didn't pick exactly the right kind of screws, but square drive screws are definitely better than phillips head screws, which were designed for machines, not humans. Also, I decided to go with plywood, not OSB. The cheapest plywood was almost double the price of the cheapest OSB, but it smelled like wood, where the OSB smelled like industrial chemicals.
If you look closely, you can see how I arranged the plywood. They say you should avoid having four corners meet at the same spot. So at top center, lower right, and lower left, are three full sheets. The bottom center sheet is a bit darker, and I cut two pieces off it with a Japanese hand saw. One of them is leaning against the side, and the other is placed at center right, which takes up enough room for the top left and top right panels to be cut from the same sheet, with one of them rotated making it look brighter.
On Friday I put a bunch more screws in the plywood, took a rest, and then did the most exciting part of the whole project. To round off the corners, I walked around the perimeter of the whole building, widdershins, holding up the chainsaw, while the falling pieces bounced off my helmet. Using the corners from the two bottom pieces, and the small rectangular piece, I believe I will be able to cover the long boards sticking out on the two sides.
Also on Thursday, the end of the last long dry spell of the year, I took down the wall tent and stuffed it in a steel drum. Then I slept in the structure. The inside area is roughly 50 square feet, enough for my old car seat mattress, a camp stove, and a few bags. I was going to call it a shed but now I feel like calling it a hut. There is more work to do, which again depends on the weather. The whole thing is now covered with a brand new 15x20 foot tarp, carefully attached so the rainwater doesn't run off onto the walls. And everything I need for the next few stages is already up there, in case we don't get another clear week until the roads are covered with snow and I have to walk in.
 Building is Complicated -- 29 October 2010 -- This week it stopped raining for a day and I dashed up to finish putting plywood on the roof and rounding it off. Also I made this. I'm not sure what it's called, but the idea is that water hitting the edge of the roof structure on the high side will drizzle down into the building, so you have to make something like this to catch the water and drip it onto the ground.
Originally I was going to use a five foot piece of 2x8, and I bought the board and cut it, but before I attached it, I grabbed a piece of roofing and slid it on top to see how it would fit. I planned the metal to overhang the wood by an inch on the bottom of the roof and a half inch on the top, but at some point I made an error, and the span of wood was an inch too long. So I sawed an inch off the top edge and instead of the board, used scraps of plywood, which will probably work better anyway. I wanted the left side to match the right side, because it would look like the batman logo, but it didn't work out that way. This is made from four pieces, and the two in the middle are darker because they're left over from the outhouse job in 2007. They had been coated with linseed oil, and I gave the whole thing another coat. "Boiled" linseed oil, by the way, is not boiled, but mixed with toxic solvents. Linseed oil is flax seed oil, and now I use food grade flax oil that's past the expiration date, which can be bought at Grocery Outlet for roughly the same price as non-food grade raw linseed oil, if you can even find it.
The picture above has lots of information. You can see the walls, both parts of the door frame, the lintel, the center beams, and several of the wires holding stuff together. The beams are held to the lintel by nothing but gravity and wires, and the boards are held to the beams by screws, and also by wires all around the outside of the hut. I wanted to build a roof that would last 50 years, and there will be some very strong winds in the next 50 years. So every level of the roof has to be built to not be pulled up by air pressure. Of course, the whole thing might be ruined by frost heave because I didn't build the foundation deep enough. But one function of this structure is to find out what I can get away with.
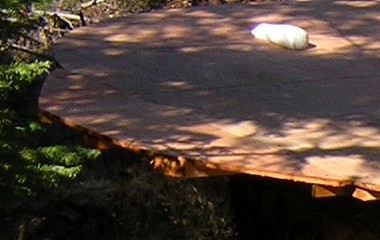 The Roof Part Two -- 7 November 2010 -- I've been grabbing every bit of dry weather to get this job done before winter. This photo is a detail of something I did on my previous quick trip, putting scrap plywood on the ends of the long boards that stick out on the sides of the structure. That white thing is one of my ghetto dehumidifiers: a sock filled with crystal cat litter. The pearls are better than the sharp-edged crystals, because they have less dust. The material is silica sand, the same thing they use for the tiny dehumidifiers in pill bottles. It sucks up moisture, and you can recharge it by sticking it in the oven at 240 degrees. Anyway, when I put the tarp on, I filled five socks and stapled them to the roof, to reduce condensation under the tarp. And on the latest trip, I took them off to put on the tar paper.
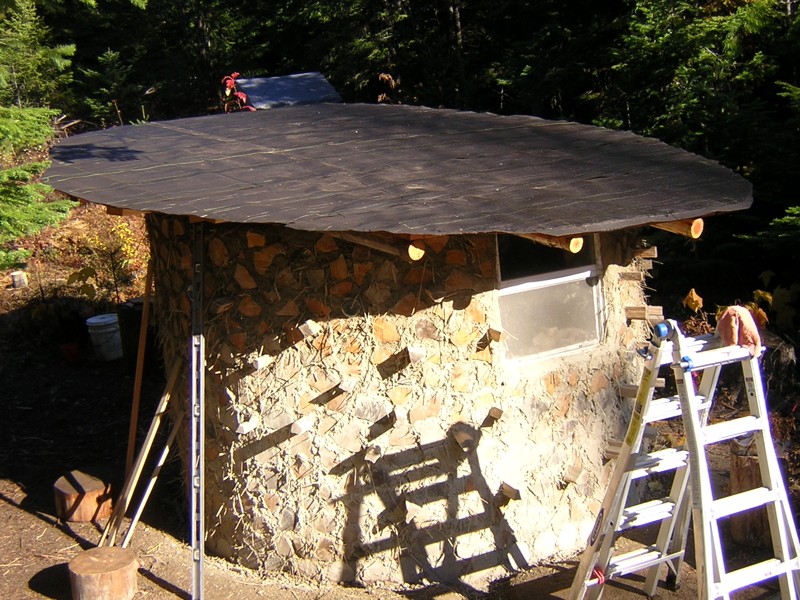 Roofing "felt" is actually thick paper saturated with asphalt. I'm using #30, also called 30-pound, which is the thicker kind. It comes in three foot wide rolls, so to cover 13½ feet from top to bottom, I used five courses, going side to side across the roof, with 3½ inch overlaps calculated to leave a few inches on the top and bottom. Here is a closer photo of the felt with lines that I drew to mark the locations of the boards under the plywood (in pale green) and the edges of the plywood (in orange, or if you're colorblind, they're the dim perpendicular lines). The white lines came already on the paper, to help lay it parallel. I was marking the boards so that when I put the roofing on, I would know where to put the screws to get them anchored in the boards for extra strength; and I was marking the edges of the plywood to help put the metal on straight, and also to avoid driving the roofing screws into the deeper screws holding the plywood to the boards. For the lines I used crayons, which are much cheaper than grease pencils and have the advantage of coming in many colors. To attach the tar paper, I used a staple hammer and 3/8 inch staples.
The tar paper went on without a hitch. I got up there early Tuesday afternoon and had it all done, except some trimming, before bedtime. This time of year the days are very short. I get up at sunrise, see what work I can do before the frost thaws, then work all through the sunny part of the day. When the sun goes behind the trees, I start putting on layers of clothing and keep working until it's too dark to see what I'm doing. Overall, I still like it better than working in the summer, when midday is too hot to do anything and then the mosquitoes come.
 On Wednesday, after the sun steamed the dew off the tar paper, I started putting on the roofing, and here you can see where it stood on Thursday morning. This is a locally-made roofing product called Loc-Rib. It's a brilliant idea: the screws go on one edge of the panel, and then the rib of the next panel snaps down and covers them from the weather. I started on the left side of the roof, with the short panel, which I made by cutting one of the long panels in half. Then I worked my way across. At first I was using an awl with a mallet to pound holes in the metal, then a hand drill to make pilot holes for the screws, then a battery-powered drill to drive the screws. Later I figured out that I could have just made a tiny hole with the awl and driven the screws straight in, but then, that might have drained the batteries faster and forced me to finish by hand.
On Thursday, ahead of schedule, I did another project, and then finished putting on the panels. The main thing left to do on Friday was trim the edges. This was harder than I thought! I was using good tinsnips, but the problem with using scissors to cut metal, is that it's damn hard to get the metal out of the way so you can get the tool in there to keep cutting. You have to do a lot of bending, and I eventually learned to think of it as tearing the metal, with the snips just helping it tear. Also, cutting the locked ribs was impossible. My family was coming up for a visit, so I asked them to bring hacksaw blades, and here you can see what it looked like half-done, with the flat parts cut away and the ribs waiting for the saw.
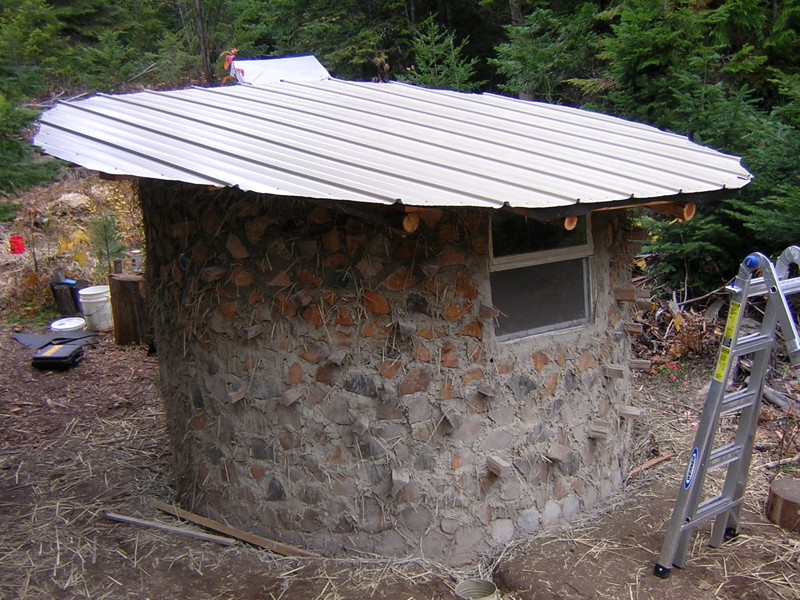 And here it is all attached and trimmed. Thanks Sean for helping with sawing and drilling. Even Loc-Rib needs some exposed screws, and you can see them around the edges. The hidden screws are pancake head, and the exposed ones are painted to match the roof, and have rubber washers to keep the water out.
So the hut is now adequate to survive the winter, but there are still a few things I'd like to get done on the next trip...
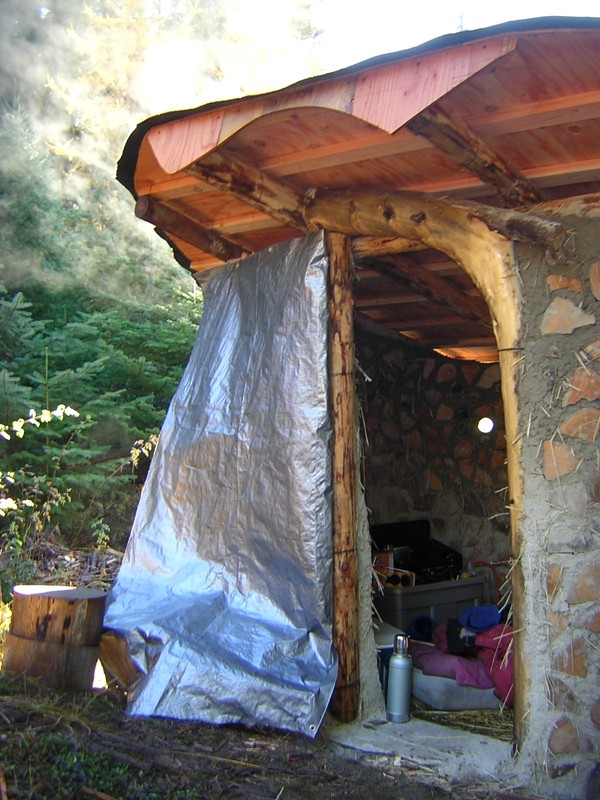 Nest -- 16 November 2010 -- Here's a photo I took back on November 3rd, while the sun was steaming the dew off the tar paper. You can also see the tarp I've been using for a door, and my setup inside, with car seat mattress and propane camp stove. The inside is an ellipse, about seven feet by eight feet, or 44 square feet, which is what they would call a "three person" tent. For one person, it's like a castle tent. The plan is to use it for three season camping and winter storage. But with a bunch of improvements, it would even be good for winter living. On the last three trips I made a few of those improvements.
 First, you can see that there's still a gap between the walls and the roof. The following day I filled it in. I forget which cob book I got this from, but you mix straw with a smooth clay-water mix about as thick as cream, like mixing a salad, so the clay coats every piece of straw but doesn't soak it. I diluted the clay left over from cobbing, and poured it on ten or twelve wheelbarrows full of straw -- almost as much as I used for the whole rest of the walls. It occurred to me that this is what birds make their nests out of. The clay serves to stick the straw together, keep bugs out, and make it resistant to fire. I packed it in pretty tightly, and it's still going to insulate much better than cob. Of course, you can only use something this light at the top of the wall where it doesn't have to bear any weight.
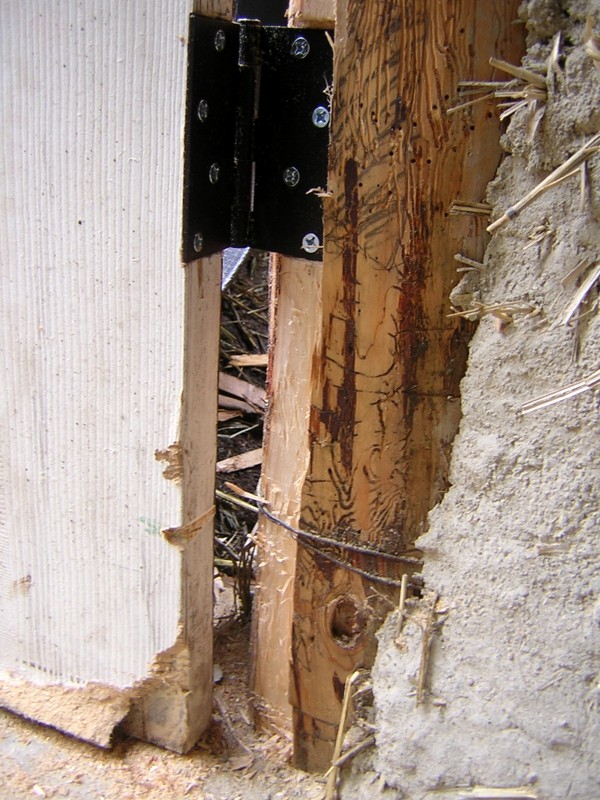 The next project was to hang the door. I already had a solid-core door that I got free off Craigslist in the spring. The trick was to fit it in my curvy doorway. Obviously, the hinges would have to go on the straight side, and I planned for this back in August when I decided how to stand the frame: so that the door would swing away from the path, and create an opening toward it. I used the long level to draw a line, and then used a big chisel, a mallet, and a mini hatchet to carve this notch in the wood for the door to fit. Notice that I had to carve away a bit of the door to fit around the wires that hold the frame to the wall. You can also see the marks I made in August to show where the hinges were going to be, so I didn't put the wires there. I bought hinges at Home Depot, screwed them first to the door, and then it took almost an hour to get the door exactly positioned to screw the hinges to the frame.
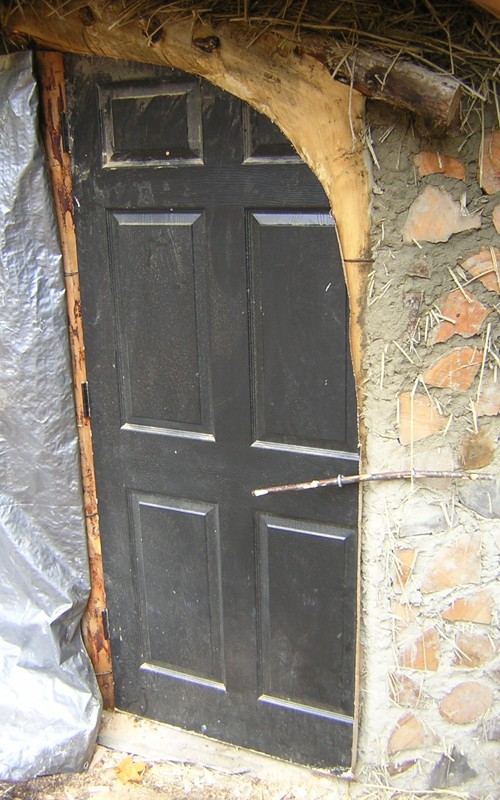 My original plan was to extend the notch all around the edge of the frame, and then cut the door to fit it, with a curved profile but square edges. Then I figured out that it would be much easier to leave the frame alone and just carve the door with angled edges. I expected the door to have wood veneer on the outside and dense particle board on the inside, but it turned out to have dense particle board on the outside, and the inside was something like sawdust and glue. So it was easy to shape. First I used a file-like rasp, and then I discovered that a sideways raking motion with the japanese saw worked better. Still, shaping the door took hours! I repeatedly closed it as far as it would go, while standing inside so I could look through the crack and see where the wood was sticking. Then I would shave that bit down and go again. Finally, because of the curving frame, the door fit at the top but stuck out too far at the bottom. I fixed this on my last stay by simply bending the door: near the bottom, on the inside, I screwed in a plant hanging hook, screwed another to the inside wall, and stretched a rubber tie-down strap tightly between them while I slept. The hooks will stay in place and serve to hold the door shut from the inside. And in the photo you can see the "latch" on the outside: two eye screws and a stick!
This completes work on the hut for 2010. The snows have started, and it will probably be five months before I can drive all the way in again. But in the spring I anticipate more work on this project, and the beginnings of others.
 Forest Garden Update -- 24 November 2010 -- With all the writing about the hut, it's been six months since I've written about my favorite part of this whole project: growing plants. They're more beautiful than buildings, and they build themselves. Maybe in the future we will be able to plant a seed and grow something we can live inside. Anyway, this photo was taken in August, and I'm measuring four months of growth on the Ivan's Beauty mountain ash. It grew 48 inches, or a foot a month! In the late summer it grew another three inches, and in the photos of the hut roof you can see its red leaves poking over the top. It doubled its height in one growing season, and if I were an economist I would project that exponential growth into the future, and expect it to reach the moon in 2047.
The other mountain ash hybrid, Ivan's Belle, made some sprouts from the rootstock instead of growing from the top. I let them go to strengthen the root for winter, but I'll cut them off before spring. The sweet pit apricot, also in its first year, made two separate bursts of branch growth and more than doubled its trunk thickness. And as usual the blue elder, with its roots in a stream under rotting wood, grew into a monster. This year it made two bunches of bland berries that ripened in October. I let the birds have most of them. The aronias all increased their berries, especially the Raintree Select. And the most productive single plant, still in its first year, was the Orus 8 gooseberry-currant hybrid, which made about a dozen large skipskin berries like concord grapes.
The serviceberries put on good growth this year but haven't flowered yet. The cherries, blueberries, and apples are merely surviving, except the Ashmead's, which must have found water with its taproot because it's taken off. The Tomcot apricot languished and the Harken peach weakened. I expect it to die this winter. I put leaf mulch around everything, but last night it got to -15F (-26C), and anything weak or not fully dormant will likely be snuffed. The plants are now selecting themselves for this erratic climate.
Because I'm focusing on building, I don't expect to put anything in the ground in the spring. But I did prepare four plots low on the west hill, and threw in a bunch of sea buckthorn seeds from Richters. I need a male to wind-pollinate the cloned females, and with four plants, I have a 15/16 chance to get at least one. In general, I want to shift away from transplants and toward seeds, although I do have plans for more transplants in 2012.