Landblog Main
previous archive
Perennial Root Vegetables -- 22 January 2010 -- When I was in Portland, I was invited to an exotic perennial root vegetable tasting, including scorzonera, skirret, oca, jerusalem artichoke, dahlia, yacon, daylily, mashua, and wapato. To me, the wapato tasted like dirty socks, but I loved the raw mashua, because of its spiciness, and the yacon, which is sweet and crunchy like an apple. Neither of those grow in my climate, but my other two favorites do: Jerusalem artichokes, aka sunchokes, are not great, but good enough that everyone should grow them because they're so easy and productive. And the big winner was skirret. The root looks like a bunch of pencil-thin white carrots, and tastes like a carrot but sweeter, and when it's cooked it gets soft like a potato. Eric Toensmeier's Perennial Vegetables says that you should not buy seeds, but living plants of a variety that does not have a woody center. Let me know if you find a source!
The Year Without a Winter -- 6 February 2010 -- In December of 2008, Spokane got more than five feet of snow. This year I don't think we got five inches. We're usually buried in snow for all of January, and this year the streets are dry and I've been riding my bike in the sun, sometimes barefoot.
The good news is, I might be able to start working on my land a couple months early. I'll drive up in a few days and see if I can get in, and if so, I can do some work and hauling. [Update: still too muddy for 2wd, although it should be easily drivable in April.]
The bad news is, unless we get an unusually rainy summer, eastern Washington will have the worst drought in the USA, there will be huge fires, and the spring might go dry. It has run through some very dry summers, but has not yet been tested after a dry winter. I'll have to get some food grade 50 gallon barrels and spend a day filling them.
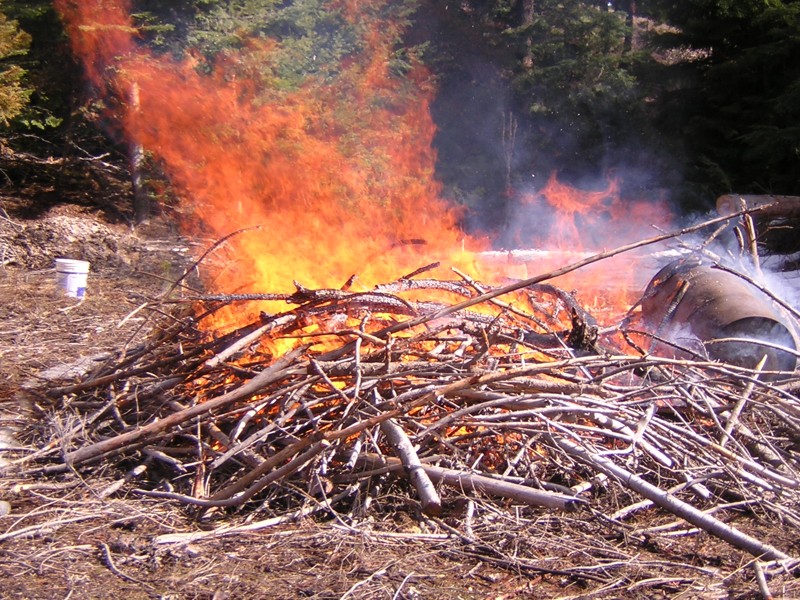 Slash Burn 2010 -- 25 February 2010 -- If you've never set fire to a pile of dry branches the size of a large car, I recommend it. This is the scariest picture I took, and it still doesn't look like much, and it's nothing compared to a forest fire, but even a fire this size is scary! It's surprisingly loud, hot, and violent. This is mostly the limbs of the two western hemlocks that fell a couple years ago. You can see the pile on the right side of this photo from last June. I covered it with a tarp over the winter to keep it dry, and stuck in a barrel that needed to be burned clean. Two days ago I drove up early, walked in the last mile, and lit it up with a rag soaked in alcohol. That fire went out! So I lit another fire, and then another. You really have to build a small campfire inside the pile. But then at a certain point, it takes off fast.
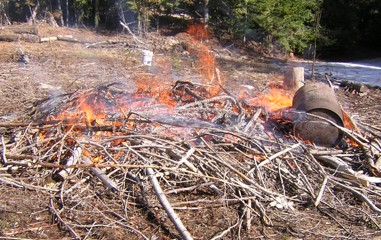 If you're doing this in cold, damp weather, as you should, the wood at the edges of the pile will not burn. Maybe 20 minutes after the above photo, you can see here that the fire has gone down and has just eaten out the center of the pile. About ten minutes after this, it finally cooled down enough that I could get close enough to throw most of the edge wood into the center with a shovel. In this photo and the above, you can see a five gallon bucket full of water, one of three that I set around the perimeter in case the fire spread, which turned out to be completely unnecessary this early in the year.
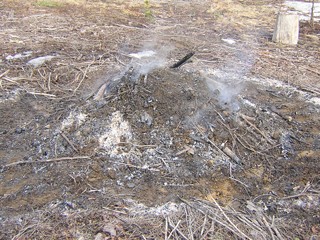 When all the wood was burned, turned to charcoal, or on fire, I got the idea to bury what was left so that more of it would turn into charcoal instead of burning. So I just went around the edges with a shovel and threw all the coals and the dirt under them into a pile in the center. I figure I'll pick out all the charcoal and store it for terra preta, and use this same spot every year for slash burning. Between that and the five or six piles that I've covered with leaves to speed decomposition, I think I'm gradually gaining on the dead wood.
 Chicks -- 14 March 2010 -- It will be a few years before I'm in a position to get chickens, but these are the chicks that my sister and brother-in-law just got in Seattle. They're about two weeks old, all hens. The one stretching on the left is a Rhode Island Red, below it is a Speckled Sussex, the black one is a Barred Rock, and on the right is a Buff Orpington. By watching them (we call it Chick TV) I'm already learning their personalities. The Orpington is just very mellow; the Rock has emerged as the alpha and the tough one; the Sussex is the smallest and wildest; and the Red is not too bright. Today my sister gave them two feedings of earthworms from the back yard, and the Red did not get a single one. She barely recognized the worms as food, pecked at them a bit, and then chased around the other chicks. The Rock chased around the other chicks and took their worms, while the Sussex immediately recognized the worms as food, grabbed them and ran away fast.
Right now they're all under heat lamps. In a few weeks they'll go out in the back yard in an Omlet Eglu Classic coop. I'm showing my sister how to make sprouted wheat, which is much better for them than unsprouted. She says the best book is City Chicks, and Raising Chickens for Dummies is also very good.
Court Pendu Plat -- 27 March 2010 -- A couple weeks ago my sister took me to a Seattle garden event. I learned some stuff about mason bees (put the house in first morning light), about hardy kiwis (too much work)*, about grafting (the best tape is self-bonding electrical tape), and best of all, there was a build your own fruit tree area, where people donated cuttings, a nursery brought in rootstocks, and grafters were there to put them together. And one of the apple cuttings was one I've been looking for for years, Court Pendu Plat. That link goes to a description with some comments, and here's a five minute Court Pendu Plat video. It's chewy, dry, and not very productive, but it might be 1800 years old, it has great flavor, and it fruits in years when other trees fail. I got it on Antonovka rootstock, and I figure I'll grow it on the back porch in Spokane for a year and plant it out in 2011.
*Later note on kiwis: The woman who gave the talk thought they were wonderful, but I noticed that they require a trellis, very good soil, and they're hard to pollinate. She suggested hand pollination by brushing a male flower over the female flowers.
How to attach a wall tent to a platform -- 15 April 2010 -- Last summer I made a tent platform, and that link goes to the post about it. I decided to make the platform exactly fit the inside of the tent, so that the legs could sit up on it and the walls could drop down over the edges. But this spring, before I could put the tent on the platform and sleep in it, I had to figure out how to get it to stay on. It's not just that the wind might blow it off, but that the bottoms of the six legs need to be held in with some tension to make the walls fit and allow the zipper to close. My first idea was to carve holes in the platform, an inch diameter and a half inch deep. But I was afraid that wouldn't be deep enough, and any deeper could break the wood, which is only an inch and a half thick. My next idea was to cut a board into squares, drill one inch holes all the way through, and screw them to the platform. Then Charlie had an idea that was easier and more sturdy, but also more expensive. He suggested using a "flange".
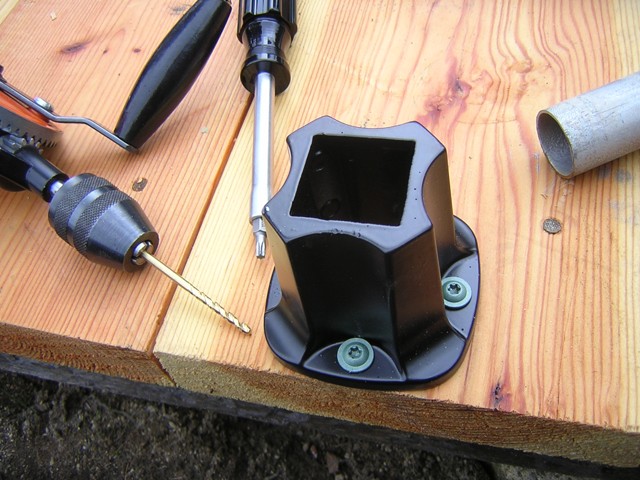 I said "what's a flange?" I thought it was a guitar effect. It turns out it's a piece of hardware shaped like a flat donut, with little holes around the edges to screw the flange to something, and a big hole in the middle to stick something through. In a web search for "floor flange", I found something a bit different. Here it is screwed to the platform. The model number is FF125, it's designed for iron railings, and it was perfect for this project. I got six from Ace Hardware for $37 after shipping, and picked up 24 screws for another $5.
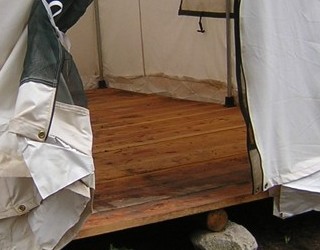 And here's the tent on the platform. I put it up with help from Ben and Ian, which was a lot easier than putting it up alone. But it's still not done. The next challenge is to keep mosquitoes from coming in through the gap between the platform and the tent. I'm thinking 45 feet of industrial strength velcro tape.
[Update: Readers made many suggestions for sealing mosquitoes out, of which the most popular was using wood and screws to batten the plastic sod cloth to the platform edges. It turned out that the two long sides of the platform are uneven because of varying wood lengths, and I decided that no technique is worth the trouble. See the July 21 post for my eventual solution.]
 Foundation -- 25 April 2010 -- My policy is to not write about any project until after I've done it, but it's becoming obvious that the mysterious stone circle I made last fall (in this post) is the foundation for a structure. A week ago, I picked up eight 80 pound bags of concrete mix from Home Depot, and Ian and Jana came up to help me. Mixing concrete with a shovel is surprisingly easy if you do it a bag at a time -- and if you can lift 80 pounds. If not, the 60 pound bags are only a slightly worse value. I was afraid it would be so wet that I would have to fill the whole trench, which would have required a lot more of it. But we could keep it firm enough to just fill the cracks between the urbanite and get a couple inches on top.
 And here's what went on top: the concrete test cylinders that I picked up last August. This was how far eight bags got us. Yes, I rinsed the dirt off before putting the concrete on. Also, I covered all this up with wet leaves to keep it moist so it could cure better. And I'm going to have to throw in lava rock and dig a trench to carry off water that would otherwise fill the foundation and freeze next winter. To find out how much the frost under the foundation will damage the structure, is one of the things this structure was designed for.
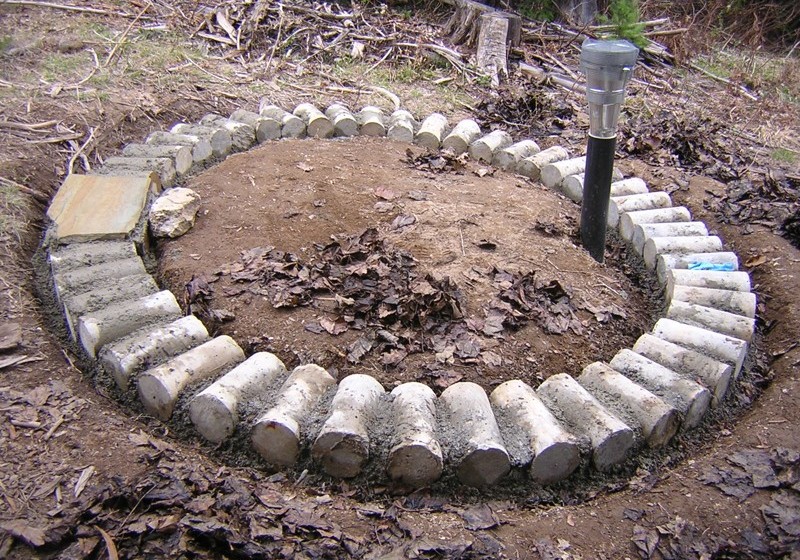 A few days later, I picked up Ian and six more bags and drove up to finish. We ended up using 45 of 50 cylinders, and that rock slab on the left was donated by Bob, and will go under the door. Here is a
detail of what we put under the door slab: a few more rocks with concrete around them. And that big rock to the right of the slab is holding in a piece of bark which is holding in some wet concrete. That blue thing on the right is the disposable glove I used to shape the concrete with my hand. Total cost, not counting the massive costs of owning a vehicle: around $55.
A few days later, I picked up Ian and six more bags and drove up to finish. We ended up using 45 of 50 cylinders, and that rock slab on the left was donated by Bob, and will go under the door. Here is a
detail of what we put under the door slab: a few more rocks with concrete around them. And that big rock to the right of the slab is holding in a piece of bark which is holding in some wet concrete. That blue thing on the right is the disposable glove I used to shape the concrete with my hand. Total cost, not counting the massive costs of owning a vehicle: around $55.