 Bees: water and drones -- 3 May 2013 --
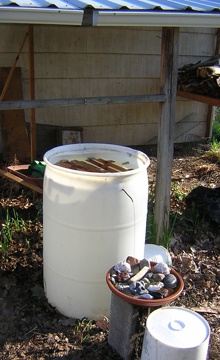
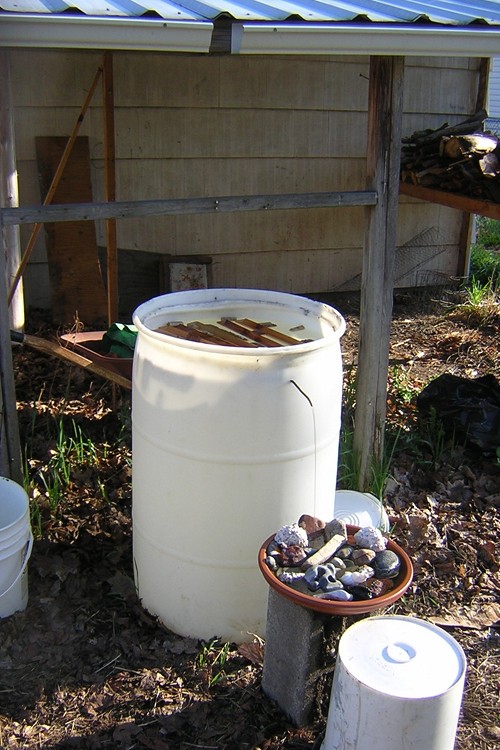
Here's a picture of the watering setup. From where I'm standing to take this, the hives are behind me and slightly to the right. You can see that the water from the garage awning drains into the barrel, which overflows into a dish with pretty rocks for the bees to stand on. Every morning I pour water into the barrel to refill the dish, but if I'm out of town they can still get it from the barrel, and hopefully not from the neighbor's hot tub! Floating in the barrel are some top bars that were too warped for the hive, and some wine corks cut in half.
There is one particular black rock that the bees love. It appears to be petrified wood. I think it's porous and soaks up the water so they can drink from the pores. So I went on eBay and bought some similar looking petrified wood, and also bought a box of raw pumice stone. The description says some of it floats on water, so I figure I'll put the floating stones in the barrel and the non-floating stones in the dish, and see how the bees like it.
Yesterday I did the second full hive inspection. I set up a video camera so I could take notes by talking instead of having to write stuff down while holding frames full of bees. But still, the novelty of holding frames full of bees, and the stress of trying not to squish them when I put the frames back, was distracting. I got caught up in trying to tell the difference between capped honey and capped brood. I had already researched this by looking at lots of pictures online, but every large comb was loaded with stuff that looked like capped brood, and I find it hard to believe they have such a huge brood nest in such a young hive, plus I think some of the caps were on comb that was built too recently for the bees to have capped brood already. So I forgot to look for the queen, and I forgot to examine the apparently empty cells for eggs and small open brood. The large open brood was hard to miss, and it was all in drone comb.
I first noticed the drone comb a week ago through the window, and compared to the other comb the cells are enormous! I tried to take a picture but it looked terrible because my eye is much better than a camera at separating the stuff behind the window from the reflections on the window. Looking more closely through the window, I could see the tiny eggs on the bottoms of the cells. These were the same cells where I saw open brood yesterday.
Here's my guess. The bees made lots of worker comb and had the queen fill it, and then they were like, that's enough workers for now, we want some drones, so they started building drone comb and the queen has been laying only drones for the last week or so. Drones are male bees that don't do anything but spread the hive's genetics by mating with queens from other hives. Every successful hive makes drones if the beekeeper lets them, and they are also made by hives that are about to die. Hopefully that's not the case here and the queen will go back to making workers. (Update: the next day through the window I saw eggs in worker brood comb.)
The first new workers should emerge from their cells in two or three days. They will become nurse bees, freeing more of the original bees to forage. Now that it's getting warmer and the bee population is about to grow, I drilled a third hole in the end of the hive, above the one they were using the most on the south side of the end. And guessing that they like the hole to slope downward on the way into the hive, I sloped it downward and they're already using it more than the one below it.
Also, during the inspection I moved the follower board and added three new bars, two near the front of the hive and one at the end. The idea is that if you keep adding space for the bees to fill, especially in the brood nest, they won't swarm. Here's a great reddit comment about
how bees swarm. This would be a bad year for it. We got less than an inch of rain in April and there is no rain in the forecast. If the summer is too dry, a new hive will have trouble finding food.
I figure a hive that came through winter in good shape will be growing so much that it's likely to swarm in the next ten days, so I've placed two bait hives, one under the garage awning in back and one in the hawthorn tree in front. I found a nice place on a big horizontal branch wedged between two vertical branches and held in with a rubber strap. It's only seven feet up, not the recommended 10-15 feet, but there's no way I'm lifting a box of bees from 15 feet up a ladder.
Bees: days 4-10 -- 24 April 2013 --
I'm going to call the installation day zero. That feeding failed, but I successfully fed them on the mornings of days 1-4 and the afternoon of day 5. That was Thursday. They didn't really get settled until Monday or Tuesday, and on Thursday already I could see three new white combs against the observation window. Thinking that space would soon be a bigger issue than warmth, I took off the lid and moved three top bars over to the bee side of the follower board, and fed them to make up for the stress. I fed them one more time on the morning of day 8, because it was going to be a cool rainy day followed by a cold night.
My feeling on feeding is that if the weather is good and flowers are blooming, they should be out foraging. I fed them at the beginning because it was cold and they were stressed, but now that it's warming up, they have comb, and they know where the flowers are, I doubt I will feed them again. I weighed the honey the last time I poured it into the tray, and it was 8-10 ounces. So it took a little more than three pounds of honey to get a package established in colder than average weather. Also I didn't find any evidence of bees drowning in my improvised tray. I'm wondering if they only drown in medium-thickness syrup, because if it's watery they can climb out and if it's thick they don't sink. The honey was even partly crystallized and they still ate it all.
Yesterday I finally opened the hive to pull out and look at the combs. They say not to bother a new package for the first ten days, but they also say that top bar hives have to be checked as soon as they start building comb to make sure they're straight. I don't know how to reconcile this, since by day ten they had already built six combs. But they weren't as big as they looked from the observation window because they were against the south side of the hive and didn't go more than halfway back. And luckily they're all straight, so far...
Going from the entrance end of the hive toward the back, I was worried that I wasn't seeing any eggs or brood, just honey/pollen, capped honey (or capped brood??) and empty cells. Then I found some open brood, big enough to be capped in a day or two, meaning the first eggs were laid on day 2 or 3. And at last I found the queen, so my direct release gamble paid off! I gave them three more bars, including one in the middle of the nest, so I shouldn't have to bother them again for a while. With above normal temperatures and lots of plants in bloom, the next ten days will be great.
I love the red LED flashlight. Through the window I can shine it around to see lots of stuff I otherwise couldn't see, including what they're doing on the bottom board. Also I've been watching them through an 8x25 monocular. From the kitchen I can see how active they are. They start foraging at around 50F, and above 55 they go crazy. Maybe they're fooled into foraging at colder temperatures because the hive is in a warm microclimate. When they're really busy I like to lie on the ground ten feet from the entrance, the closest point I can focus the monocular, and watch them going in and out. Almost all of the bees coming in have pollen, and I wonder if this is one reason that stimulative feeding (according to experienced beekeepers) doesn't work: because if they can get sugar at the hive, they don't have to visit flowers, and they don't get as much pollen.
At night I slide the lid down to one hole and plug both end holes with corks. They use one end hole a lot more than the other, so in the morning I unplug that one and open the top to three holes, and when it gets warmer I give them both end holes and five on top. I figure I'll drill them another end hole when their population grows.
Bees: the first 72 hours -- 16 April 2013 --
So on Saturday morning I drove out to Miller's Homestead on the west prairie to pick up my bees. They had one room set up as an office where they looked for my name and gave me a card, then I took the card to a dark garage where they gave me a box of bees. The guy asked, "Do you have a car?" and I said I have a truck, but later I realized he was talking about the bee variety, Carniolan. They're a little darker than the more common Italian bees, and they tolerate cold better.
Here's another guy's blog post,
Installing Package Bees, where you can see photos of a package exactly like mine, but my installation was different. First I leveled the hive, which is important if you're not using foundation. Then I set the follower board to give the bees about twelve bars of space, and stuffed dry leaves into the unused space to keep it insulated. Then I put on my jacket and veil and gloves, took off the bars, set some of my own food on the bottom board, pried the industrial food can out, pulled out the queen cage and looked at the bees around it.
Most people will tell you to keep the queen in the cage, inside the hive, with a tiny marshmallow plugging the entrance, so that by the time the bees eat their way through, they're used to the queen and won't try to kill her. Michael Bush recommends releasing her right away, because the bees will be happy to have a queen and will only kill her if another queen already got mixed in with the workers by accident. My sister advised me to delay the release, because she's seen bees angrily clustering around the queen cage. So I looked at the bees and they didn't look angry at all, and I decided to direct release.
First, and this is the scary part, I shook the bees to the bottom of the package, and then shook them through the hole into the hive. This took a bunch of shaking, and some of the bees stubbornly stayed in the package, so I set it aside and put the bars on top. Then I took the cork plug out of the queen cage, held the hole against one of the end holes in the hive, and she walked right in. For me the advantage of direct release is that I don't have to get in later to remove the cage, and the cage will not mess up the foundationless combs. If the bees had looked hostile to the queen, I had already drilled some tiny holes through one of the top bars so I could attach the cage with wires.
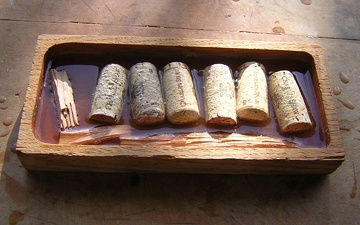
You can't put the queen on the bottom because the bees want to cluster on top. But you can put food on the bottom. There are a lot of feeding systems out there, and I'm trying a new one. I don't know what this wooden thingy was made for, and ideally it would be a little longer, but it has the right width to fit on the bottom board, and a good depth. The corks are for the bees to stand on and not drown, and you can't tell from this but they're cut in half.
Most people say that it's better to feed sugar syrup than honey from another hive, because it can carry disease. My philosophy is that disease mostly just finishes off something that's already weak and stressed, and it's better to keep the bees strong and happy. So I'm feeding them some raw local honey I bought a few years ago. My first thought was to also mix in some bee pollen, which I first soaked in water. So when I dumped them in, they landed in a honey-pollen soup in the tray. Sunday morning I opened the bottom, and it had several hundred dead bees, including dead or drowned bees in the food tray, and they hadn't eaten much.
I'm thinking the pollen was a mistake. At this stage they don't need it anyway because they only use it to build more bees, and they don't have comb yet to lay eggs. So I brushed off the bottom board, took the tray inside and cleaned it, and put it back in with just honey. The hinged bottom board is the best decision I made in building the hives, because I can clean it and stick food in without messing with the top bars or letting too much heat out.
Also, late Saturday afternoon, some of the bees were still clustering in the package box instead of migrating to the hive, so I shook it out on the ground and put a cardboard tent over the heap of bees for shelter. About half of them eventually got in the hive and the other half were dead on the ground Sunday morning.
Sunday afternoon it warmed up and the bees were flying around, but I didn't see them visit any flowers or their water source (rain barrel with floats and the overflow going to a clay dish with rocks). Monday morning I was busy, and didn't want to get in the hive in the afternoon because they looked too active. Then Monday night the temperature dropped to 25F!
On Tuesday morning I opened the bottom again wondering if I'd find hundreds of dead bees, but there were only five or six, and the honey tray was licked dry! I took it inside and refilled it and added a few extra bits of wood that you see in the photo, and stuck it back in the hive.
The next few days are going to be sunny but cold and dry, so I plan to keep feeding them as long as they keep eating, until it warms up and I see them out foraging. Also I found tiny wax flakes on the bottom board, so they're already building comb, but I'm not going to mess with the bars to look at it, and I can't see anything through the observation window, because during the day it's covered with bees. They can't see red light, so I've ordered a red LED flashlight to look through the window at night.
Mini/Bait Hives -- 29 March 2013 --
When I finished my big hives, I thought I might not find a local supplier of bees, and would have to catch a swarm with a bait hive. The idea is, in late spring a healthy hive will reproduce by sending out the old queen with a bunch of workers to find a new home, so if you build a perfect bee home, a swarm might move in, and then you can transfer the bees to a regular hive. The essential document is
Bait Hives for Honey Bees (pdf) by Thomas Seeley. Studies show that the ideal size is around 1.4 cubic feet, and bees like old wood, so I removed a sheet of 3/4 inch plywood that had been serving as a ramp outside my back door, did some sketching and math, and figured out how to most efficiently cut it up.
My original plan was to make every piece of wood 13 by 16 inches. Plywood is 48 inches wide, so you can make three 16 inch pieces with only two cuts and nothing left over. I sawed a bunch of 13x48 sections, and since they were all bowed from being a ramp out in the rain, I set them face down with a weight in the middle for a few weeks to bend them back, and then cut them down to 13x16. But by this time I was thinking, instead of a plywood lid, I should just use top bars, and then I can give the bees a few days to start building comb and just move the bars over to the main hive. Also I was reading more and learning about the many uses of a mini-hive. I went back to the sketchbook and altered the plans to so the top would exactly fit ten bars. The bars I use are 1 3/8 inches, or 1.375, and ten would be 13.75. There was enough plywood to cut one more piece, 13.75 by 48, which would make the bottoms of three hives.
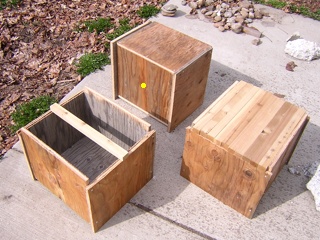
Here are three finished hives, arranged so you can see them from three angles. The yellow dot marks the hive bottom, 13.75 by 16. Then I screwed on the two flush sides, then the end pieces. They're sticking out because it was easiest to just cut everything (except the bottoms) 13x16. And now they're easier to grip and will stay ventilated on the bottom. None of the wood was perfectly flat, so I had to do some bending to make everything fit, and I fit the bars in each hive before attaching the end pieces to make sure the top openings were square and the right size. Notice that the side pieces are attached on the sides of the bottom piece, not on top of it, to maintain the right internal dimensions. The final internal volume is 13.75 x 16 x 11.25 = 2475 cubic inches = 1.43 cubic feet. Also notice that I put all the weathered grey wood facing inside, and later I coated the insides with water with a few drops of lemongrass oil. I haven't made the entrances yet, but I think instead of one large hole with nails or wires to keep birds out, I'll drill three or four 3/4 inch holes, same as in the main hives.
They recommend putting bait hives up in trees, but that's a lot of work, and since I found a local source of bees I'm no longer desperate. I figure I'll just put them up on a shelf under my garage awning, and see if I know anyone with a good place to stick one.
 Beekeeping -- 26 February 2013 --
 I've been working on this project for months, and just added a new project page to the side bar on the left about building two
top bar hives.
I'm still not sure where the bees will come from, and in the best case it will be another 18 months before I start harvesting honey. I'm not even a big honey eater. The appeal of this project is to form an alliance with an extremely complex and nearly wild animal.
Rendering Lard -- 24 January 2013 -- Last summer Alexa and I split a whole pig from a local farmer, and I put the fat scraps in a big box in the bottom of my freezer, planning to eventually render them into lard. This winter when the nights got really cold, I took the opportunity to move all the stuff from the freezer to the back porch and defrost the freezer. I forgot the fat and left it overnight on the floor of the basement, so I figured it was time to finally cook it down. Winter is the best time for any big cooking project because heating up the house is a good thing.
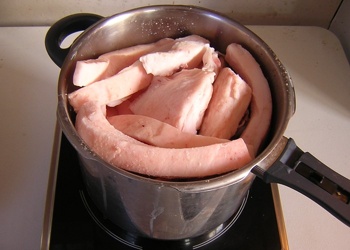
This photo shows only a fraction of the job -- I did five or six pots that size. The procedure is simple: put the fat in a pot at a low temperature for hours. You're doing two things: extracting the oil from the solid stuff in the fatty tissue, and driving off all the water. The second thing is exactly like making
clarified butter. At the beginning of each batch I used the lowest setting on my induction burner to avoid burning the stuff on the bottom. Gradually the level of liquid rose, and I could get away with raising the heat a little to drive off the water. At this point the pot would be about half full of dark yellow bubbling liquid and shrunken partially cooked fat scraps. I kept it mostly uncovered, but I would partially cover it to see how much water was left by how much the bottom of the lid was steaming up. At some point I turned the burner back down to the lowest setting, and the fat scraps gradually got fully cooked. I knew they were done when I could squeeze them against the side of the pot with a wooden spoon and they would go almost flat.
Then I picked out most of the scraps, and poured the fat through a gold coffee filter into a big jar. The first two batches of lard were yellowish and super-hard like wax. The later batches were white and much softer, with a lower melting temperature. I did some research and found out that a pig has different kinds of fat in different places. The hard lard is from around the kidneys, and it is prized in baking, because the key to flaky pastries is for the fat to not melt until it gets cooked. The soft lard is mostly from the pig's back, and you can use it for frying. I think that's back fat in the photo above.
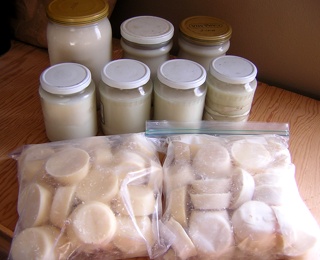
This is a whole pig worth of lard. The hard stuff is in front, made into "lard pucks" with a cupcake pan. First I poured water in the pan to see exactly how much was a quarter of a cup. Then I poured lard in to that level, let it cool, froze it, banged it out on the counter, and put it in the bags. This is five pans, or sixty pucks. A quarter cup of lard is almost exactly 50 grams, and two pucks make a nice pie crust. Now I can use these directly for pies without having to measure. I also tried putting the soft lard in the cupcake pan, but even at freezer temperature it's too soft to cleanly come out of the pan, and too soft to store without a mess. So all the soft stuff is in the jars. That big jar is a half gallon, and the total volume is almost three gallons, or around 11 liters.
The worst part of this project was the cleaning. Animal fat can eat up a tremendous amount of soap, and the hard stuff needs super-hot water. Whenever possible I would clean first with a paper towel, and then finish with hot soapy water.
By the way, I saved all the cleanest cooked fat scraps and salted them and put them in a bag in the fridge. These are called pork rinds or cracklings, and I don't know if I'll be hungry enough to eat them. I think pig fat is good for me, but you can do your own research, or better yet, experiment on yourself by eating different things and noticing how you feel. Here's the
Weston Price fats page.
 TV Antenna -- 14 January 2013 --
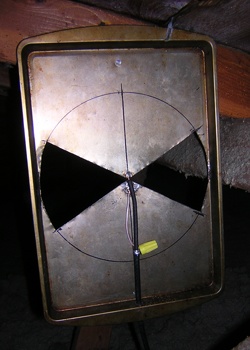
 Back in October I bought an HDTV, and over the weekend I made this antenna and mounted it in the attic. My design is based on this video,
The best DIY Antenna for HDTV, which I picked over many other designs because it looked easy and I already had all the parts... almost. I had coaxial cable, soldering equipment, and tinsnips to cut the pattern, but I didn't have a round biscuit tin, so I substituted a small cookie sheet that I got for a dollar from the dollar store. The video also says to make a little bracket for the cable, which I skipped.
The big challenge, not mentioned in the video, was soldering the outside wires from the cable onto the pan. Apparently they were coated with some kind of oil that prevented the solder from sticking. Yes, I was using leaded solder, and plenty of flux. I also tried cleaning the wires with a soapy paper towel, sanding them, burning the oil off with the soldering iron, and burning the oil off with a blowtorch, which also burned up the wires. I was about to try unbraiding two inches of wire and boiling it in a pot of super-soapy water, until Troy suggested a work-around: I used a wire nut to connect the cable wires to some copper speaker wire, which was then easy to solder to the pan. Then, rather than strip the foil off the insulation around the center wire, I put heat shrink wrap around it to get it up to where it connected to the top of the pan.
I don't know if a round biscuit pan would work better, but this thing works fine. I'm getting all the local digital broadcasts with clear pictures. After testing it in the window, I used a half inch bit to drill a hole at the edge of the ceiling, and happened to exactly hit a 2x6 in the attic, deeper than the bit was long. So I put on a head flashlight and dust mask and climbed up in the attic, and Troy and I tapped on both sides of the ceiling until I found the right board. I sawed the corner off to get to the hole, fed the cable down, drilled a little hole in the pan and nailed it to a roof beam.
Archives:
September - October 2004
November - December 2004
January - March 2005
March - April 2005
May - July 2005
August 2005
September - October 2005
January - April 2006
May - June 2006
August 2006
September - November 2006
April - May 2007
June - September 2007
April - June 2008
July - November 2008
January - April 2009
May - June 2009
July - August 2009
September - November 2009
January - April 2010
May - July 2010
August - October 2010
October - November 2010
May - June 2011
August - December 2011
April - September 2012

 Bees: water and drones -- 3 May 2013 --
Here's a picture of the watering setup. From where I'm standing to take this, the hives are behind me and slightly to the right. You can see that the water from the garage awning drains into the barrel, which overflows into a dish with pretty rocks for the bees to stand on. Every morning I pour water into the barrel to refill the dish, but if I'm out of town they can still get it from the barrel, and hopefully not from the neighbor's hot tub! Floating in the barrel are some top bars that were too warped for the hive, and some wine corks cut in half.
Bees: water and drones -- 3 May 2013 --
Here's a picture of the watering setup. From where I'm standing to take this, the hives are behind me and slightly to the right. You can see that the water from the garage awning drains into the barrel, which overflows into a dish with pretty rocks for the bees to stand on. Every morning I pour water into the barrel to refill the dish, but if I'm out of town they can still get it from the barrel, and hopefully not from the neighbor's hot tub! Floating in the barrel are some top bars that were too warped for the hive, and some wine corks cut in half.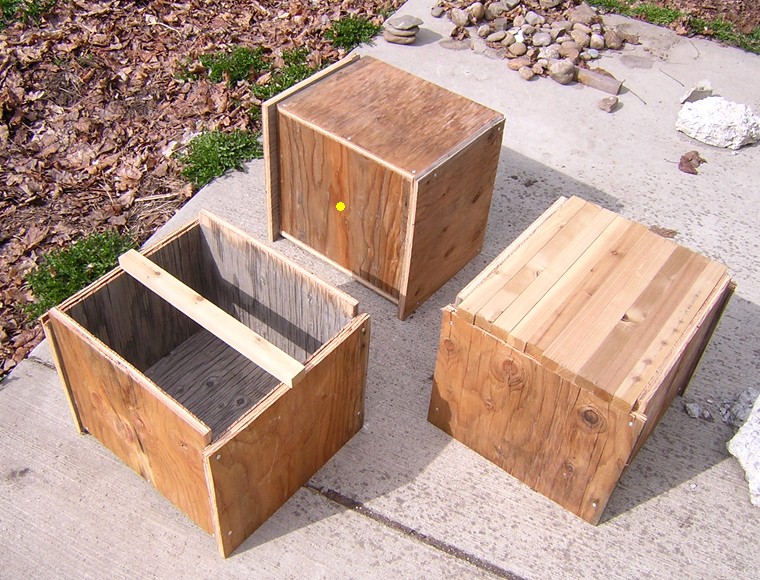 Here are three finished hives, arranged so you can see them from three angles. The yellow dot marks the hive bottom, 13.75 by 16. Then I screwed on the two flush sides, then the end pieces. They're sticking out because it was easiest to just cut everything (except the bottoms) 13x16. And now they're easier to grip and will stay ventilated on the bottom. None of the wood was perfectly flat, so I had to do some bending to make everything fit, and I fit the bars in each hive before attaching the end pieces to make sure the top openings were square and the right size. Notice that the side pieces are attached on the sides of the bottom piece, not on top of it, to maintain the right internal dimensions. The final internal volume is 13.75 x 16 x 11.25 = 2475 cubic inches = 1.43 cubic feet. Also notice that I put all the weathered grey wood facing inside, and later I coated the insides with water with a few drops of lemongrass oil. I haven't made the entrances yet, but I think instead of one large hole with nails or wires to keep birds out, I'll drill three or four 3/4 inch holes, same as in the main hives.
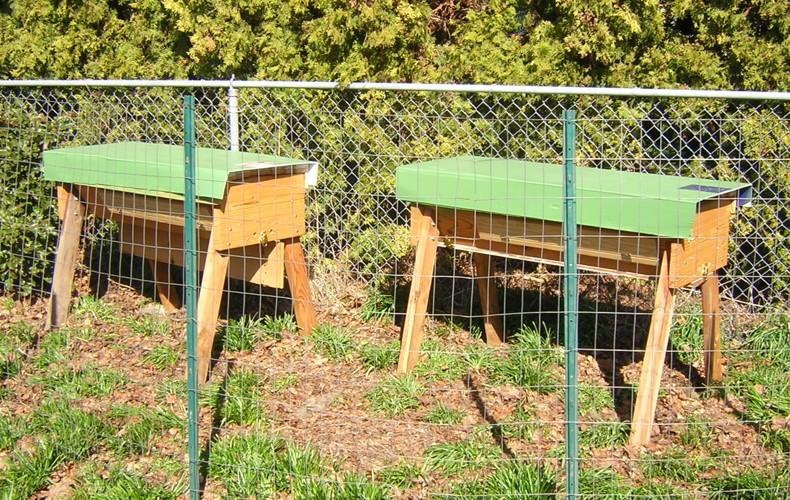 Beekeeping -- 26 February 2013 -- I've been working on this project for months, and just added a new project page to the side bar on the left about building two top bar hives.
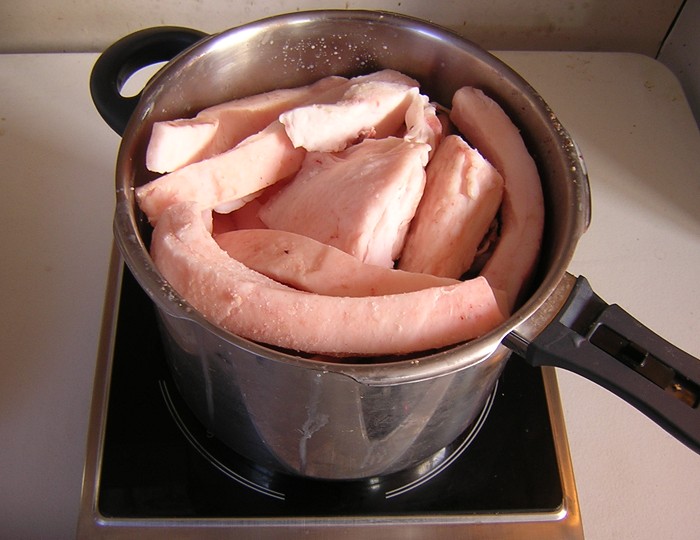 This photo shows only a fraction of the job -- I did five or six pots that size. The procedure is simple: put the fat in a pot at a low temperature for hours. You're doing two things: extracting the oil from the solid stuff in the fatty tissue, and driving off all the water. The second thing is exactly like making clarified butter. At the beginning of each batch I used the lowest setting on my induction burner to avoid burning the stuff on the bottom. Gradually the level of liquid rose, and I could get away with raising the heat a little to drive off the water. At this point the pot would be about half full of dark yellow bubbling liquid and shrunken partially cooked fat scraps. I kept it mostly uncovered, but I would partially cover it to see how much water was left by how much the bottom of the lid was steaming up. At some point I turned the burner back down to the lowest setting, and the fat scraps gradually got fully cooked. I knew they were done when I could squeeze them against the side of the pot with a wooden spoon and they would go almost flat.
 This is a whole pig worth of lard. The hard stuff is in front, made into "lard pucks" with a cupcake pan. First I poured water in the pan to see exactly how much was a quarter of a cup. Then I poured lard in to that level, let it cool, froze it, banged it out on the counter, and put it in the bags. This is five pans, or sixty pucks. A quarter cup of lard is almost exactly 50 grams, and two pucks make a nice pie crust. Now I can use these directly for pies without having to measure. I also tried putting the soft lard in the cupcake pan, but even at freezer temperature it's too soft to cleanly come out of the pan, and too soft to store without a mess. So all the soft stuff is in the jars. That big jar is a half gallon, and the total volume is almost three gallons, or around 11 liters.
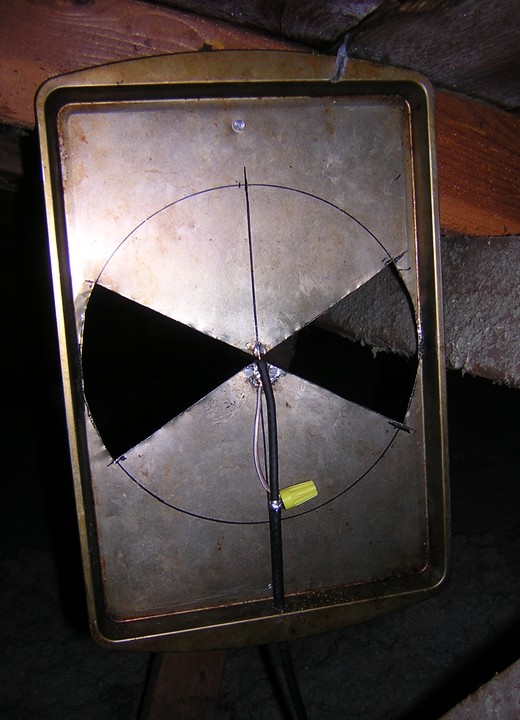 TV Antenna -- 14 January 2013 -- Back in October I bought an HDTV, and over the weekend I made this antenna and mounted it in the attic. My design is based on this video, The best DIY Antenna for HDTV, which I picked over many other designs because it looked easy and I already had all the parts... almost. I had coaxial cable, soldering equipment, and tinsnips to cut the pattern, but I didn't have a round biscuit tin, so I substituted a small cookie sheet that I got for a dollar from the dollar store. The video also says to make a little bracket for the cable, which I skipped.