Mini/Bait Hives -- 29 March 2013 --
When I finished my big hives, I thought I might not find a local supplier of bees, and would have to catch a swarm with a bait hive. The idea is, in late spring a healthy hive will reproduce by sending out the old queen with a bunch of workers to find a new home, so if you build a perfect bee home, a swarm might move in, and then you can transfer the bees to a regular hive. The essential document is
Bait Hives for Honey Bees (pdf) by Thomas Seeley. Studies show that the ideal size is around 1.4 cubic feet, and bees like old wood, so I removed a sheet of 3/4 inch plywood that had been serving as a ramp outside my back door, did some sketching and math, and figured out how to most efficiently cut it up.
My original plan was to make every piece of wood 13 by 16 inches. Plywood is 48 inches wide, so you can make three 16 inch pieces with only two cuts and nothing left over. I sawed a bunch of 13x48 sections, and since they were all bowed from being a ramp out in the rain, I set them face down with a weight in the middle for a few weeks to bend them back, and then cut them down to 13x16. But by this time I was thinking, instead of a plywood lid, I should just use top bars, and then I can give the bees a few days to start building comb and just move the bars over to the main hive. Also I was reading more and learning about the many uses of a mini-hive. I went back to the sketchbook and altered the plans to so the top would exactly fit ten bars. The bars I use are 1 3/8 inches, or 1.375, and ten would be 13.75. There was enough plywood to cut one more piece, 13.75 by 48, which would make the bottoms of three hives.
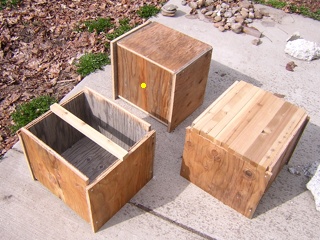
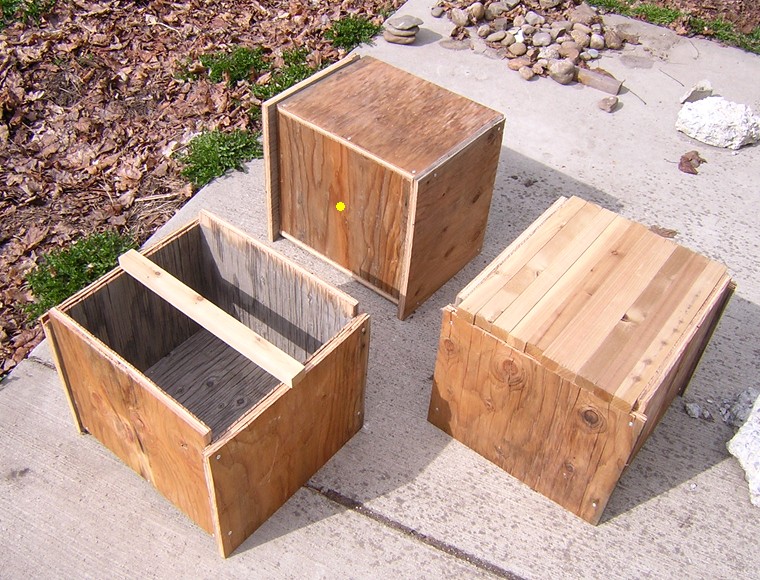
Here are three finished hives, arranged so you can see them from three angles. The yellow dot marks the hive bottom, 13.75 by 16. Then I screwed on the two flush sides, then the end pieces. They're sticking out because it was easiest to just cut everything (except the bottoms) 13x16. And now they're easier to grip and will stay ventilated on the bottom. None of the wood was perfectly flat, so I had to do some bending to make everything fit, and I fit the bars in each hive before attaching the end pieces to make sure the top openings were square and the right size. Notice that the side pieces are attached on the sides of the bottom piece, not on top of it, to maintain the right internal dimensions. The final internal volume is 13.75 x 16 x 11.25 = 2475 cubic inches = 1.43 cubic feet. Also notice that I put all the weathered grey wood facing inside, and later I coated the insides with water with a few drops of lemongrass oil. I haven't made the entrances yet, but I think instead of one large hole with nails or wires to keep birds out, I'll drill three or four 3/4 inch holes, same as in the main hives.
They recommend putting bait hives up in trees, but that's a lot of work, and since I found a local source of bees I'm no longer desperate. I figure I'll just put them up on a shelf under my garage awning, and see if I know anyone with a good place to stick one.
 Beekeeping -- 26 February 2013 --
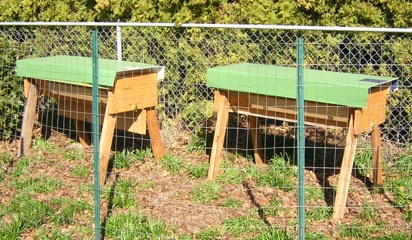
 I've been working on this project for months, and just added a new project page to the side bar on the left about building two
top bar hives.
I'm still not sure where the bees will come from, and in the best case it will be another 18 months before I start harvesting honey. I'm not even a big honey eater. The appeal of this project is to form an alliance with an extremely complex and nearly wild animal.
Rendering Lard -- 24 January 2013 -- Last summer Alexa and I split a whole pig from a local farmer, and I put the fat scraps in a big box in the bottom of my freezer, planning to eventually render them into lard. This winter when the nights got really cold, I took the opportunity to move all the stuff from the freezer to the back porch and defrost the freezer. I forgot the fat and left it overnight on the floor of the basement, so I figured it was time to finally cook it down. Winter is the best time for any big cooking project because heating up the house is a good thing.
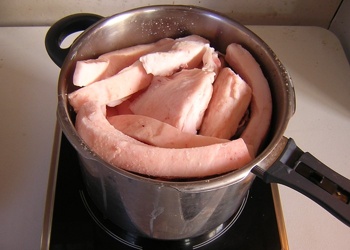
This photo shows only a fraction of the job -- I did five or six pots that size. The procedure is simple: put the fat in a pot at a low temperature for hours. You're doing two things: extracting the oil from the solid stuff in the fatty tissue, and driving off all the water. The second thing is exactly like making
clarified butter. At the beginning of each batch I used the lowest setting on my induction burner to avoid burning the stuff on the bottom. Gradually the level of liquid rose, and I could get away with raising the heat a little to drive off the water. At this point the pot would be about half full of dark yellow bubbling liquid and shrunken partially cooked fat scraps. I kept it mostly uncovered, but I would partially cover it to see how much water was left by how much the bottom of the lid was steaming up. At some point I turned the burner back down to the lowest setting, and the fat scraps gradually got fully cooked. I knew they were done when I could squeeze them against the side of the pot with a wooden spoon and they would go almost flat.
Then I picked out most of the scraps, and poured the fat through a gold coffee filter into a big jar. The first two batches of lard were yellowish and super-hard like wax. The later batches were white and much softer, with a lower melting temperature. I did some research and found out that a pig has different kinds of fat in different places. The hard lard is from around the kidneys, and it is prized in baking, because the key to flaky pastries is for the fat to not melt until it gets cooked. The soft lard is mostly from the pig's back, and you can use it for frying. I think that's back fat in the photo above.

This is a whole pig worth of lard. The hard stuff is in front, made into "lard pucks" with a cupcake pan. First I poured water in the pan to see exactly how much was a quarter of a cup. Then I poured lard in to that level, let it cool, froze it, banged it out on the counter, and put it in the bags. This is five pans, or sixty pucks. A quarter cup of lard is almost exactly 50 grams, and two pucks make a nice pie crust. Now I can use these directly for pies without having to measure. I also tried putting the soft lard in the cupcake pan, but even at freezer temperature it's too soft to cleanly come out of the pan, and too soft to store without a mess. So all the soft stuff is in the jars. That big jar is a half gallon, and the total volume is almost three gallons, or around 11 liters.
The worst part of this project was the cleaning. Animal fat can eat up a tremendous amount of soap, and the hard stuff needs super-hot water. Whenever possible I would clean first with a paper towel, and then finish with hot soapy water.
By the way, I saved all the cleanest cooked fat scraps and salted them and put them in a bag in the fridge. These are called pork rinds or cracklings, and I don't know if I'll be hungry enough to eat them. I think pig fat is good for me, but you can do your own research, or better yet, experiment on yourself by eating different things and noticing how you feel. Here's the
Weston Price fats page.
 TV Antenna -- 14 January 2013 --
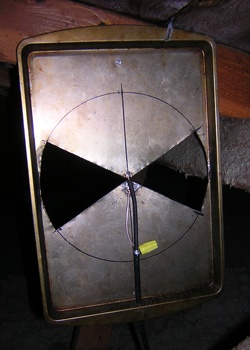
 Back in October I bought an HDTV, and over the weekend I made this antenna and mounted it in the attic. My design is based on this video,
The best DIY Antenna for HDTV, which I picked over many other designs because it looked easy and I already had all the parts... almost. I had coaxial cable, soldering equipment, and tinsnips to cut the pattern, but I didn't have a round biscuit tin, so I substituted a small cookie sheet that I got for a dollar from the dollar store. The video also says to make a little bracket for the cable, which I skipped.
The big challenge, not mentioned in the video, was soldering the outside wires from the cable onto the pan. Apparently they were coated with some kind of oil that prevented the solder from sticking. Yes, I was using leaded solder, and plenty of flux. I also tried cleaning the wires with a soapy paper towel, sanding them, burning the oil off with the soldering iron, and burning the oil off with a blowtorch, which also burned up the wires. I was about to try unbraiding two inches of wire and boiling it in a pot of super-soapy water, until Troy suggested a work-around: I used a wire nut to connect the cable wires to some copper speaker wire, which was then easy to solder to the pan. Then, rather than strip the foil off the insulation around the center wire, I put heat shrink wrap around it to get it up to where it connected to the top of the pan.
I don't know if a round biscuit pan would work better, but this thing works fine. I'm getting all the local digital broadcasts with clear pictures. After testing it in the window, I used a half inch bit to drill a hole at the edge of the ceiling, and happened to exactly hit a 2x6 in the attic, deeper than the bit was long. So I put on a head flashlight and dust mask and climbed up in the attic, and Troy and I tapped on both sides of the ceiling until I found the right board. I sawed the corner off to get to the hole, fed the cable down, drilled a little hole in the pan and nailed it to a roof beam.
Archives:
September - October 2004
November - December 2004
January - March 2005
March - April 2005
May - July 2005
August 2005
September - October 2005
January - April 2006
May - June 2006
August 2006
September - November 2006
April - May 2007
June - September 2007
April - June 2008
July - November 2008
January - April 2009
May - June 2009
July - August 2009
September - November 2009
January - April 2010
May - July 2010
August - October 2010
October - November 2010
May - June 2011
August - December 2011
April - September 2012

 Here are three finished hives, arranged so you can see them from three angles. The yellow dot marks the hive bottom, 13.75 by 16. Then I screwed on the two flush sides, then the end pieces. They're sticking out because it was easiest to just cut everything (except the bottoms) 13x16. And now they're easier to grip and will stay ventilated on the bottom. None of the wood was perfectly flat, so I had to do some bending to make everything fit, and I fit the bars in each hive before attaching the end pieces to make sure the top openings were square and the right size. Notice that the side pieces are attached on the sides of the bottom piece, not on top of it, to maintain the right internal dimensions. The final internal volume is 13.75 x 16 x 11.25 = 2475 cubic inches = 1.43 cubic feet. Also notice that I put all the weathered grey wood facing inside, and later I coated the insides with water with a few drops of lemongrass oil. I haven't made the entrances yet, but I think instead of one large hole with nails or wires to keep birds out, I'll drill three or four 3/4 inch holes, same as in the main hives.
 Beekeeping -- 26 February 2013 -- I've been working on this project for months, and just added a new project page to the side bar on the left about building two top bar hives.
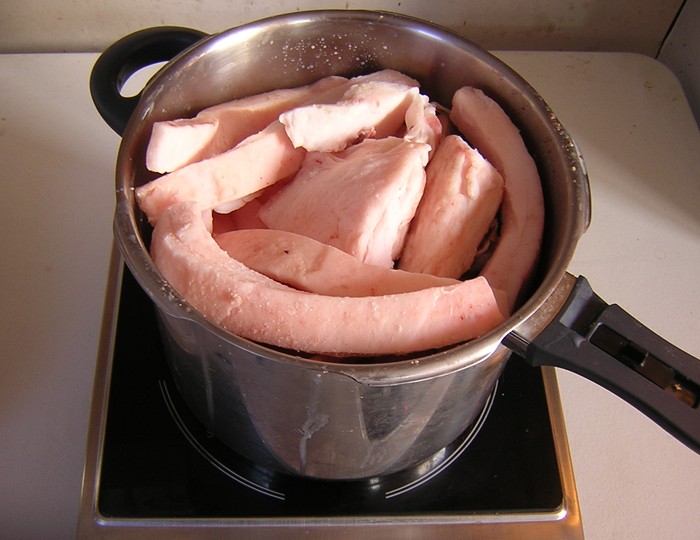 This photo shows only a fraction of the job -- I did five or six pots that size. The procedure is simple: put the fat in a pot at a low temperature for hours. You're doing two things: extracting the oil from the solid stuff in the fatty tissue, and driving off all the water. The second thing is exactly like making clarified butter. At the beginning of each batch I used the lowest setting on my induction burner to avoid burning the stuff on the bottom. Gradually the level of liquid rose, and I could get away with raising the heat a little to drive off the water. At this point the pot would be about half full of dark yellow bubbling liquid and shrunken partially cooked fat scraps. I kept it mostly uncovered, but I would partially cover it to see how much water was left by how much the bottom of the lid was steaming up. At some point I turned the burner back down to the lowest setting, and the fat scraps gradually got fully cooked. I knew they were done when I could squeeze them against the side of the pot with a wooden spoon and they would go almost flat.
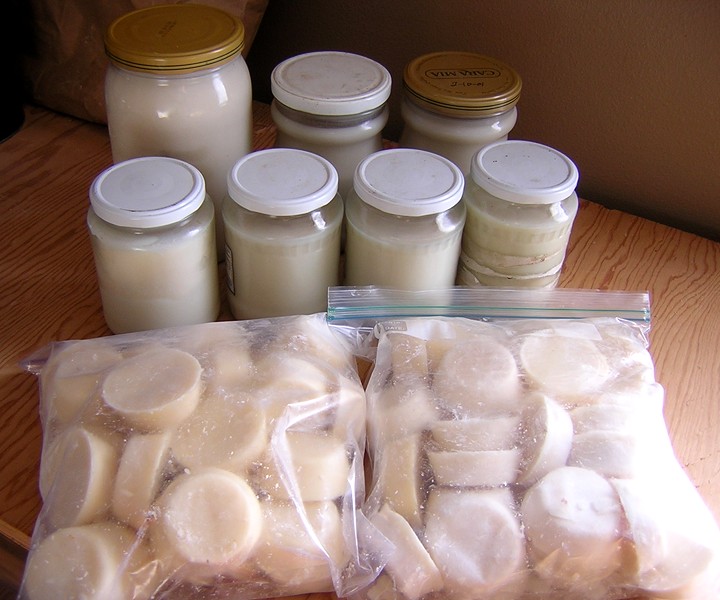 This is a whole pig worth of lard. The hard stuff is in front, made into "lard pucks" with a cupcake pan. First I poured water in the pan to see exactly how much was a quarter of a cup. Then I poured lard in to that level, let it cool, froze it, banged it out on the counter, and put it in the bags. This is five pans, or sixty pucks. A quarter cup of lard is almost exactly 50 grams, and two pucks make a nice pie crust. Now I can use these directly for pies without having to measure. I also tried putting the soft lard in the cupcake pan, but even at freezer temperature it's too soft to cleanly come out of the pan, and too soft to store without a mess. So all the soft stuff is in the jars. That big jar is a half gallon, and the total volume is almost three gallons, or around 11 liters.
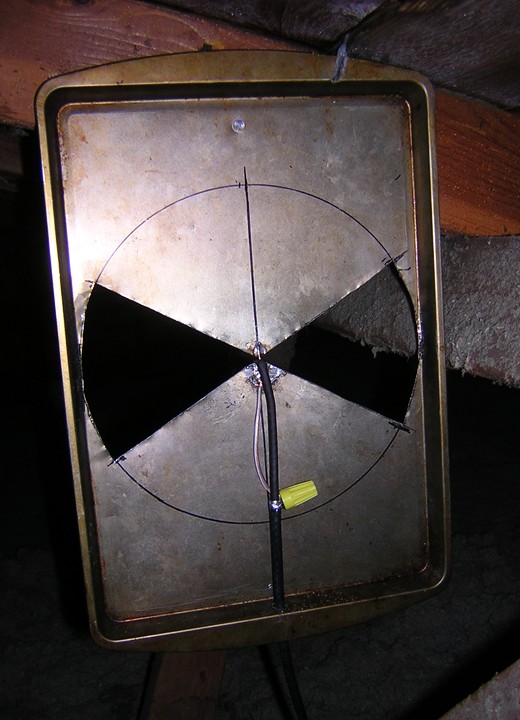 TV Antenna -- 14 January 2013 -- Back in October I bought an HDTV, and over the weekend I made this antenna and mounted it in the attic. My design is based on this video, The best DIY Antenna for HDTV, which I picked over many other designs because it looked easy and I already had all the parts... almost. I had coaxial cable, soldering equipment, and tinsnips to cut the pattern, but I didn't have a round biscuit tin, so I substituted a small cookie sheet that I got for a dollar from the dollar store. The video also says to make a little bracket for the cable, which I skipped.