
 Cylinders -- 20 August 09 -- These are concrete test cylinders. When professional builders are making something with concrete, they turn some of it into these, and then see how hard they are to smash. The photo comes from the Craigslist posting where I found them.
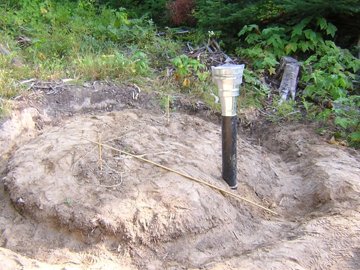 Underground House Complete -- 30 August 09 -- I'm joking. This is the intake for a greywater sump. Chuck came up from Portland this weekend and donated and mostly installed it. That elliptical shape around it, I'll explain another time.
 Clay! -- 4 September 09 -- I've been checking the craigslist free stuff list all summer, and just got a stroke of luck. A guy named Steve, who runs Search Dog North Idaho, has arranged for a bunch of clay, excavated from the Sandpoint Bypass project, to be donated to local artists. He says cob building is definitely an art, and I can have as much as I want. Yesterday I took the passenger seat out of the truck again and drove up and hauled the first load to the land.
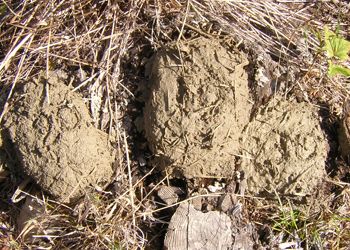 Here are some cob test bricks I made, with pure clay, coarse granite sand with a bit of silt, and native reed canarygrass. The numbers carved on top are the clay percentages: 20, 10, and 30. After they dry, I'll see how easily they break, and then do more tests to get the optimum percentage, or the lowest percentage that's good enough. The hardest part of making them was getting the clay in usable form. I soaked some chunks in water overnight, and then the next day I repeatedly stirred the bucket with a piece of wood and pounded the lumps out, until it was a uniform smooth thick texture that formed soft peaks just like meringue.
 How to Make an Ellipse -- 9 October 09 -- A circle is defined by one point, the center, and one distance, the radius. An ellipse is defined by two points and a distance. Each point is called a focus (plural foci), and the distance is the sum of the distances to each one. This photo, taken in early August, shows the first stage of drawing an ellipse on the ground: pound two thin stakes, tie a string between them with plenty of slack, and move another stick around as far as the string lets it go. The sticks here are bamboo that was shipped with tree saplings to keep them straight.
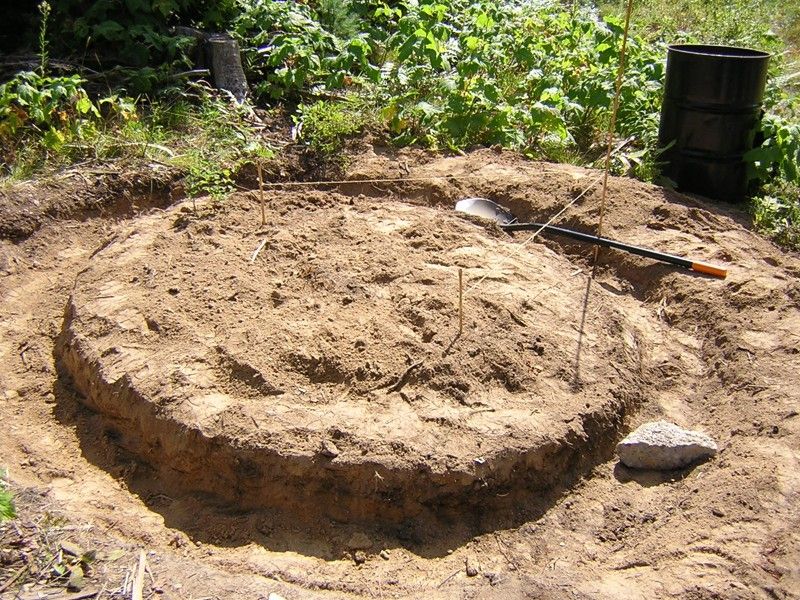 And here it is after more work. At the outside edge, the trench is roughly ten feet by nine feet. I knew at the beginning that I wanted those dimensions, so before I did any digging I did some math to figure out that I should use a ten foot string and put the foci four feet apart. It turns out that the long diameter of the ellipse is always equal to the length of the string. If the foci are in the same spot, the "short" diameter is the same as the long and you have a circle. As the foci get farther apart, the short side gets shorter. You might notice that the long side of the ellipse is facing the sun.
 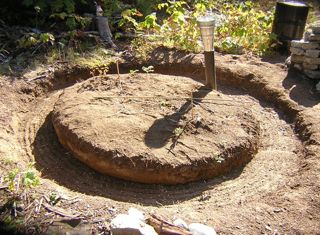 I would dig a bit, run the stick around on the string, and dig a bit more, with the goal of a sixteen inch trench extending about three inches beyond the limit of the string. This isn't quite that precise, and the uphill side is a few inches higher than the downhill side, but at a certain point I said good enough, ran a rake around the bottom to smooth it out, and waited for a good rain to soak it before I went to the next step.
 Continuing with my very successful policy of not writing about anything until after I've done it, I'm not going to say where I'm going with this, but you can probably guess. In the bottom of the trench is a bunch of "urbanite" I hauled up from Spokane. It wasn't quite enough, so I found some rocks to fill in the bigger gaps. Now I'm going to let it sit over the winter and settle a bit, and do the next stage in the spring. That thing sticking up, by the way, is the input for a greywater sump that Chuck donated. See the August 30 post for more info.
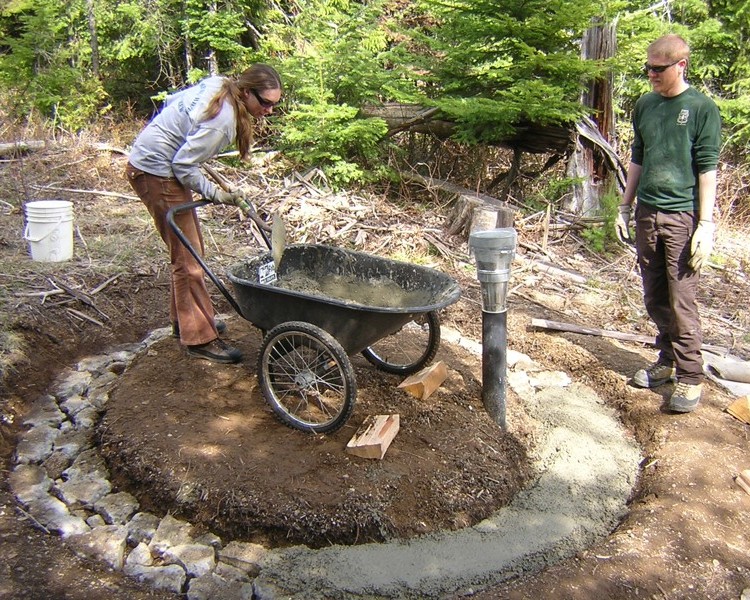 Foundation -- 25 April 2010 -- My policy is to not write about any project until after I've done it, but it's becoming obvious that the mysterious stone circle I made last fall (in this post) is the foundation for a structure. A week ago, I picked up eight 80 pound bags of concrete mix from Home Depot, and Ian and Jana came up to help me. Mixing concrete with a shovel is surprisingly easy if you do it a bag at a time -- and if you can lift 80 pounds. If not, the 60 pound bags are only a slightly worse value. I was afraid it would be so wet that I would have to fill the whole trench, which would have required a lot more of it. But we could keep it firm enough to just fill the cracks between the urbanite and get a couple inches on top.
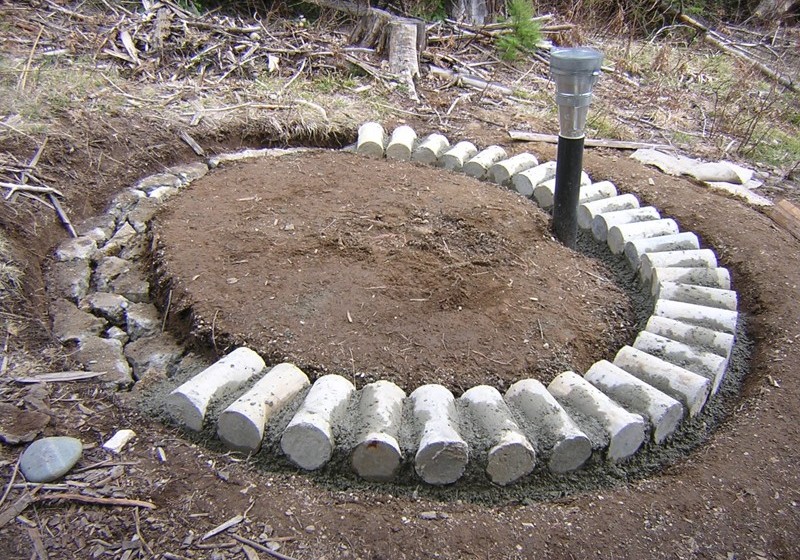 And here's what went on top: the concrete test cylinders that I picked up last August. This was how far eight bags got us. Yes, I rinsed the dirt off before putting the concrete on. Also, I covered all this up with wet leaves to keep it moist so it could cure better. And I'm going to have to throw in lava rock and dig a trench to carry off water that would otherwise fill the foundation and freeze next winter. To find out how much the frost under the foundation will damage the structure, is one of the things this structure was designed for.
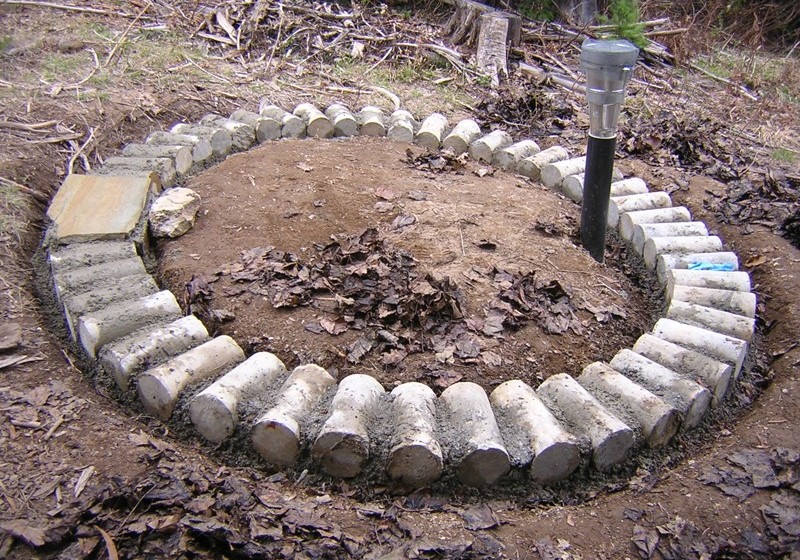 A few days later, I picked up Ian and six more bags and drove up to finish. We ended up using 45 of 50 cylinders, and that rock slab on the left was donated by Bob, and will go under the door. Here is a
detail of what we put under the door slab: a few more rocks with concrete around them. And that big rock to the right of the slab is holding in a piece of bark which is holding in some wet concrete. That blue thing on the right is the disposable glove I used to shape the concrete with my hand. Total cost, not counting the massive costs of owning a vehicle: around $55.
A few days later, I picked up Ian and six more bags and drove up to finish. We ended up using 45 of 50 cylinders, and that rock slab on the left was donated by Bob, and will go under the door. Here is a
detail of what we put under the door slab: a few more rocks with concrete around them. And that big rock to the right of the slab is holding in a piece of bark which is holding in some wet concrete. That blue thing on the right is the disposable glove I used to shape the concrete with my hand. Total cost, not counting the massive costs of owning a vehicle: around $55.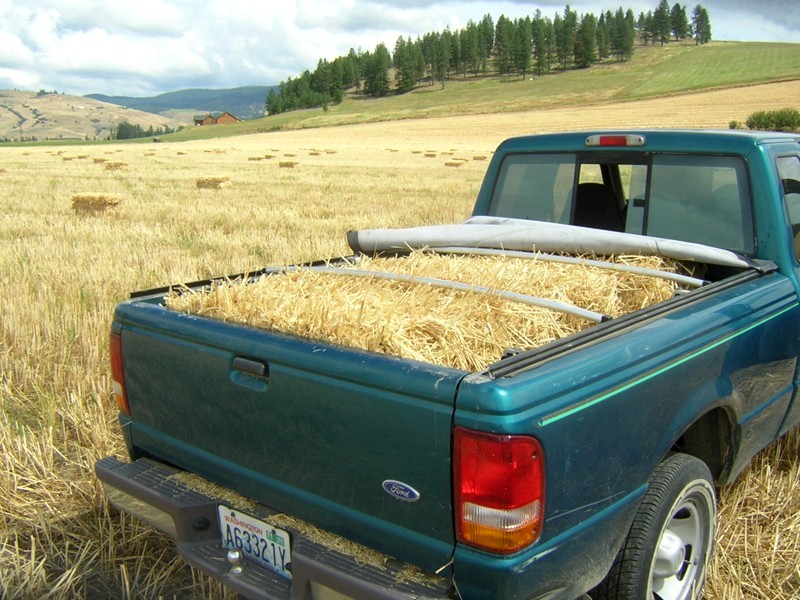 Got Straw -- 11 August 2010 -- Wheat harvest has been going on for a few weeks now, and finally someone offered fresh straw on craigslist, and cheap, only $1.25 a bale! It was in Kettle Falls, an 80 mile drive north of here, but it was a nice day for a drive and I had never been up there. Along the way I picked up two hitchhikers, a young hippie from Connecticut and a woman from Belarus, who were on their way to a Rainbow gathering. I dropped them off and found the farmer, who led me to the field in the photo. The bales were just barely small enough that I could cram four of them in the truck and still get the cover on in case it rained. Then I took a nice shortcut to drop them off at the land, driving up Flowery Trail Road from Chewelah to Usk.
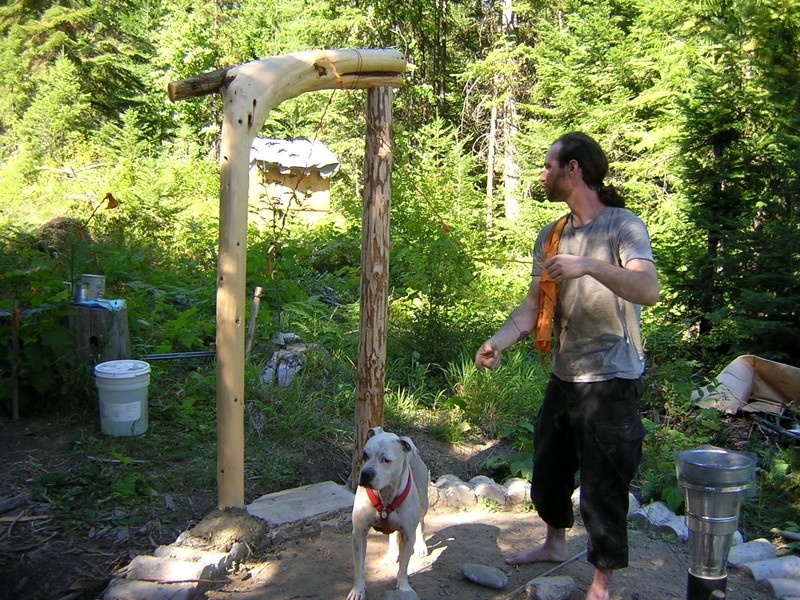 Woodhenge -- 18 August 2010 -- "In ancient times, hundreds of years before the dawn of history, lived a strange race of people... the Druids." Seriously, in the photo you can see Chuck and Agamemnon, who came up to help with this year's project and clumsily stalk chipmunks, respectively. The wooden thing is a door frame, with the curved part made out of a western redcedar, and the straight part made out of a grand fir. The fir was already dead and I killed the cedar for exactly this purpose. It was growing upside down from how you see it.
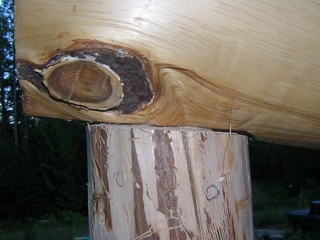 Then we had to fit the parts together so that the legs were parallel, cut some wood off the bottoms of the legs so the whole thing stood up straight at the right height, and cut away some wood so that we'd have a smooth joint, which you can see in the photo. The "O" was to remind us which side of the log faced the outside of the structure. Chuck was a good sport about holding the thing up while I checked it with a level and figured out how much wood to cut. I made some lucky guesses and we still had to stand it up and set it down a few times.
 Cobbing Begins -- 18 August 2010 -- Here you see the beginnings of a cordwood cob wall, a.k.a. cobwood. Chuck and I are beginners, and we probably did this in about five hours over two days. We're digging pre-mixed sand and clay out of the pit, and some of it is half dried and needs to be mixed with wetter stuff, so we're doing that while we also mix in the straw, using the popular method of stomping on a tarp and then lifting the edge of the tarp to fold the cob over on itself. Then it's just a matter of picking out the right pieces of wood and packing the cob around them. The door frame is wired to pieces of wood on both sides. Those little holes everywhere on top of the cob are so the next layer fits more securely.
 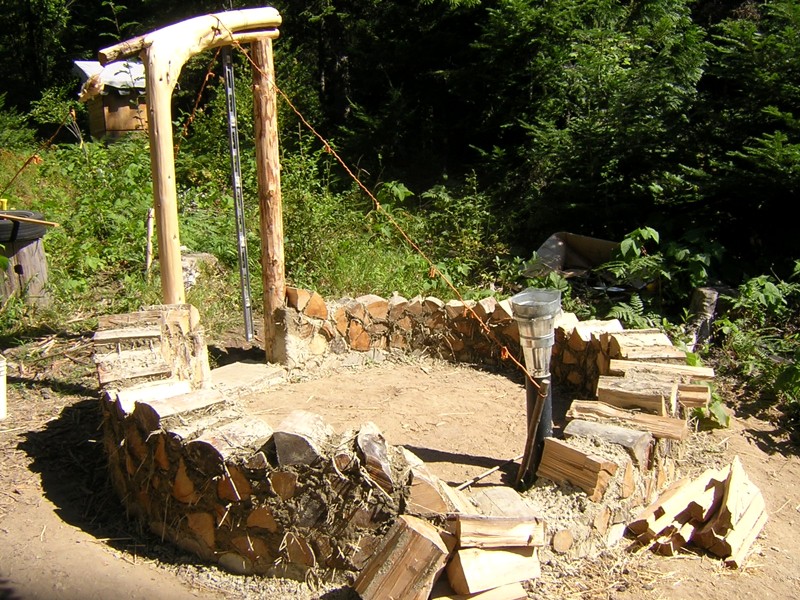 Cost-Benefit Analysis of Cobwood -- 25 August 2010 -- I worked all day Saturday and Sunday raising this wall. On Sunday I had to quit around 5pm, not because I was out of energy or materials, but because I knew that if I did any more, I would have nightmares about it. Monday I couldn't bear to work on the wall so I did a bunch of chainsawing and drawknifing.
I think the ideal how-to book might be written in collaboration, with someone who loves the field and has explored it thoroughly supplying options that others might not see, and someone who hates the experience providing the constraints you describe.
Anyway, the walls in the photo represent about 25 human-hours of work -- but that was starting with a stack of split wood and a pit of pre-mixed sand and clay. By the way, pre-mixing sand and clay more than a week in advance is a mistake. The water tends to rise to the top and evaporate, and the sand tends to sink to the bottom, and then it all needs to be reprocessed, which takes just as much work as mixing the sand and clay in the first place. I should have spent that time cutting wood.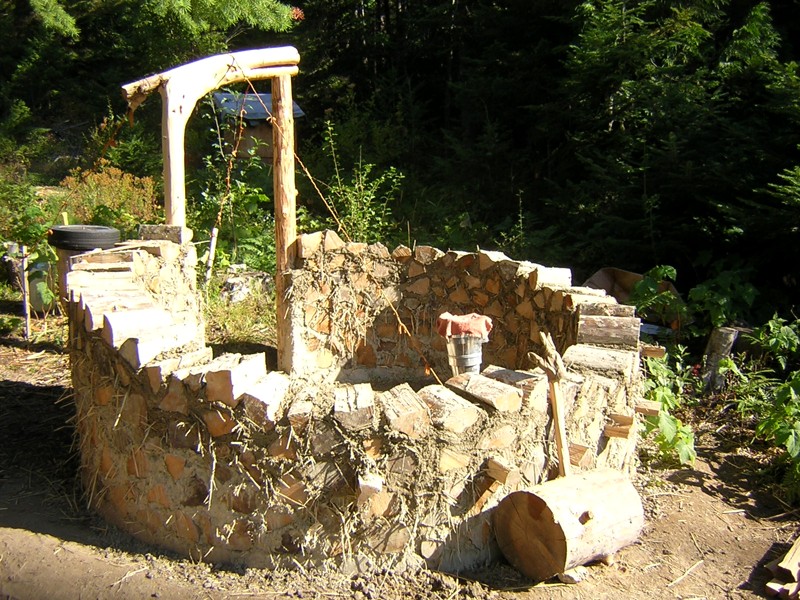 On Wednesday the weather was nearly perfect, and for some reason I still had good energy, so I added another layer to the wall. This got me close to the bottom of my steel barrel of clay paste, and I needed more water to make a third batch. Because I anticipated this last month, I already had a plastic barrel of water, filled from the second spring before it went dry. Water barrels are so heavy that tipping them and pouring the water is not an option, so I siphoned it with a hose. Then I returned to Spokane.
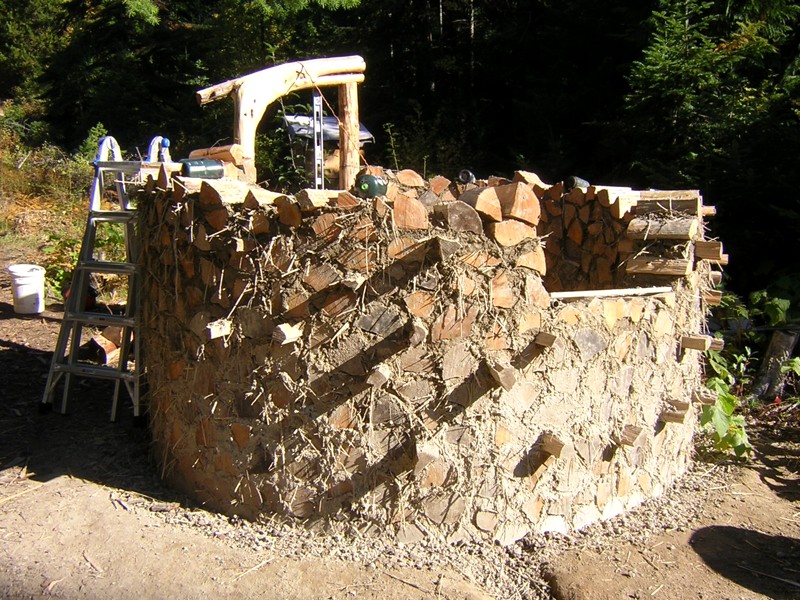 Windows 7 -- 3 October 2010 -- From September 15-20 I was in Seattle at the Permaculture convergence, and then from the 21st to the 28th I had a visitor, Alexa. We stayed on the land for five days, but there was some rain and both of us got sick, so we only managed to get three more courses of wood on the wall. Also we did some splitting. I highly recommend splitting a more difficult wood first, and then switching to cedar. It's like you just wave your axe and the cedar splits itself. Anyway, this is what the wall looked like after Alexa helped, and after I put a little more on myself. At this stage, the best thing about having a helper is that one of us can stand on each side of the wall to make sure the wood fits right, and pack the cob around it. Alone I have to keep running in and out to look at both sides. Notice the piece of wood in the gap at the front. That represents the width of something in the next stage, and six empty propane canisters mark the locations of something else.
 These are bottle windows, a common feature in cob buildings. There are different methods for making them. I noticed that 32 ounce glass juice bottles fit perfectly inside 40 ounce Dinty Moore beef stew cans, which I got for $4 each from Grocery Outlet. Also included was the stew, which was nourishing even though it smells like dog food. The photo shows all necessary materials, except one thing: to keep the whole thing under 13 inches, at least one of the bottles needs to have the top cut off. I did this with a strange bottle cutting kit that I picked up a few years ago. Bottle cutters generally score the glass and then you have to heat and cool it to break it at the score. Some of them cracked, which I patched with duct tape. It was also tricky to keep the foil smooth inside the tube, instead of bunching up and blocking the light.
 And here's the wall with everything installed and a bit more cob and wood added. Thanks Bob for donating the big window. It has double-paned glass, a screen, and it opens and closes. You can't really see it here, but I've put a stainless steel wire across the front, wrapped around logs on either side, to keep it from falling out. It can't fall in because the angle of the wall stops it. You can't see all the bottle windows, but there are three on each side, lower toward the front and higher toward the door. They say to put them at eye level, so this covers eyes of different heights of people. The pieces of wood sticking out have a purpose, which will eventually be revealed.
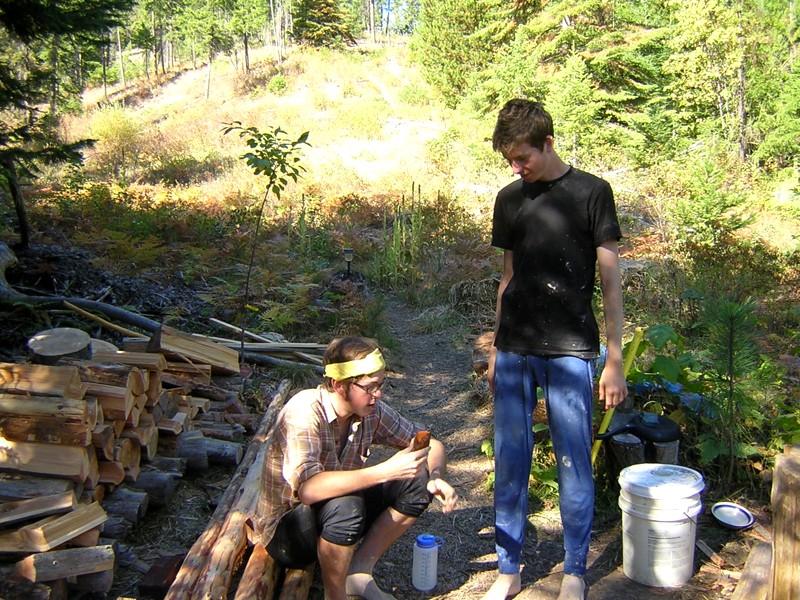 Visitors and Mushrooms -- 10 October 2010 -- These are Ethan and Ian, who hitchhiked across the state to help out. Because they're similar in many ways, at first I got them confused, and I kept thinking of the film Rosencrantz and Guildenstern are Dead. Anyway, I drove them up last Monday, and by the end of the day on Tuesday they were mixing cob and building wall, giving me time to chainsaw enough old cedar for the rest of the structure. The slow drying of the wall limited the speed we could put cob on, so they ended up doing a lot of splitting, and then some unexpected rain on Thursday stalled the project and left about 60 gallons of unapplied cob.
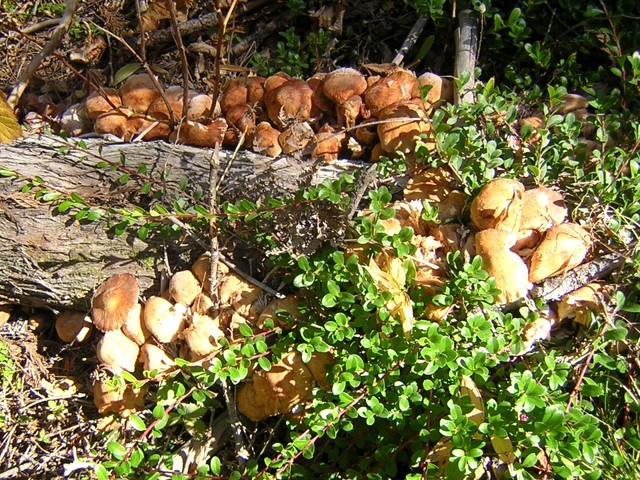 The wet spring, summer, and fall have made this the best year yet for fungi. We went on a mushroom walk and found lots of boletes, but none of the tasty ones, lots of purple-capped Russulas, and some Lactarius rubrilacteus. This photo shows a large fruiting of Armillaria mellea, or honey mushrooms. It took me a while to be sure of the identification because many of the stems had no rings. Then I cooked up a big panful in bacon grease and ate them, while the other guys prudently just took little nibbles. That wood they're growing on is a western redcedar that just recently died. So it appears that honey fungus could be causing the cedar dieoff in the area, although I still think the deeper cause is climate change, which has either weakened the cedars or made an environment more friendly to the fungus.
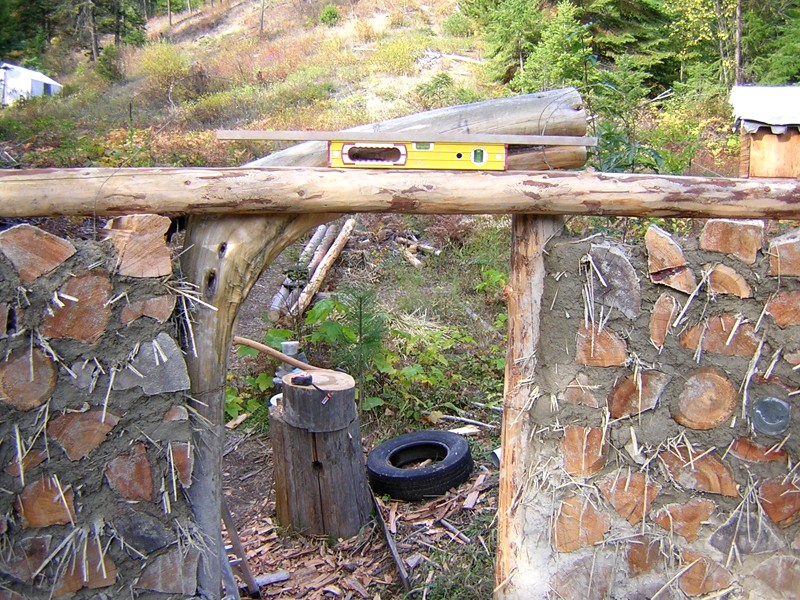 Lintel -- 16 October 2010 -- On this trip, using week-old cob that only needed some wetting and re-stomping, I built the walls around the door frame high enough to begin placing the roof beams. This photo shows something I've been thinking about, and when I got to this point, it became obvious. Mainly the lintel makes it much easier to place one of the beams. That piece of wood on top of the level is cut to the width of the window, which fits between the two center beams on the other side. So on this side, it marks the space between the beams, with one of them going to the right of the door frame, and the other going above the low side of the frame. Originally I was going to rest it on top of the sloping frame, which would raise two problems: how to hold it there, and how to get all the beams parallel and level, if one of them can't be moved side to side without also moving it up and down. The lintel solves both problems. Also it makes a platform to fill in the walls above the door.
 Here you see some beams parallel and level. I love this kind of work! These pipes mark the locations of the beams, and I spent more than an hour fiddling with them, measuring the distance between them and lining them all up with my eye, until I could see all four positions and know how high to build the cob and wood under them. Also notice the wires, which are wrapped around wood buried in cob and will be wrapped around the beams.
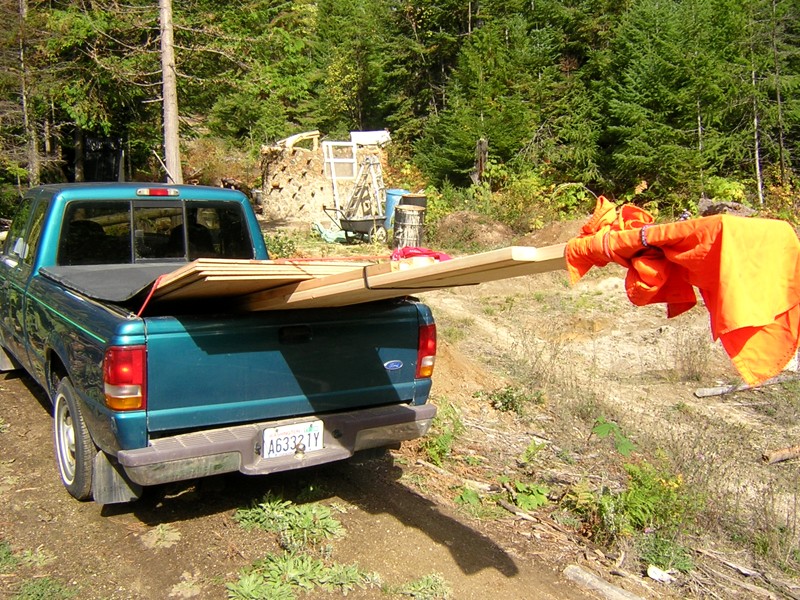 The Roof Part One -- 24 October 2010 -- When people talk about natural or low-budget building, they talk almost exclusively about the walls. This is because the roof is more complex than the walls, there are more ways to mess it up, the consequences of messing it up are worse, and it's damn hard to make a roof that's natural and low-budget. It's like, "oooo, you can build this wonderful hand-made house and oh yeah you'll have to shell out thousands of dollars for industrial materials to keep it from getting ruined in the first rainstorm."
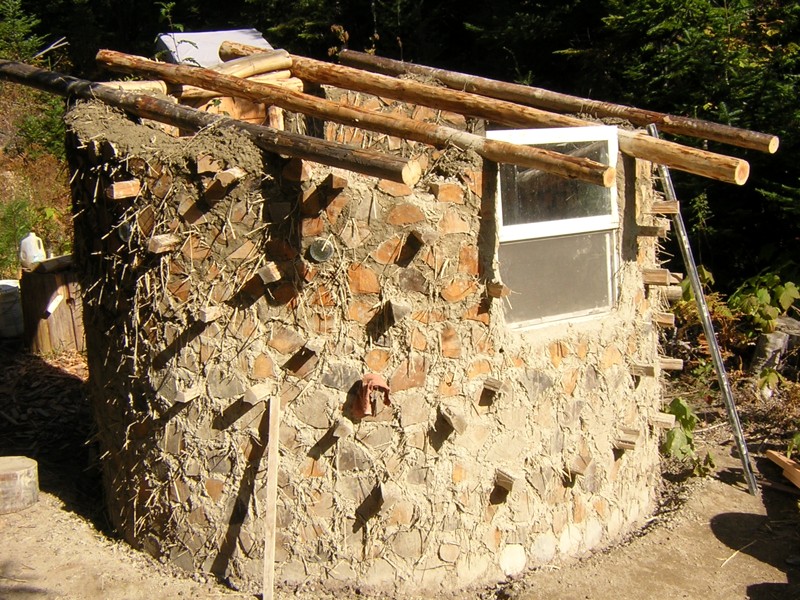 Before I knew what stuff to buy, I spent many hours doing sketches, and it's taken me years just to wrap my mind around roofing in general. But having done the mental work, the physical work is going faster than I expected. Here's the first layer, which I'm calling the beams. Since they slant downward, you could also call them "rafters". It was an ongoing project this summer to find four trees, living or dead, that were the right size and straight enough. The two center ones are fresh douglas-fir, I think the one on the right was standing dead on the north hill, and the one on the left was in a slash pile. I had the two center beams cobbed in and wired down on the previous Friday. On Monday I got the two edge beams placed and loosely cobbed in. Then came one of the tricky parts.
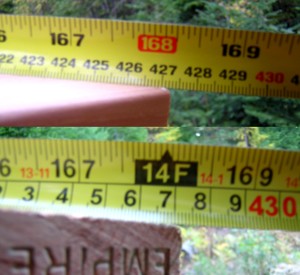 I did this by cutting the edge beams precisely to 132 inches, and placing boards across the ends, cut to 104 inches, making a rectangle. Then I pounded tiny nails into the top two corners, to hold the ends of two measuring tapes, and brought the tapes down in a big X to read them at the bottom corners. Then I kept sliding everything up and down and back and forth until the two cross-corner measurements were equal. Then I drilled holes and screwed the boards down, one corner at a time, continuing to measure and tap with a mallet. In this photo the screws have been placed, and you can see that the numbers are still a little off: one is 4272mm, and the other is nearly 4273mm. Seriously, that level of precision for this structure is ridiculous, but I was having fun!
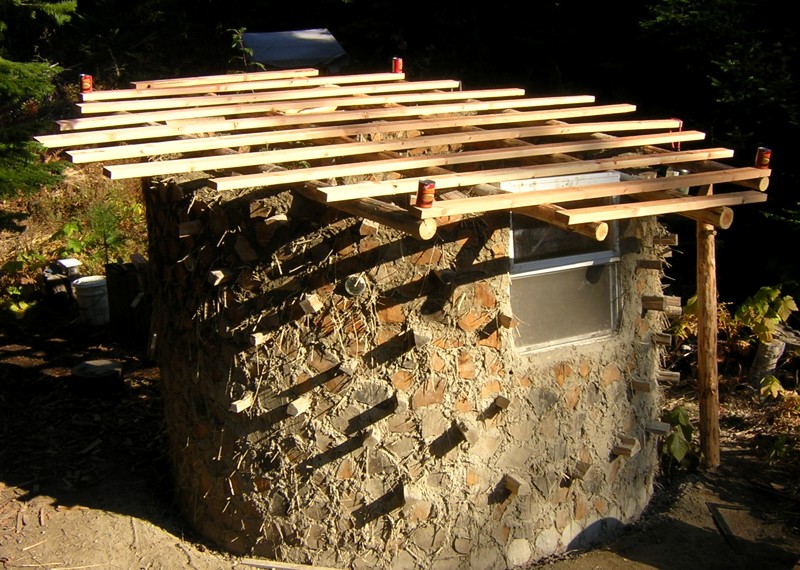 And here you see the second layer of the roof, done on Wednesday and photographed (as always) on the following morning when the light is good. The cans of Amy's Curried Lentil soup mark the corners of the square. (It was easier than photoshopping in four arrows.) So all the other boards could be placed by measuring up or down the slope from those two boards. You might also notice that the edge beam on the right is propped up. That's one of the little imperfections that crept in: that beam was a bit low so I was trying to raise it and pack more cob under it, but I never was able to raise it enough, so the boards had to be bent down to screw into it. These boards are 2x4's, which are actually 1½ by 3½ inches. Originally I was going to put them up on edge, at 24 inch intervals, but Charlie convinced me that it would be much easier, and almost as strong, to lay them flat at 16 inch intervals. Then I made a few final tweaks, moving one board up a bit to fit around the window, and most of the rest one inch toward the top when I decided that was a better fit for the roof.
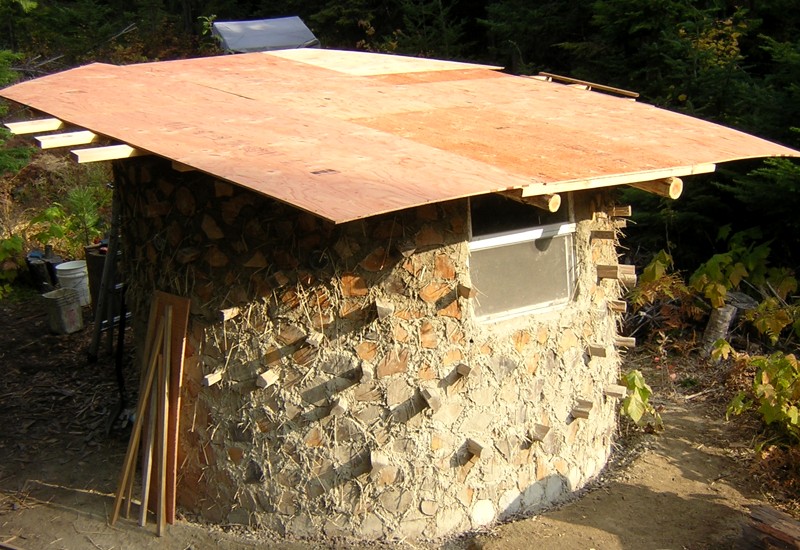 And here's the plywood over the boards, done on Thursday. At this stage the panels have been screwed down just enough to hold them in place. I decided to go with all screws, no nails, and I'm sure I didn't pick exactly the right kind of screws, but square drive screws are definitely better than phillips head screws, which were designed for machines, not humans. Also, I decided to go with plywood, not OSB. The cheapest plywood was almost double the price of the cheapest OSB, but it smelled like wood, where the OSB smelled like industrial chemicals.
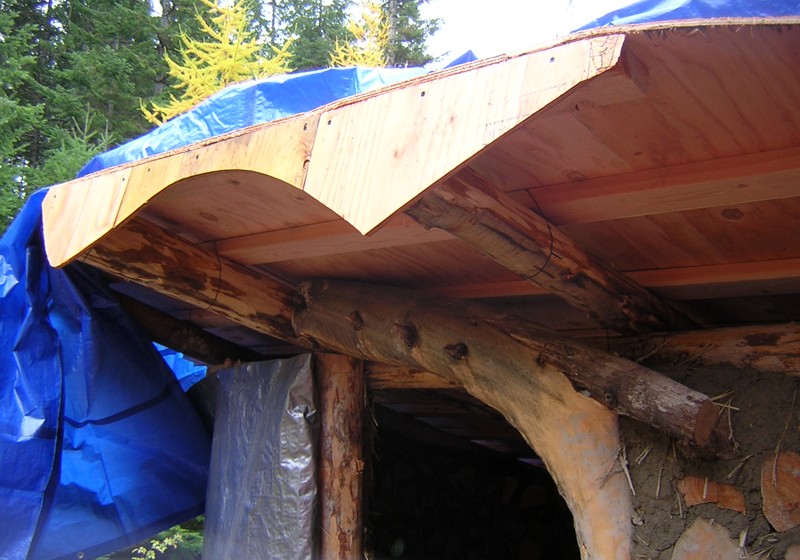 Building is Complicated -- 29 October 2010 -- This week it stopped raining for a day and I dashed up to finish putting plywood on the roof and rounding it off. Also I made this. I'm not sure what it's called, but the idea is that water hitting the edge of the roof structure on the high side will drizzle down into the building, so you have to make something like this to catch the water and drip it onto the ground.
 The Roof Part Two -- 7 November 2010 -- I've been grabbing every bit of dry weather to get this job done before winter. This photo is a detail of something I did on my previous quick trip, putting scrap plywood on the ends of the long boards that stick out on the sides of the structure. That white thing is one of my ghetto dehumidifiers: a sock filled with crystal cat litter. The pearls are better than the sharp-edged crystals, because they have less dust. The material is silica sand, the same thing they use for the tiny dehumidifiers in pill bottles. It sucks up moisture, and you can recharge it by sticking it in the oven at 240 degrees. Anyway, when I put the tarp on, I filled five socks and stapled them to the roof, to reduce condensation under the tarp. And on the latest trip, I took them off to put on the tar paper.
 Roofing "felt" is actually thick paper saturated with asphalt. I'm using #30, also called 30-pound, which is the thicker kind. It comes in three foot wide rolls, so to cover 13½ feet from top to bottom, I used five courses, going side to side across the roof, with 3½ inch overlaps calculated to leave a few inches on the top and bottom. Here is a closer photo of the felt with lines that I drew to mark the locations of the boards under the plywood (in pale green) and the edges of the plywood (in orange, or if you're colorblind, they're the dim perpendicular lines). The white lines came already on the paper, to help lay it parallel. I was marking the boards so that when I put the roofing on, I would know where to put the screws to get them anchored in the boards for extra strength; and I was marking the edges of the plywood to help put the metal on straight, and also to avoid driving the roofing screws into the deeper screws holding the plywood to the boards. For the lines I used crayons, which are much cheaper than grease pencils and have the advantage of coming in many colors. To attach the tar paper, I used a staple hammer and 3/8 inch staples.
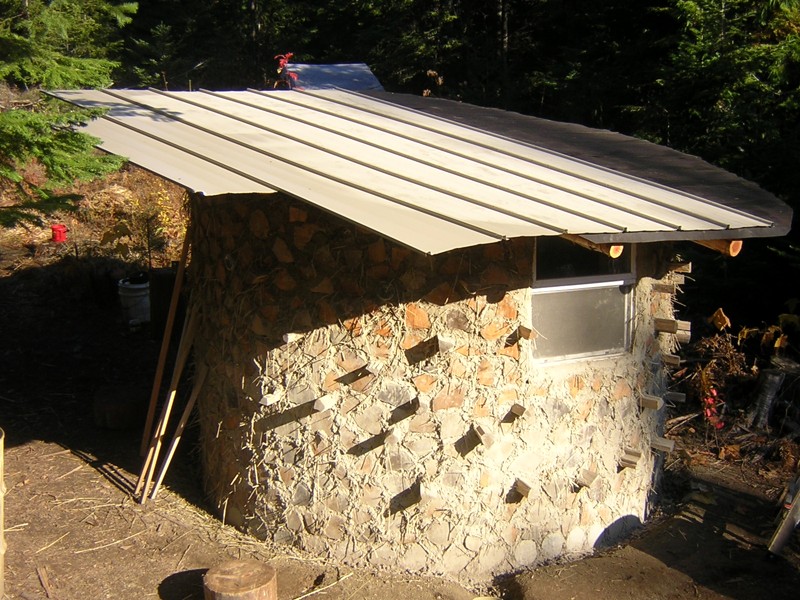 On Wednesday, after the sun steamed the dew off the tar paper, I started putting on the roofing, and here you can see where it stood on Thursday morning. This is a locally-made roofing product called Loc-Rib. It's a brilliant idea: the screws go on one edge of the panel, and then the rib of the next panel snaps down and covers them from the weather. I started on the left side of the roof, with the short panel, which I made by cutting one of the long panels in half. Then I worked my way across. At first I was using an awl with a mallet to pound holes in the metal, then a hand drill to make pilot holes for the screws, then a battery-powered drill to drive the screws. Later I figured out that I could have just made a tiny hole with the awl and driven the screws straight in, but then, that might have drained the batteries faster and forced me to finish by hand.
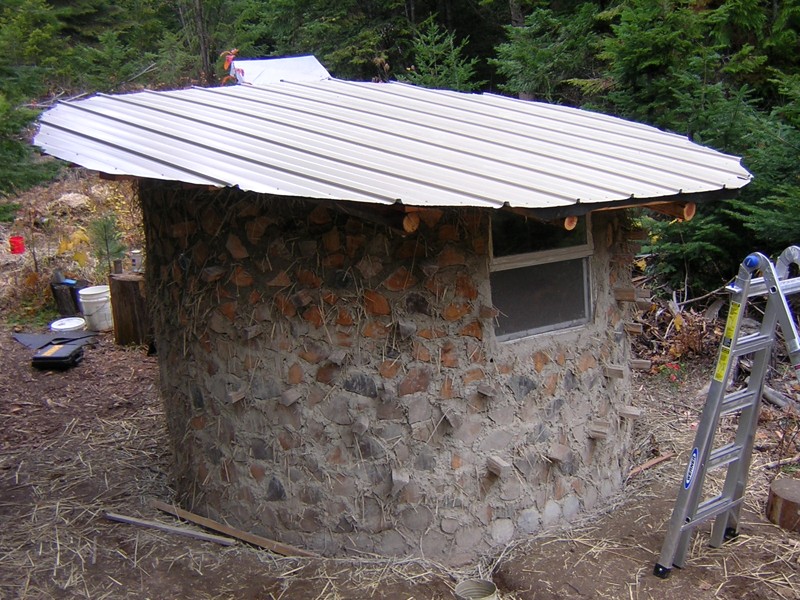 And here it is all attached and trimmed. Thanks Sean for helping with sawing and drilling. Even Loc-Rib needs some exposed screws, and you can see them around the edges. The hidden screws are pancake head, and the exposed ones are painted to match the roof, and have rubber washers to keep the water out.
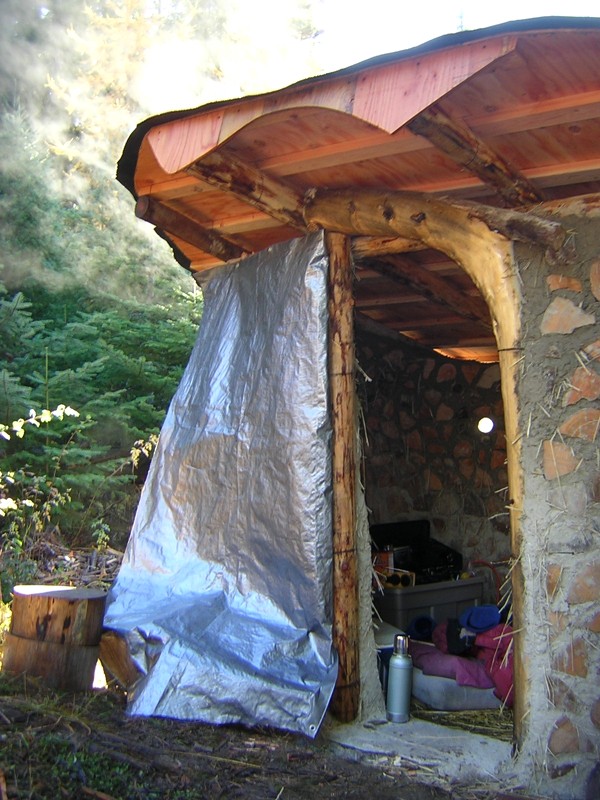 Nest -- 16 November 2010 -- Here's a photo I took back on November 3rd, while the sun was steaming the dew off the tar paper. You can also see the tarp I've been using for a door, and my setup inside, with car seat mattress and propane camp stove. The inside is an ellipse, about seven feet by eight feet, or 44 square feet, which is what they would call a "three person" tent. For one person, it's like a castle tent. The plan is to use it for three season camping and winter storage. But with a bunch of improvements, it would even be good for winter living. On the last three trips I made a few of those improvements.
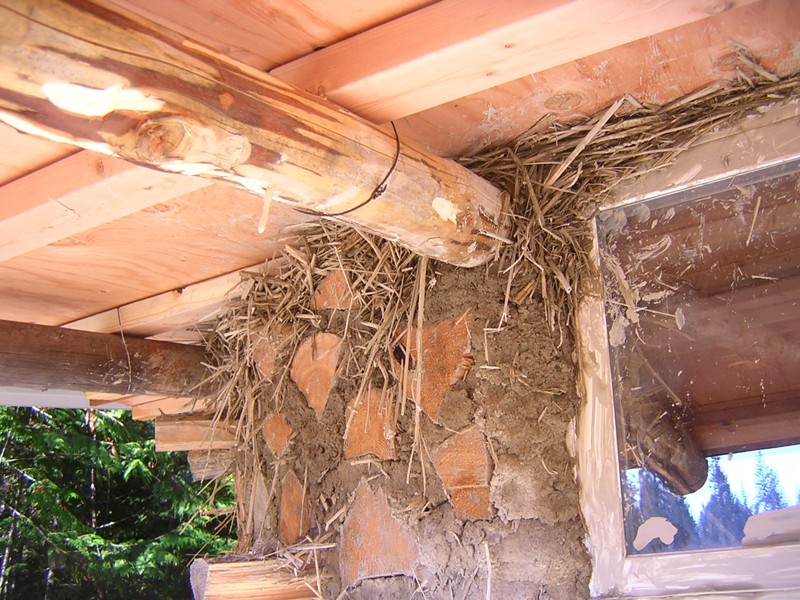 First, you can see that there's still a gap between the walls and the roof. The following day I filled it in. I forget which cob book I got this from, but you mix straw with a smooth clay-water mix about as thick as cream, like mixing a salad, so the clay coats every piece of straw but doesn't soak it. I diluted the clay left over from cobbing, and poured it on ten or twelve wheelbarrows full of straw -- almost as much as I used for the whole rest of the walls. It occurred to me that this is what birds make their nests out of. The clay serves to stick the straw together, keep bugs out, and make it resistant to fire. I packed it in pretty tightly, and it's still going to insulate much better than cob. Of course, you can only use something this light at the top of the wall where it doesn't have to bear any weight.
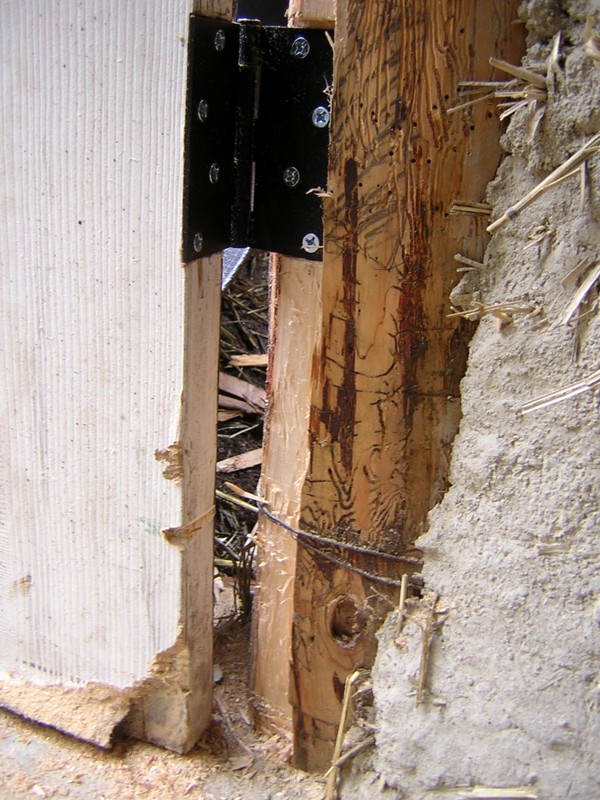 The next project was to hang the door. I already had a solid-core door that I got free off Craigslist in the spring. The trick was to fit it in my curvy doorway. Obviously, the hinges would have to go on the straight side, and I planned for this back in August when I decided how to stand the frame: so that the door would swing away from the path, and create an opening toward it. I used the long level to draw a line, and then used a big chisel, a mallet, and a mini hatchet to carve this notch in the wood for the door to fit. Notice that I had to carve away a bit of the door to fit around the wires that hold the frame to the wall. You can also see the marks I made in August to show where the hinges were going to be, so I didn't put the wires there. I bought hinges at Home Depot, screwed them first to the door, and then it took almost an hour to get the door exactly positioned to screw the hinges to the frame.
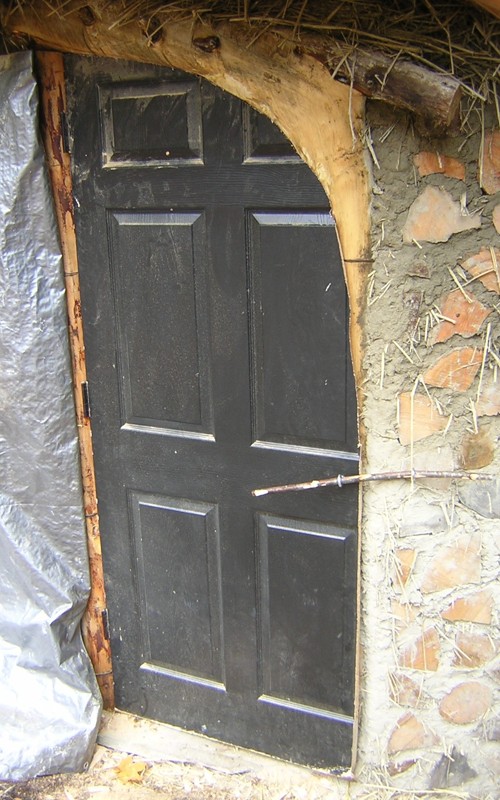 My original plan was to extend the notch all around the edge of the frame, and then cut the door to fit it, with a curved profile but square edges. Then I figured out that it would be much easier to leave the frame alone and just carve the door with angled edges. I expected the door to have wood veneer on the outside and dense particle board on the inside, but it turned out to have dense particle board on the outside, and the inside was something like sawdust and glue. So it was easy to shape. First I used a file-like rasp, and then I discovered that a sideways raking motion with the japanese saw worked better. Still, shaping the door took hours! I repeatedly closed it as far as it would go, while standing inside so I could look through the crack and see where the wood was sticking. Then I would shave that bit down and go again. Finally, because of the curving frame, the door fit at the top but stuck out too far at the bottom. I fixed this on my last stay by simply bending the door: near the bottom, on the inside, I screwed in a plant hanging hook, screwed another to the inside wall, and stretched a rubber tie-down strap tightly between them while I slept. The hooks will stay in place and serve to hold the door shut from the inside. And in the photo you can see the "latch" on the outside: two eye screws and a stick!